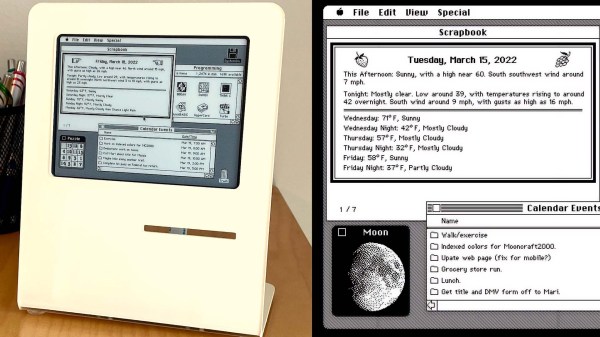
A Macintosh-inspired desk ornament, next to a sceenshot of a classic Macintosh computer desktop

‘Desk Accessory’ Pays Homage To Macintosh

The retrocomputing community are experts at keeping vintage Apple iron running, but if you’re looking for a simpler way to pay homage to the original Mac, check out this Raspberry Pi powered ‘desk accessory’ by [John Calhoun], fittingly called ‘SystemSix’.

Housed inside a delightfully Mac-shaped piece of laser-cut acrylic, SystemSix is powered by as Raspberry Pi 3, with the graphics displayed on a sizeable 5.83″ e-ink panel. While it resembles a kind of retro-futuristic take on the ‘classic’ Macintosh, SystemSix is the illusion of a fully interactive computer. While non-interactive, the fake desktop is every bit as charming as a real Macintosh display, albeit scaled down. The desktop updates automatically with new information, and presently includes a calendar, dithered lunar phase graphic, and a local weather report.

Clearly calling it a ‘desk accessory’ is a neat play on words. The original Macintosh implemented simple desk accessory programs, such as the calculator and alarm clock, that could run alongside the main application in memory. This was the only way to run more than one application on the Macintosh, before MultiFinder added rudimentary cooperative multitasking in 1987. As such, SystemSix is a functional, stylish and quite literal ‘desk accessory’.

[John] has the full project write-up over on GitHub, and goes into great detail about maintaining the Macintosh aesthetic. For example, the lunar phase graphic uses ‘Atkinson’ dithering. This technique was pioneered by Apple programmer Bill Atkinson, the author of MacPaint and the QuickDraw toolbox on the original Macintosh (and later, Hypercard).

And in case you were wondering – yes, this is the [John Calhoun], who programmed Glider for Macintosh. Now recently retired from Apple, we’re really excited to see what other Macintosh-inspired creations he comes up with. Maybe he will come back around to his Mac-powered MAME cabinets that we covered all the way back in 2005. Or perhaps a sleeper battlestation, like the iMac G4 lampshade that was upgraded with an M1 processor.



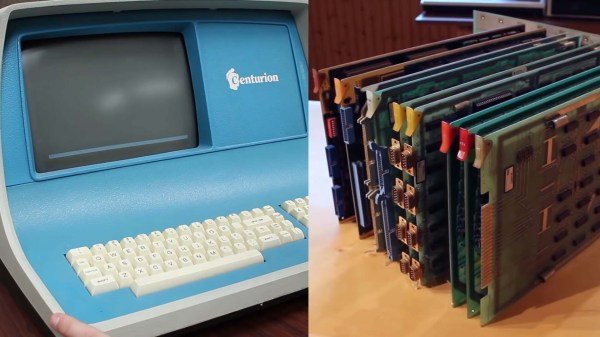
A vintage computer terminal next to a bank of computer cards

Minicomputer Restoration Hanging In The Balance

[David Lovett] aka Usagi Electric has spent the last several months dissecting a Centurion minicomputer from 1980. His latest update reveals that the restoration has hit several snags, and bootstrapping this old blue beast is going to be a challenge.

When we last checked in on this project, [David] had built a homebrew ROM reader to backup critical data stored several of the minicomputer’s ROM chips. Since then, the good news is that the Centurion is showing signs of life. Probing the Data Set Ready pin on the default RS232 serial port reveals a stream of data, likely stemming from the ‘CPU6’ board.

Unfortunately, that’s where the good news ends. Adding a terminal to the serial port interrupts this stream of data, and no information appears to be sent or received from any of the three terminals tested. To make matters worse, both of the massive hard drives appeared to have suffered catastrophic head crashes at some point in the 1990s, destroying the Centurion operating system and likely other important data in the process. Soiled air filters were the likely culprits, with evidence showing that yearly maintenance had been overlooked. While at least one of the drives can be repaired with new platters, the original operating system is completely lost.

As luck would have it, a previous employee of Centurion was able to provide a wealth of undocumented information that greatly aided in making sense of the minicomputer’s individual components. Incredibly, they were also able to provide a PROM Diagnostic board for the Centurion system. Not only could this board run a barrage of tests, it could also bootstrap the system with TOS (Test Operating System), a bare-bones memory monitor stored on the card’s PROMs. While the diagnostic card itself needs repairs, there’s now the slightest chance that [David] can use TOS as the starting off point for writing new software for the Centurion.

We really can’t wait to see what happens next with this project. We’ve covered some very special vintage computer restorations in the past, such as the cursed Diablo drive from a rare Xerox Alto, not to mention the delicate power-up procedure for an original Apple 1.

Continue reading “Minicomputer Restoration Hanging In The Balance”

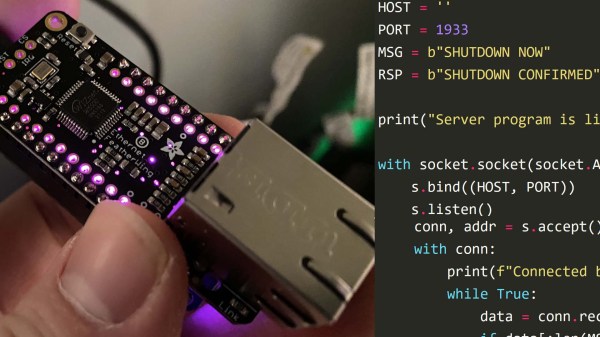
A small circuit board glowing purple inset with computer code

Power Cycling Museum Computers On The Cheap

Flicking a circuit breaker to power cycle hundreds of desktop computers inside interactive museum exhibits is hardly ideal. Computers tend to get cranky when improperly shutdown, and there’s an non-zero risk of data loss. However, financial concerns ruled out commercial computer management solutions, and manually shutting down each exhibit at the end of the day is not practical. Tasked with finding a solution, [Jeff Glass] mixed off-the-shelf UPS (uninterruptible power supply) hardware, a Featherwing and some Python to give the museum’s computer-run exhibits a fighting chance.

Without drastically changing the one-touch end-of-day procedure, the only way to properly shutdown the hundreds of computers embedded in the museum exhibits involved using several UPS units, keeping the PCs briefly powered on after the mains power was cut. This in itself solves nothing – while the UPS can trigger a safe shutdown via USB, this signal could only be received by a single PC. These are off-the-shelf consumer grade units, and were never intended to safely shut down more than one computer at a time. However, each 300 watt UPS unit is very capable of powering multiple computers, the only limitation is the shutdown signal and the single USB connection.

To get around this, the Windows task scheduling service was setup to be triggered by the UPS shutdown signal, which itself then triggered a custom Python script. This script then relays the shutdown signal from the UPS to every other computer in the museum, before shutting itself down for the evening.

While many computers can be enabled to boot on power loss, the UPS and safe shutdown scripts meant that this wasn’t an option. To get around this, an ESP32 Featherwing and a little bit if CircuitPython code sends out WOL (wake-on-LAN) signals over Ethernet automatically on power up. This unit is powered by a non-UPS backed power outlet, meaning that it only sends the WOL signal in the morning when mains power is restored via the circuit breaker.

There are undoubtedly a variety of alternative solutions that appear ‘better’ on paper, but these may gloss over the potential costs and disruption to a multi-acre museum. Working within the constraints of reality means that the less obvious fix often ends up being the right one. How would you have tackled this problem? Sound off in the comments below. And while you’re here, make sure to check out our coverage of other UPS solutions, like this supercap UPS.

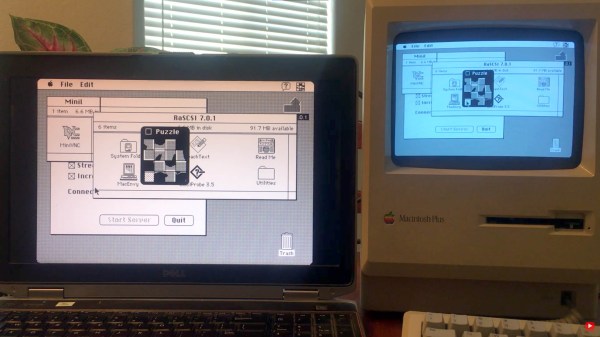
A Macintosh Plus computer next to a modern laptop

Remote Desktop Fun For Your Old Macintosh

Remotely accessing your computer’s desktop, files and network from anywhere has enabled remote working (i.e. ‘work from home’) for the last several decades. Modern PCs have more than enough computational grunt for Virtual Network Computing (VNC), but where does that leave our retro computing community? [Marcio Teixeira] has it covered with MiniVNC, a brand-new remote desktop server for (very) vintage Macintosh computers.

Now before you say anything, it’s true that ChromiVNC has existed for some time, and is a pretty decent remote desktop server for old Macs. However MiniVNC has several significant advantages, most notably, MiniVNC is fully compatible with MacTCP. Apple’s very first TCP/IP networking stack landed on the Macintosh platform with System 6. As such, MiniVNC can serve up a remote desktop on some of the oldest Mac computers, including the Macintosh Plus.

It’s hard to overstate just how cool that is – the iconic Macintosh Plus was released in 1986, runs at a pedestrian 8MHz and supports a maximum of 4MB memory. While much of MiniVNC was written in C++, portions of the software (including TRLE encoding) had to be handwritten in 68K assembly language to ensure decent performance. The entire focus of MiniVNC was on performance and flexibility, with accuracy coming in second, which seems like the right decision. The odd screen artifact and missed update seems to be reasonable trade-off to get this running somewhat smoothly on a Motorola 68000 processor.

Continue reading “Remote Desktop Fun For Your Old Macintosh”

A Ryobi belt sander with remote control car parts

Boring Belt Sander Is RC Racer In Disguise

As a child, [David Windestal] already knew that a belt sander was the perfect motor for a banging radio-controlled car. Many years later, the realization of that dream is everything he could have hoped for.

The core of this project is a battery-powered belt sander by a well known manufacturer of gnarly yellow power tools. With an eye for using bespoke 3D printed parts, the conversion appeared straightforward – slap on (or snap on) a pre-loved steering mechanism, add a servo for controlling the sander’s trigger, and that’s pretty much job done. Naturally the intention was to use sandpaper as tread, which is acceptable for outdoor use but not exactly ideal for indoors. A thermoplastic polyurethane (TPU) tread was designed and printed for playtime on the living room floor, where sandpaper may be frowned upon.

The finished product is a mean looking toy with plenty of power. What we really like most about this hack is the commitment to the aesthetics. It’s seriously impressive to see a belt sander so convincingly transformed into a three-wheeler radio-controlled car. The final iteration is also completely reversible, meaning that your belt sander can keep on sanding two by fours on the job site. All the printed parts snap snug into place and are mostly indistinguishable from the stock sander.

Speaking of reversible, there were just a couple of issues with the initial design, if you catch our drift. We won’t spoil what happens, but make sure to watch the video after the break for the full story.

If this hack has whet your appetite for more quirky tool hacks, make sure to check out our coverage of the angle grinder turned slimline belt sander. Or if you can’t get enough of RC, then check out this remote controlled car with active suspension.

Continue reading “Boring Belt Sander Is RC Racer In Disguise”

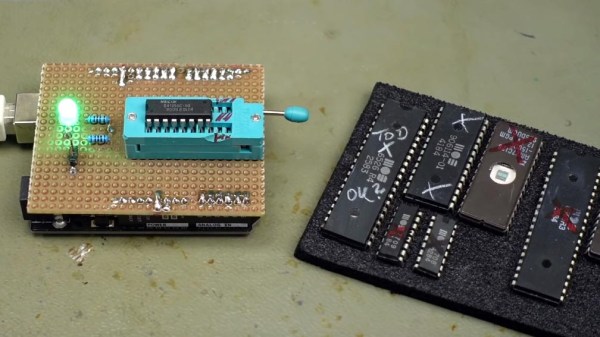
A circuit board with a memory chip in a socket, and many memory chips in foam

Simple DRAM Tester Built With Spare Parts

Some of the most popular vintage computers are now more than forty years old, and their memory just ain’t how it used to be. Identifying bad memory chips can quickly become a chore, so [Jan Beta] spent some time putting together a cheap DRAM tester out of spare parts.

This little tester can be used with 4164 and 41256 DRAM memory chips. 4164 DRAM was used in several popular home computers throughout the 1970s and 1980s, including the Apple ][ series, Commodore 64, ZX Spectrum and many more. Likewise, the 41256 was used in the Commodore Amiga. These computers are incredibly popular in the vintage computing community, and its not uncommon to find bad memory in any of them.

With an Arduino at its core, this DRAM tester uses the most basic of electronic components, and any modest tinkerer should have pretty much everything in stock. The original project can be found here, including the Arduino code. Just pop the suspect chip into the ZIF socket, hit the reset switch, and wait for the LED – green is good, and red means it’s toast.

It’s a great sanity check for when you’re neck deep in suspect DRAM. A failed test is a sure sign that the chip is bad, however the tester does occasionally report a false pass. Not every issue can be identified with such a simple tester, however it’s great at weeding out the chips that are definitely dead.

If you’re not short on cash, then the Chip Tester Pro may be more to your liking, however it’s hard to beat the simplicity and thriftiness of building your own simple tester from spare parts. If you’re a little more adventurous, this in-circuit debugger could come in handy.

Continue reading “Simple DRAM Tester Built With Spare Parts”

A vintage pocket calculator with extra exposed circuitry added

I2C Breathes New Life Into Casio Pocket Calculator

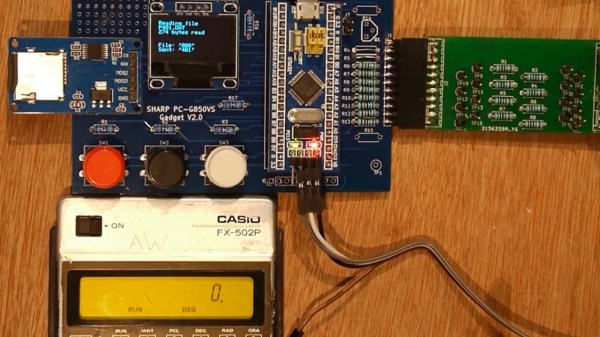
When is a pocket calculator more than just a calculator? [Andrew Menadue] has been pushing the limits of his 1970s Casio FX-502P by adding all sorts of modern functionality via the calculator’s expansion port.

Several older Casio calculators included an expansion port for connecting cassette tape storage and printing functionality. Data on the FX-502P could be saved on cassette tape using the well-known Kansas City standard, however this signal was produced by Casio’s FA-1 calculator cradle, not the FX-502P itself. To interact with the calculator itself would require an understanding of whatever protocol Casio designed for this particular model.

It turns out that the protocol is a little quirky compared to its contemporaries, with variable length data packets and inverted data logic, (zero volts is ‘1’ and three volts is ‘0’). Once the protocol was untangled, it was ‘simply’ a matter of connecting the calculator to the GPIO interface on the STM32, and using some software wizardry to start shooting data packets back and forth.

This hack can be used to send and receive data from an SD card (via a RAM buffer), however it’s the other expansion capabilities that really make us wonder. [Andrew] has demonstrated how easy it is to add a real-time clock or thermal printer. Using the I2C capabilities of the STM32, it’s likely that all sorts of gadgets and sensors could be coupled with this vintage calculator, and many others like it.

You can find even more details about this hack over here, including some follow up videos to the original hack. No stranger to vintage calculators, we last featured [Andrew] after he retrofitted a modern LCD display to an old Casio. It’s charming to see how these calculators are far from obsolete.

Continue reading “I2C Breathes New Life Into Casio Pocket Calculator”