A vintage pocket calculator with extra exposed circuitry added

I2C Breathes New Life Into Casio Pocket Calculator

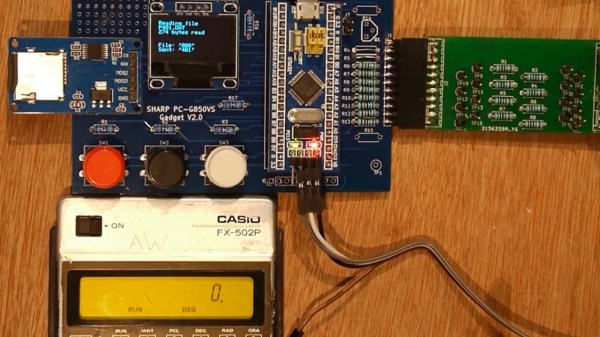
When is a pocket calculator more than just a calculator? [Andrew Menadue] has been pushing the limits of his 1970s Casio FX-502P by adding all sorts of modern functionality via the calculator’s expansion port.

Several older Casio calculators included an expansion port for connecting cassette tape storage and printing functionality. Data on the FX-502P could be saved on cassette tape using the well-known Kansas City standard, however this signal was produced by Casio’s FA-1 calculator cradle, not the FX-502P itself. To interact with the calculator itself would require an understanding of whatever protocol Casio designed for this particular model.

It turns out that the protocol is a little quirky compared to its contemporaries, with variable length data packets and inverted data logic, (zero volts is ‘1’ and three volts is ‘0’). Once the protocol was untangled, it was ‘simply’ a matter of connecting the calculator to the GPIO interface on the STM32, and using some software wizardry to start shooting data packets back and forth.

This hack can be used to send and receive data from an SD card (via a RAM buffer), however it’s the other expansion capabilities that really make us wonder. [Andrew] has demonstrated how easy it is to add a real-time clock or thermal printer. Using the I2C capabilities of the STM32, it’s likely that all sorts of gadgets and sensors could be coupled with this vintage calculator, and many others like it.

You can find even more details about this hack over here, including some follow up videos to the original hack. No stranger to vintage calculators, we last featured [Andrew] after he retrofitted a modern LCD display to an old Casio. It’s charming to see how these calculators are far from obsolete.

Continue reading “I2C Breathes New Life Into Casio Pocket Calculator”

3D Printing Livers

The University of Utrecht has a team that is successfully bioprinting “liver units” that are able to do some of the functions of a human liver and may open the door to new medical treatments. This isn’t simply printing a fake liver in a jar though, instead the technique uses optical tomography to rapidly create small structures of about 1 cc of volume in less than 20 seconds.

Apparently, one problem with printing hydrogels full of biological structures is that passing them through a nozzle tends to disturb the delicate structures.  This technique uses no nozzle or layers, which makes it useful in this situation.

Continue reading “3D Printing Livers”

Ray Tracing On A Modern TI Graphing Calculator

Something being impractical isn’t any reason not to do it, which is why just about anything with a CPU in it can run Doom by now. For the same reason there obviously is a way to do ray tracing of 3D scenes on a modern-day TI-84 Plus CE graphical calculator. This is excellent news for anyone who has one of these calculators, along with a lot of time, perhaps during boring classes, to spare.

As [TheScienceElf] demonstrates in a video, also embedded after the break, it’s not quite the real-time experience one would expect from an NVidia RTX 30-series GPU. Although the eZ80-based CPU in the calculator is significantly more efficient than a Z80 as found in many 1980s home computers, the demo scene at standard resolution takes about 12 minutes to render, as also noted on the GitHub project page.

Perhaps the most interesting part about this project is its use of the Clang-based C & C++ toolchain for the TI-84 Plus CE which gives easy access to the calculator’s hardware and related, including graphics, file I/O, fonts, keypad input and more. Even if using a TI-84 Plus CE to render the next Pixar-level movie isn’t the most productive use imaginable for these devices, this project and the CE toolchain make it all too easy to tinker with these $150 devices.

It would also offer a nice change of pace from writing Snake in TiBASIC, a BASIC dialect in which [TheScienceElf] incidentally has also written a ray tracer.

(Thanks to [poiuyt] for the tip)

Continue reading “Ray Tracing On A Modern TI Graphing Calculator”

An Off-Grid Makeshift Cell Network

When traveling into the wilderness with a group of people, it’s good to have a method of communications set up both for safety and practicality. In the past people often relied on radios like FRS, CB, or ham bands if they had licenses, but nowadays almost everyone has a built-in communications device in their pocket that’s ready to use. Rather than have all of his friends grab a CB to put in their vehicle for their adventures together, [Keegan] built an off-grid network which allows any Android phone to communicate with text even if a cell network isn’t available.

The communications system is built on the LoRa communications standard for increased range over other methods like WiFi using a SX1278 chip and an ESP8266. The hardware claims a 10 km radius using this method which is more than enough for [Keegan]’s needs. Actually connecting to the network is only half of the solution though; the devices will still need a method of communication. For that, a custom Android app was created which allows up to 8 devices to connect to the network and exchange text messages with each other similar to a group text message.

For off-grid adventures a solution like this is an elegant solution to a communications problem. It uses mostly existing hardware since everyone carries their own phones already, plus the LoRa standard means that even the ESP8266 base station and transmitter are using only a tiny bit of what is likely battery power. If you’re new to this wireless communications method, we recently featured a LoRa tutorial as well.

Dummy The Robot Arm Is Not So Dumb

[Zhihui Jun] is a name you’re going to want to remember because this Chinese maker has created quite probably one of the most complete open-source robot arms (video in Chinese with subtitles, embedded below) we’ve ever seen. This project has to be seen to be believed. Every aspect of the design from concept, mechanical CAD, electronics design and software covering embedded, 3D GUI, and so on, is the work of one maker, in just their spare time! Sound like we’re talking it up too much? Just watch the video and try to keep up!

After an initial review of toy robots versus more industrial units, it was quickly decided that servos weren’t going to cut it – too little torque and lacking in precision. BLDC motors offer great precision and torque when paired with a good controller, but they are tricky to make small enough, so an off-the-shelf compact harmonic drive was selected and paired with a stepper motor to get the required performance. This was multiplied by six and dropped into some slick CNC machined aluminum parts to complete the mechanics. A custom closed-loop stepper controller mounts directly to the rear of each motor. That’s really nice too.

Stepper controller mounts on the motor rear – smart!

Control electronics are based around the STM32 using an ESP32 for Wi-Fi connectivity, but the pace of the video is so fast it’s hard to keep up with how much of the design operates. There is a brief mention that the controller runs the LiteOS kernel for Harmony OS, but no details we can find. The project GitHub has many of the gory details to pore over perhaps a bit light in places but the promise is made to expand that. For remote control, there’s a BLE-connected teaching device (called ‘Peak’) with a touch screen, again details pending. Oh, did we mention there’s a force-feedback (a PS5 Adaptive Trigger had to die for the cause) remote control unit that uses binocular cameras to track motion, with an AHRS setup giving orientation and that all this is powered by a Huawei Atlas edge AI processing system? This was greatly glossed over in the video like it was just some side-note not worth talking about. We hope details of that get made public soon!

Threading a needle through a grape by remote control

The dedicated GUI, written in what looks like Unity, allows robot programming and motion planning, but since those harmonic drives are back-drivable, the robot can be moved by hand and record movements for replaying later. Some work with AR has been started, but that looks like early in the process, the features just keep on coming!

Quite frankly there is so much happening that it’s hard to summarise here and do the project any sort of justice, so to that end we suggest popping over to YT and taking a look for yourselves.

We love robots ’round these parts, especially robot arms, here’s a big one by [Jeremy Fielding],  and if you think stepper motors aren’t necessary, because servo motors can be made to work just fine, you may be right.

Continue reading “Dummy The Robot Arm Is Not So Dumb”

Rotary Valve Engine Gets A Second Chance, Smokes The Competition

It’s a dedicated hacker who has the patience to build an engine from scratch. And it’s a borderline obsessed hacker who does it twice. [Meanwhile In the Garage] is of the second ilk, and in the video below the break, he takes a failed engine design and musters up the oomph to get it running.

The whole build began with an idea for a different kind of intake and exhaust valve. [Meanwhile In the Garage] dreamed up a design that does away with the traditional poppet valve. Instead of valves that open by being pushed away from their seat by a camshaft, this design uses a cylinder that is scooped so that as it rotates, its ports are exposed to either the intake or the exhaust.

Four Stroke Cycle with Poppet valves. Courtesy Wikipedia, CC BY-SA 3.0

During the compression stroke, the valve cylinder becomes part of the combustion chamber, with both ports facing away from the piston. If you read the comments, you’ll find that multiple people have come up with the idea through the years. With his mill, lathe, and know-how, [Meanwhile In the Garage] made it happen. But not without some trouble.

The first iteration resisted all valiant attempts at getting it started. The hour-long video preceding this one ended up in a no-start. Despite his beautiful machine work and a well thought out design, it wasn’t to be. Fire came from the engine either through the exhaust or the carburetor, but it never ran. In this version, several parts have been re-worked and the effect is immediate! The engine fired up nicely and even seems to rev up pretty well. Being a first-generation prototype, it lacks seals and other fancy parts to keep oil out of the combustion chamber. Normal engine oil has been added to the fuel as a precaution as well. The fact that it smokes quite badly isn’t a surprise and only proves that the design will benefit from another iteration. Isn’t that true for most prototypes, though?

Home-grown engines aren’t a new thing at Hackaday, and one of This Author’s favorite jet turbines used a toilet paper holder. Yes, really.  Thanks to [Keith] for the Tip!

Continue reading “Rotary Valve Engine Gets A Second Chance, Smokes The Competition”

Pre-exploded PSU close-up: shown is inductor with the heatsink it shorted against.

The Little Replacement PSU That Could: Kill A Microsoft Surface And Monitor

Recently [Big Clive], everyone’s favorite purveyor of anything electronic that’s dodgy, cheap, cheerful, decidedly crispy or any combination thereof, got sent a very dead external power supply unit. Being clearly a third-party PSU with poorly written and many (likely not truthful) safety approval markings on its label, this PSU had the dubious honor of having destroyed a Microsoft Surface computer as well as the monitor that was connected at the time.

In [Clive]’s video (also embedded after the break) the black and very crispy board is examined, showing a wealth of vaporized traces and plenty of soot. What’s however most fascinating is the failure mode: instead of something obvious like e.g. the main transformer between the primary and secondary side failing, here it would seem that an inductor (see heading image) on the secondary side had its insulation rubbed off and shorted on a nearby heatsink. A heatsink that just happened to be also electrically connected on the primary (mains-level) side.

Judging by the former owner’s report and aftermath, this led to a very sudden and violent demise of the PSU, with mains power very likely making its way into the unsuspecting Surface system and connected monitor. The number of ‘very nope’ design decisions made in this PSU are astounding, and a lesson for both aspiring EEs and anyone considering getting a ‘cheap’ third-party replacement PSU.

(Thanks to [Helge] for the tip)

Continue reading “The Little Replacement PSU That Could: Kill A Microsoft Surface And Monitor”