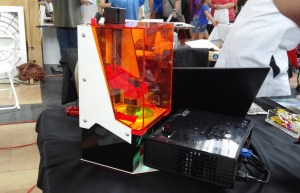
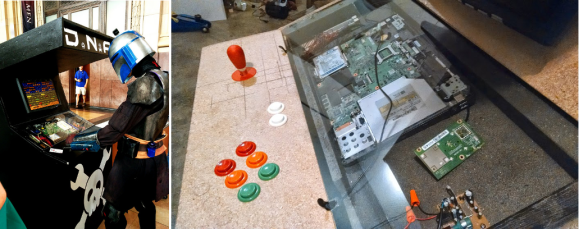
Seven story robot juggles three VW Beetles

Step Right Up Or Cower In Fear; The 7-Story Car-Juggling Robot Is Here

Sometimes we see a project that’s just as frightening as it is awesome. The Bug Juggler is a prime example of this phenomenon. A seven-story diesel-powered humanoid robot is one thing, but this one will pick up two VW Beetles, put one in its pocket, pick up a third, and juggle them. Yes, juggle them.

The Bug Juggler will be driven by a brave soul sitting in the head-cage and controlling him through haptic feedback connected to high-speed servo valves. A diesel engine will generate hydraulic pressure, and the mobility required for juggling the cars will come from hydraulic accumulators.

The project is in the capable hands of team members who have built special effects, a diesel/hydraulic vehicle for hauling huge sections of pipe, and mechanisms for Space Shuttle experiments. In order to attract investors for the full-scale version, they are building an 8-foot tall proof-of-concept arm assembly capable of tossing and catching a 250lb. mass.

If you prefer to see Beetles crushed, check out Stompy, the 18-foot rideable hexapod. Make the jump to see an animation of the full-scale Bug Juggler in action. Don’t know about you, but we wouldn’t stand quite so close to it without a helmet and some really good health insurance.

Continue reading “Step Right Up Or Cower In Fear; The 7-Story Car-Juggling Robot Is Here”

Magic In The Midwest: Maker Faire Kansas City

What did you do over the weekend? I spent both days at Maker Faire Kansas City and it was awesome. This is the fourth year the Faire has been held in Union Station, a stunning Kansas City landmark that celebrates its centennial this fall.

The Things

As you might imagine, there were 3D printers galore. One of my favorites was the One Up family from Q3D. These acrylic beauties start at $199 and offer a heated bed plate option.

Maker Juice Labs, purveyors of 3D printing inks for SLA brought a LittleSLA printer which they demonstrated by making some very nice key chains.

Little SLA does it stereolithographically.

SeeMeCNC had their Rostock Max V2 printer cooking up some huge prints, and Oni Technology, a local KC company, had their H Bot cranking.

Locally-made Oni H Bot.

At the Modio booth, my companion and I constructed heroes and monsters from a rainbow-colored pile of 3D-printed body parts and weapons. With Modio’s iPad app, you can create characters from the existing parts library, modify those parts, and print them on any 3D printer. All of the parts are designed to snap together. Modio recently teamed up with MakerBot and hopes to port their app from the iPad to the iPhone and Android in the near future.

I managed to resist the inexplicable Hostess booth and their free piles of Twinkies, Cup Cakes, and Coffee Cakes. They had a display that promised banana Twinkies and some Greek yogurt oddities, but only had the regular stuff on hand. On Sunday, I saw many people lugging around entire boxes of free Donettes and other goodies.

Continue reading “Magic In The Midwest: Maker Faire Kansas City”

Pimp My Cutting Fluid Pot

oil pot

Think about the simple tools you use every day. From writing implements to wire spoolers, there is arguably nothing that deserves to be hot rodded more than the things you depend on and might even take for granted.

For mad machinist [Chris], one of those everyday tools is his cutting fluid pot. Of course he already had one. A heavy one. A manly one. But it wasn’t completely ideal, and it wasn’t plated with gold that he prospected, refined, and processed himself. More on that in a minute.

[Chris] had obtained some neodymium ring magnets a while back. He was playing around with them in his shop when he noticed that his cutting fluid applicator brush fit nicely through the center and, being metal, was contained nicely through the wonders of magnetism. It was then that he decided to build a cutting fluid pot that would keep his brush in place and remain upright. Better living through magnetism.

He drilled and chamfered the brush hole out of a #20 JIC hydraulic cap and used the matching plug for the base. In case your catalog is out of reach, those are a 1¼” pair. [Chris] bored tiny pockets in the base for tiny magnets. After bathing both parts in delicious brake cleaner, he adhered all the magnets with LOCTITE®.

Okay, so, he’s done, right? No. Of course not. It did not surprise us to learn that [Chris] is also a miner, and not the 8-bit kind that hates creepers. Over the last two years, he prospected, refined, and other gold-related verbs using equipment he made himself. Just make the jump and watch the video before we give it all away. You’ll laugh, you’ll cry, you’ll be compelled to watch his other videos.

Continue reading “Pimp My Cutting Fluid Pot”

Knitted Circuit Board Lends Flexibility To E-Textiles

What could be better than sewing a circuit into wearable fabric? How about rolling your own circuit-ready knits? Chicago-based artist and assistant professor [Jesse] has done just that by perfecting a method for knitting solderable circuit boards.

This can be done by hand or with a knitting machine. The basic idea is that 2-3 strands of 34-36AWG bus wire are knitted into mercerized cotton yarn in rows, mimicking a piece of stripboard. Once the knitting is blocked and the component layout chosen, the floating bus wire strands between the rows are cut as you would cut unneeded stripboard traces. When it’s all done, [Jesse] used iron-on backing to protect her skin from scratches and lead transfer.

Her tutorial covers a simple LED circuit with a battery and a sliding switch, though she describes in detail how this can be expanded for more complex circuitry and offers good suggestions for working with different components. She also advocates feeding the bus wire from a spool rack to maintain tension and recommends stretching a piece of nylon stocking over the spool to keep it from unfurling all over the place.

This is the most aesthetically appealing e-textile work we’ve seen since this electro-embroidery piece or this blinky LED necklace, and it’s fascinating to watch the e-textile world unfold. Watch [Jesse]’s short videos after the break where she demonstrates a simple blinky knit as well as a lovely pulsing heart collar.

Continue reading “Knitted Circuit Board Lends Flexibility To E-Textiles”

MIDI Melodies Make Moody Milieu

MIDI piano lights

In this beautiful, well-documented, cat-assisted hack, [capricorn1] adds visual dimension to his impressive piano skills by using his keyboard’s MIDI output to drive Edison bulbs.

He hung them from a rod of electrical conduit pipe and threaded the wires through it to a DB25 connector. The lights are controlled by an Arduino Mega plus a custom shield with an optocoupler to handle zero cross detection. He happened to already have a board with 12 SSRs on it from another project. All of the electronics are in a re-purposed switch box—the switches control four different modes: classic, velocity, scrolling, and automatic. You’ll see the scrolling mode in the video after the jump.

[capricorn1] used a small sampling of the Arduino MIDI Library, namely the note on/off functions and the control change function to handle his sustain pedal. He’s listed the full code for the project, which includes usage of the ipMIDI module for automation over WiFi.

If you don’t have a MIDI keyboard or any Edison bulbs, you could make a MIDI floor piano. You’re required to play both “Chopsticks” and “Heart and Soul” on it, though. Those are like the Hello, World for floor pianos.

Continue reading “MIDI Melodies Make Moody Milieu”

DSLR Gives Exposure To 3D Light Traces

light lion

We’ve all twirled sparklers around in the darkness to write fleeting circles and figure eights with the light they give. Some of us have done it with the glowing end of a cigarette, too. Hackaday Projects user [ekaggrat] went a step further, painting with an LED mounted on the print head of his newly built 3DR Delta and capturing the LED’s path with a DSLR camera set for long exposure.

He started by creating a mesh model. From there, he converted it slices and G-code in Grasshopper. The LED is connected to pin D11/servo pin 1 on the RAMPS board. [ekaggrat] used the M42 G-code extension toggle the pin and write the slice lines with light. He has future plans to use an RGB LED, and we hope he shares that on the Projects site as well.

While this isn’t the most advanced light painting setup we’ve seen, it’s still pretty awesome and far more accessible. There is more information on his site, and you can grab the G-code from his repo. Stick around to see a video of the process.

Continue reading “DSLR Gives Exposure To 3D Light Traces”