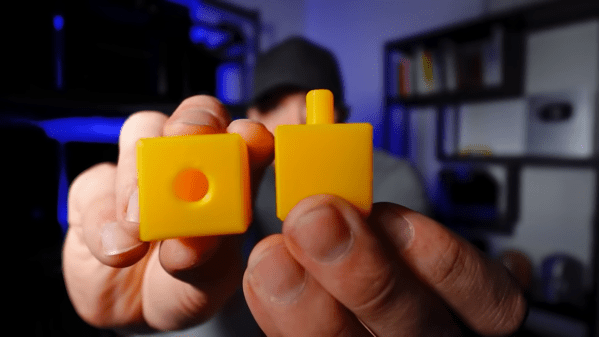
[Slant 3D] has a useful video explaining some thoughtful CAD techniques for designing 3D printed pins that don’t break and the concepts can be extended to similar features.
Sure, one can make pins stronger simply by upping infill density or increasing the number of perimeters, but those depend on having access to the slicer settings. If someone else is printing a part, that part’s designer has no actual control over these things. So how can one ensure sturdier pins without relying on specific print settings? [Slant 3D] covers two approaches.
The first approach includes making a pin thick, making it short (less leverage for stress), and adding a fillet to the sharp corner where the pin meets the rest of the part. Why? Because a rounded corner spreads stress out, compared to a sharp corner.
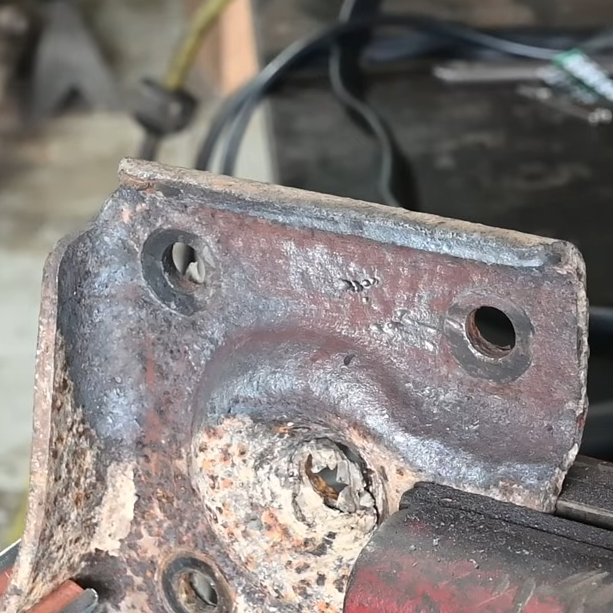
[Metal Massacre Fab Shop] has a review of a portable plasma cutter that ends up being a very good demonstration of exactly what these tools are capable of. If you’re unfamiliar with this kind of work, you might find the short video (about ten minutes, embedded below) to be just the right level of educational.
The rust removal function has an effect not unlike sandblasting.
Plasma cutters work by forcing compressed air through a small nozzle, and ionizing it with a high voltage. This process converts the gas into a very maneuverable stream of electrically-conductive, high-temperature plasma which can do useful work, like cutting through metal. The particular unit demonstrated also has a rust removal function. By operating at a much lower level, the same plasma stream can be used to give an effect not unlike sandblasting.
Of course, an economical way to cut metal is to just wield a grinder. But grinders are slow and not very maneuverable. That’s where a plasma cutter shines, as [Metal Massacre Fab Shop] demonstrates by cutting troublesome locations and shapes. He seems a lot more satisfied with this unit than he was with the cheapest possible (and misspelled!) plasma cutter he tried last year.
And should you want a plasma cutter, and aren’t afraid to salvage components? Consider building your own.
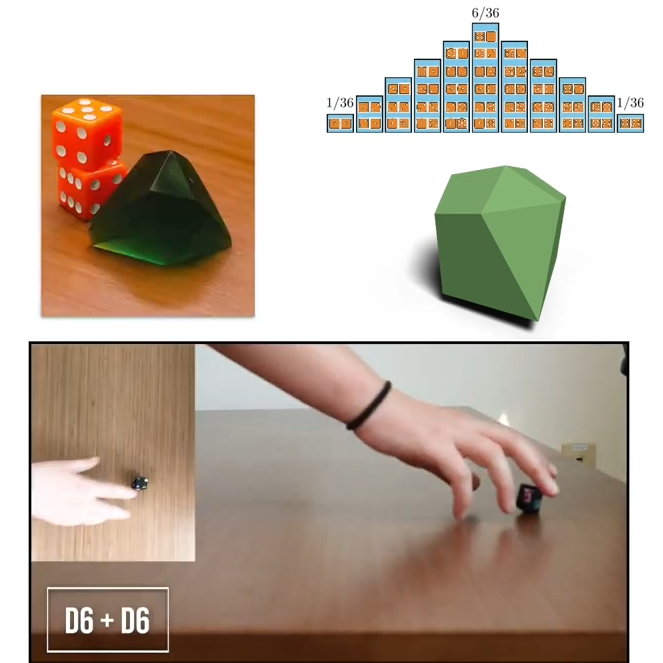
Rolling two six-sided dice (2d6) gives results from 2 to 12 with a bell curve distribution. Seven being the most common result, two and twelve being the least common. But what if one could do this with a single die?
This eleven-sided die has a distribution matching the results of 2d6.
As part of research Putting Rigid Bodies to Rest, researchers show that a single eleven-sided asymmetric shape can deliver the same results. That is to say, it rolls numbers 2 to 12 in the same distribution as 2d6. It’s actually just one of the oddball dice [Hossein Baktash] and his group designed so if you find yourself intrigued, be sure to check out the 3D models and maybe print your own!
The research behind this is a novel method of figuring out what stable resting states exist for a given rigid body, without resorting to simulations. The method is differentiable, meaning it can be used not just to analyze shapes, but also to design shapes with specific properties.
For example, with a typical three-sided die each die face has an equal chance of coming up. But [Hossein] shows (at 8:05 in the video, embedded below) that it’s possible to design a three-sided die where the faces instead have a 25%-50%-25% distribution.
How well do they perform in practice? [Hossein] has done some physical testing showing results seem to match theory, at least when rolled on a hard surface. But we don’t think anyone has loaded these into an automated dice tester, yet.
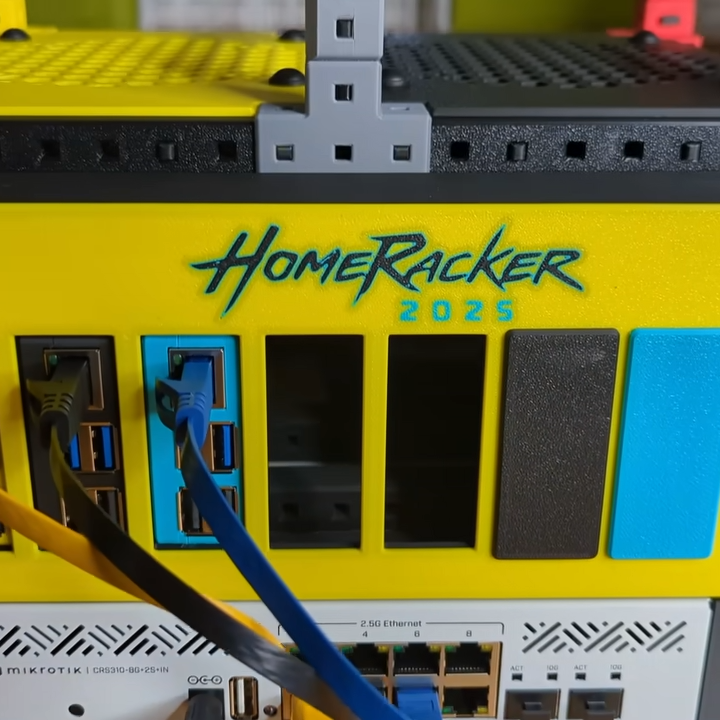
Things are cooler when rack-mounted, and [KellerLab] aims to make that all far more accessible with the HomeRacker, a modular and 3D-printable rack building system designed to let you rack-mount to your heart’s content. While it can handle big things, it seems especially applicable to tasks like mounting one’s home network equipment and Raspberry Pi machines.
A rack is a great place for those Raspberry Pi servers and home networking equipment, but it can also handle bigger jobs.
The basic system (or core) consists of three different parts: supports, connectors, and lock pins. The supports are the main structural bars, the connectors mostly go at the corners, and the lock pins ensure everything stays put. The nominal sizing is a 15 mm x 15 mm profile for the supports, with lengths being a multiple of 15 mm.
All is designed with 3D printing in mind, and requires no tools to assemble or disassemble. There are design elements we really appreciate, like how parts are printed at an angle, which improves strength while eliminating the need for supports. The lock pins (and the slots into which they go) are designed so that they are effective and will neither rattle nor fall out.
But the core system is just the foundation. There’s plenty of modularity and expansions to handle whatever one may need, from Gridfinity shelves and drawers to various faceplates and other modules. There are some example applications available from [KellerLab]’s HomeRacker models page, like CD shelf, under-desk drawer, or filament rack.
One last point to make about the value of printing objects like this at an angle: not only can the resulting layer lines provide better strength and reduce or eliminate the need for supports, but printing at an angle can help hide layer lines.
Can a shape pass through itself? That is to say, if one had two identical solids, would it be possible to orient one such that a hole could be cut through it, allowing the other to pass through without breaking the first into separate pieces? It turns out that the answer is yes, at least for certain shapes. Recently, two friends, [Sergey Yurkevich] and [Jakob Steininger], found the first shape proven not to have this property.
A 3D-printed representation of a cube passing through itself [image: Wikipedia]Back in the late 1600s, Prince Rupert of the Rhine proved it was possible to accomplish this feat with two identical cubes. One can tilt a cube just so, and the other cube can fit through a tunnel bored through it. A representation is shown here.
Later, researchers showed this was also true of more complex shapes. This ability to pass unbroken through a copy of oneself became known as Rupert’s Property. Sometimes it’s an amazingly tight fit, but it seems to always work.
The header image above shows a completely unsupported 3D-printed bridge, believe it or not. You’re looking at the bottom of the print. [Make Wonderful Things] wondered whether unsightly unsupported bridges could be improved, and has been busy nailing down remarkably high-quality results by exhaustive testing of different settings.
It all started when they thought that unsupported bridges looked a lot as though they were made from ropes stretched between two points. Unlike normal layers, these stretched extrusions didn’t adhere to their neighbors. They are too far apart from one another, and there’s no “squish” to them. But could this be overcome?
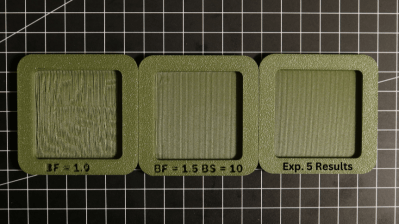
His experiments centered mainly around bridge printing speed, temperature, and bridge flow. That last setting affects how much the extrusion from the hot end is adjusted when printing a bridge. He accidentally increased it past 1.0 and thought the results were interesting enough to follow up on; it seemed that a higher flow rate when printing a bridge gave the nudge that was needed to get better inter-line adhesion. What followed was a lot of testing, finally settling on something that provided markedly better results than the stock slicer settings. Markedly better on his test pieces, anyway.
The best results seem to come from tweaking the Bridge Flow rate high enough that extrusions attach to their neighbors, printing slowly (he used 10 mm/sec), and ensuring the bridged area is as consistent as possible. There are still open questions, like some residual sagging at corners he hasn’t been able to eliminate, but the results otherwise look great. And it doesn’t even require laying one’s printer on its side!
All the latest is on the project page where you can download his test models, so if you’re of a mind to give it a try be sure to check it out and share your results. Watch a short video demonstrating everything, embedded just under the page break.
The iconic X-wing ship design from Star Wars is something many a hobbyist have tried to recreate, and not always with success. While [German engineer] succeeded in re-imagining an FPV quadcopter as an X-wing fighter, the process also highlighted why there have been more failures than successes when it comes to DIY X-wing aircraft.
For one thing, the X-wing shape is not particularly aerodynamic. It doesn’t make a very good airplane. Quadcopters on the other hand rely entirely on precise motor control to defy gravity in a controlled way. It occurred to [German engineer] that if one tilts their head just so, an X-wing fighter bears a passing resemblance to a rocket-style quadcopter layout, so he set out to CAD up a workable design.
When flying at speed, the aircraft goes nearly horizontal and the resemblance to an X-wing fighter is complete.
One idea that seemed ideal but ultimately didn’t work was using four EDF (electric ducted fan) motors mounted in the same locations as the four cylindrical engines on an X-wing. Motors large enough to fly simply wouldn’t fit without ruining the whole look. A workable alternative ended up being the four props and brushless motors mounted on the ends of the wings, like you see here.
The unit still needed a lot of fine tuning to get to a properly workable state, but it got there. It takes off and lands vertically, like a classical quadcopter, but when flying at speed it levels out almost completely and looks just like an X-wing as it screams by. It’s in sharp contrast to the slow, methodical movements of this Imperial Shuttle drone.
There are also a couple design elements in [German engineer]’s build we thought were notable. The spring-loaded battery door (all 3D-printed, including the spring) looks handy and keeps the lines of the aircraft clean. And since it’s intended to be flown as an FPV (first person view) aircraft, the tilting camera mount in the nose swings the camera 90 degrees during takeoff and landing to make things a little easier on the pilot.
3D models for the frame (along with a parts list) are up for anyone who wants to give it a shot. Check it out in the video, embedded below.