Do you like high-detail 3D models intended for resin printing, but wish you could more easily print them on a filament-based FDM printer? Good news, because [Jacob] of Painted4Combat shared a tool he created to make 3D models meant for resin printers — the kind popular with tabletop gamers — easier to port to FDM. It comes in the form of a Blender add-on called Resin2FDM. Intrigued, but wary of your own lack of experience with Blender? No problem, because he also made a video that walks you through the whole thing step-by-step.
3D models intended for resin printing aren’t actually any different, format-wise, from models intended for FDM printers. The differences all come down to the features of the model and how well the printer can execute them. Resin printing is very different from FDM, so printing a model on the “wrong” type of printer will often have disappointing results. Let’s look at why that is, to better understand what makes [Jacob]’s tool so useful.
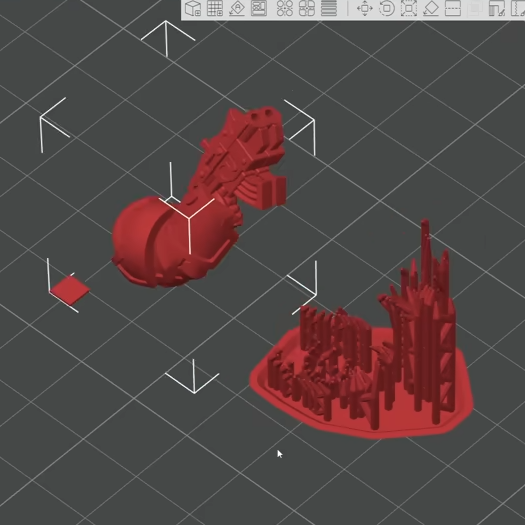
Rafts and a forest of thin tree-like supports are common in resin printing. In the tabletop gaming scene, many models come pre-supported for convenience. A fair bit of work goes into optimizing the orientation of everything for best printed results, but the benefits don’t carry directly over to FDM.
For one thing, supports for resin prints are usually too small for an FDM printer to properly execute — they tend to be very thin and very tall, which is probably the least favorable shape for FDM printing. In addition, contact points where each support tapers down to a small point that connects to the model are especially troublesome; FDM slicer software will often simply consider those features too small to bother trying to print. Supports that work on a resin printer tend to be too small or too weak to be effective on FDM, even with a 0.2 mm nozzle.
To solve this, [Jacob]’s tool allows one to separate the model itself from the support structure. Once that is done, the tool further allows one to tweak the nest of supports, thickening them up just enough to successfully print on an FDM printer, while leaving the main model unchanged. The result is a support structure that prints well via FDM, allowing the model itself to come out nicely, with a minimum of alterations to the original.
Resin2FDM is available in two versions, the Lite version is free and an advanced version with more features is available to [Jacob]’s Patreon subscribers. The video (embedded below) covers everything from installation to use, and includes some general tips for best results. Check it out if you’re interested in how [Jacob] solved this problem, and keep it in mind for the next time you run across a pre-supported model intended for resin printing that you wish you could print with FDM.
Continue reading “Make Fancy Resin Printer 3D Models FDM-Friendly”