A Cassette Interface For A 6502 Breadboard Computer, Kansas City-Style

It’s been a long time since computer hobbyists stored their programs and data on cassette tapes. But because floppy drives were expensive peripherals and hard drives were still a long way from being the commodity they are today, cassettes enjoyed a long run at the top of the bulk data storage heap.

Celebrating that success by exploring the technology of cassette data storage is the idea behind [Greg Strike]’s Kansas City decoder project, which he hopes to use with his [Ben Eater]-style 6502 computer. The video below explains the Kansas City standard in some detail, and includes some interesting historical context we really hadn’t delved into before. There are also some good technical details on the modulation scheme KCS used, which [Greg] used to base his build. After a failed attempt to use an LM567 tone decoder chip, he stumbled upon [matseng]’s KCSViewer project, which decodes KCS-encoded audio signals using nothing but discrete components.

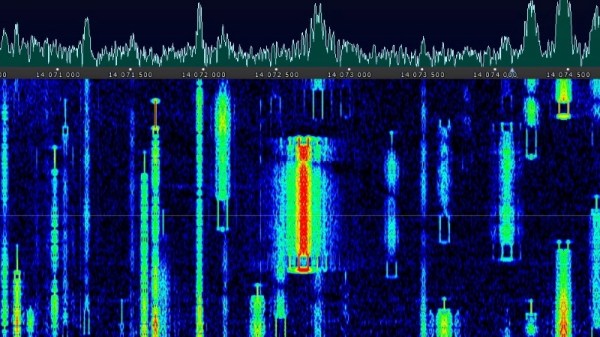
[Greg]’s prototype has a comparator to convert sine waves to square waves, followed by pair of monostable timers, each tuned to either the high or low frequency defined in the KCS specs. A test signal created using Audacity — is there anything it can’t do? — was successfully decoded, providing proof of concept for the project’s first phase. We’re looking forward to the rest of the series, which will turn this into an actual decoder, and presumably add an encoder as well.

Listeners of the Hackaday Podcast may recall we experimented with using KCS to hide some data within an episode a few months back.

Continue reading “A Cassette Interface For A 6502 Breadboard Computer, Kansas City-Style”

RF Hacking Hack Chat

Join us on Wednesday, October 12 at noon Pacific for the RF Hacking Hack Chat with Christopher Poore!

On the time scale of technological history, it really wasn’t all that long ago that radio was — well, boring. We’re not talking about the relative entertainment value of the Jack Benny Show or listening to a Brooklyn Dodgers game, but about the fact that for the most part, radio was a one-dimensional medium: what you heard was pretty much all there was to a signal, and radio was rarely used for anything particularly hackable.

Not so today, of course, where anything electronic seems to have at least one radio stuffed into it, and the space around us is filled with a rich soup of fascinating RF signals. For hackers, this is where radio gets interesting — listening in on those signals, exploring their nature, and figuring out how to put them to use are like red meat for most of us.

join-hack-chatHacking and reverse engineering opportunities abound in the RF realm, but can sometimes be a bit difficult. What’s needed is a framework for pulling those signals out of the ether and putting them into some kind of context. Fortunately, there are plenty of tips and tricks in this space; we talked about one of them, FISSURE, not too long ago. The acronym — “Frequency Independent SDR-Based Signal Understand and Reverse Engineering” — about sums up what this framework is all about. But to bring it into further focus, we’re lucky enough to have Chris Poore, a Senior Reverse Engineer at Assured Information Security, drop by the Hack Chat. We’ll talk about RF reverse engineering in general and FISSURE in particular. Be sure to stop by with your RF hacking and reverse engineering questions and war stories!

Our Hack Chats are live community events in the Hackaday.io Hack Chat group messaging. This week we’ll be sitting down on Wednesday, October 12 at 12:00 PM Pacific time. If time zones have you tied up, we have a handy time zone converter.

Hackaday Links Column Banner

Hackaday Links: October 9, 2022

Don’t you just hate it when you walk out of the bathroom with toilet paper stuck to your shoe? That’s a little bit like what happened when the Mars helicopter Ingenuity picked up a strange bit of debris on one of its landing pads. The foreign object was spotted on the helicopter’s down-pointing navigation camera, and looks for all the world like a streamer of toilet paper flopping around in the rotor wash. The copter eventually shed the debris, which wafted down to the Martian surface with no further incident, and without any apparent damage to the aircraft. NASA hasn’t said more about what the debris isn’t — aliens — than what it is, which of course is hard to say at this point. We’re going to go out on a limb and say it’s probably something we brought there, likely a scrap of plastic waste lost during the descent and landing phase of the mission. Or, you know, it’s getting to be close to Halloween, a time when the landscape gets magically festooned with toilet paper overnight. You never know.

Continue reading “Hackaday Links: October 9, 2022”

RotBot Adds An Extra Dimension To 3D Printing, With A Twist

It always seemed to us that the Z-axis on a 3D printer, or pretty much any CNC machine for that matter, is criminally underused. To have the X- and Y-axes working together to make smooth planar motions while the Z-axis just sits there waiting for its big moment, which ends up just moving the print head and the bed another fraction of a millimeter from each other just doesn’t seem fair. Can’t the Z-axis have a little more fun?

Of course it can, and while non-planar 3D printing is nothing new, [Stefan] over at CNC Kitchen shows us a literal twist on the concept with this four-axis non-planar printer. For obvious reasons, it’s called the “RotBot,” and it comes via the Zurich University of Applied Sciences, where [Michael Wüthrich] and colleagues have been experimenting with different slicing strategies to make overhang printing more manageable. The hardware side of things is actually pretty intuitive, especially if you’ve ever seen an industrial waterjet cutter in action. They modified a Prusa printer by adding a rotating extension to the print head, putting the nozzle at a 45° angle to the print bed. A slip ring connects the heater and fan and allows the head to rotate 360°, with the extruder living above the swiveling head.

On the software side, the Zurich team came up with some clever workarounds to make conical slicing work using off-the-shelf slicers. As [Stefan] explains, the team used a “pre-deformation” step to warp the model and trick the slicer into generating the conical G-code. The G-code is then back-transformed in exactly the opposite process as pre-deformation before being fed to the printer. The transformation steps are done with a bit of Python code, and the results are pretty neat. Watching the four axes all work together simultaneously is quite satisfying, as are the huge overhangs with no visible means of support.

The academic paper on this is probably worth a read, and thankfully, the code for everything is all open-sourced. We’re interested to see if this catches on with the community.

Continue reading “RotBot Adds An Extra Dimension To 3D Printing, With A Twist”

Flip-Segment Digital Clock Is A Miniature Mechanical Marvel

Clocks are such mundane objects that it’s sometimes hard for them to grab your attention. They’re there when you need them, but they don’t exactly invite you to watch them work. Unless, of course, you build something like this mechanical flip-segment clock with a captivating exposed mechanism

“Eptaora” is the name of this clock, according to its inventor [ekaggrat singh kalsi]. The goal here was to make a mechanical flip-segment display as small as possible, which meant starting with the smallest possible printable screw hole and scaling the design up from there. Each segment is controlled by a multi-lobed cam which bears on a spring-loaded cam follower. When the cam rotates against the follower, a segment is flipped up from the horizontal rest position to the vertical display position. A carryover mechanism connects two adjacent displays so that each pair of digits can be powered by a single stepper, and the finished clock is quite small — a little bit larger than the palm of a hand. The operation seems quite smooth, too, which is always a bonus with clocks such as these. Check out the mesmerizing mechanism in the video below.

We’d have sworn we covered a similar clock before — indeed [ekaggrat] says the inspiration for this clock came from one with a similar mechanism — but we couldn’t find it in the back catalog. Oh sure, there are flip-up digital clocks and all manner of mechanical seven-segment displays, but this one seems to be quite unique, and very pleasing.

Continue reading “Flip-Segment Digital Clock Is A Miniature Mechanical Marvel”

Magnetic Gearbox Design Improvements Are Toothless But Still Cool

Any project that contains something called a “flux modulator” instantly commands our attention. And while we’re pretty sure that [Retsetman] didn’t invent it after hitting his head on the toilet, this magnetic gearbox is still really cool.

Where most gearboxes have, you know, gears, a magnetic gearbox works by coupling input and output shafts not with meshing teeth but via magnetic attraction. [Retsetman]’s version has three circular elements nested together on a common axis, and while not exactly a planetary gear in the traditional sense, he still uses planetary terminology to explain how it works. The inner sun gear is a rotor with four pairs of bar magnets on its outer circumference. An outer ring gear has ten pairs of magnets, making the ratio of “teeth” between the two gears 10:2. Between these two elements is the aforementioned flux modulator, roughly equivalent to the planet gears of a traditional gearbox, with twelve grub screws around its circumference. The screws serve to conduct magnetic flux between the magnets, dragging the rotating elements along for the ride.

This gearbox appears to be a refinement on [Retsetman]’s earlier design, and while he provides no build files that we can find, it shouldn’t be too hard to roll your own designs for the printed parts.

Continue reading “Magnetic Gearbox Design Improvements Are Toothless But Still Cool”

I’ll See Your Seven-Segment Mechanical Display And Raise You To 16 Segments

Mechanical multi-segment displays have become quite a thing lately, and we couldn’t be more pleased about it. The degree of mechanical ingenuity needed to make these things not only work but look good while doing it never ceases to amaze us, especially as the number of segments increases. So we submit this over-the-top 16-segment mechanical display (Nitter) for your approval.

The original tweet by [Kango Suzuki] doesn’t have a lot of detail, especially if you can’t read Japanese, but we did a little digging and found the video shown below. It shows a lot more detail on how this mechanism works, as well as some of the challenges that cropped up while developing it. Everything is 3D printed, and flipping the state of each of the 16 segments is accomplished with a rack-and-pinion mechanism, with the pinions printed right into each two-sided cylindrical segment. The racks are connected to pushrods that hit a punch card inserted into a slot in the rear of the display. The card has holes corresponding to the pattern to be displayed; when it’s pushed home, the card activates a mechanism that slides all the racks that line up with holes and flips their segments.

This isn’t the first multi-segment mechanical masterpiece from [Kango Suzuki] that we’ve featured, of course. This wooden seven-segment display works with cams rather than punch cards, but you can clearly see the hoe the earlier mechanism developed into the current work. Both are great, and we’re looking forward to the next segment count escalation in the mechanical display wars.

Continue reading “I’ll See Your Seven-Segment Mechanical Display And Raise You To 16 Segments”