Current Loop Extends Wired Microphones Past 1 Km

A problem which beset early telephone engineers was that as the length of their lines increased, so did the distortion of whatever signal they wanted to transmit. This was corrected once they had gained an understanding of the capacitance and inductance of a long cable. The same effects hamper attempts to place microphones on long lines, and [Leo’s Bag of Tricks] has a solution for doing that using Cat5 cable. The application is audio surveillance, but we think the technique is useful enough to have application elsewhere.

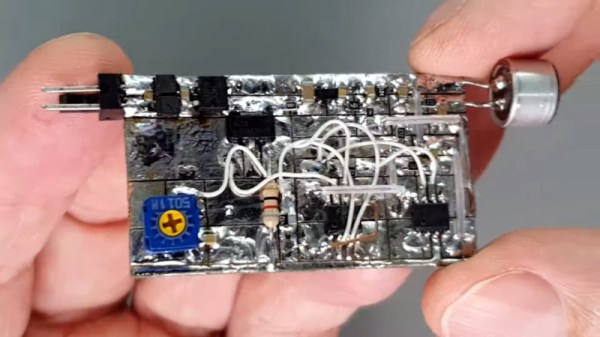
The solution which you can see in the video below the break will be familiar to teletype aficionados who have encountered current loops, in that it creates an analogue current loop. There is a standing DC current in the tens of miliamperes, and this has the audio imposed upon it by an amplifier and  shunt transistor. The audio can be easily retrieved using a pair of small transformers, leading to efficient transfer over as much of a kilometer of Cat5 cable. We’re guessing it’s not quite audiophile quality, but it’s useful to know that a current loop can be just as useful in the analogue domain as in the digital. If the subject interests you, we did a feature on them a few years ago.

Continue reading “Current Loop Extends Wired Microphones Past 1 Km”

Probably The Simplest Radiation Detector You Already Own

Over the years we’ve featured quite a few radiatioactivity detectors, which usually include a Geiger-Muller tube, or perhaps a large-area photodiode. But in the event of radiation exposure from a nuclear attack, how does the man in the street gauge the exposure without owning a dedicated instrument? This was a question of note at the height of the Cold War, and it’s one that [Dr. Marshall Brucer] answered in a 1962 paper entitled “When Do You Leave A Fallout Shelter“. The full paper is behind a paywall but the part we’re interested in is on the freely available first page.

Dr. Brucer‘s detector is simplicity itself, and it relies on the erosion of a static electric charge by radiation. Should you rub a plastic comb in your hair it will accumulate enough charge to pick up a small piece of paper, and under normal background radiation the charge will ebb away such that it will drop the piece of paper after about 15 seconds. His calculation is that once the field reaches around 10 roentgens per hour it will be enough to erase the charge and drop the paper immediately. There’s a comtemporary newspaper report (Page 7, just to the left of the large advertisment) which tells the reader that since the exposure limit is 100 roentgens (one sievert), this test failing indicates that they have nine hours to create a better shelter. For obvious reasons we can’t test this at the Hackaday bench, but those of us who remember the days when such topics were a real concern will be searching for a handy comb anyway.

Thanks [Victor Matthew] for the tip.

An All-In-One Serial Printer Playground

One of the peripherals of most desire for a microcomputer-obsessed youth in the 1980s was a printer, probably a dot-matrix device. In the decades since, printers have passed into being almost a piece of discardable junk as cheap inkjets can be found in any garage sale. That’s not to say that there’s not plenty of fun to be had hacking older types though, and there are plenty of small thermal printers out there to play with. [Tanmoydutta] has provided a platform that may help, in the form of an ESP32-C3-based serial printer controller.

On board is a level shifter for the 5 volt printer electronics and all the appropriate connectors for the printer, as well as the ESP and onboard USB interface. It’s a networked print server, but one which is entirely and completely hackable. We think the printer in question is this one sold by Adafruit.

So this board makes easier a whole host of printer-related projects, and should you try it you will no doubt finding yourself ankle-deep in little curly pieces of paper. This printer’s not the only one in town though, don’t forget the cheap Bluetooth printers!

Know Audio: Stereo

In our occasional series charting audio and Hi-Fi technology we have passed at a technical level the main components of a home audio set-up. In our last outing when we looked at cabling we left you with a promise of covering instrumentation, but now it’s time instead for a short digression into another topic: stereo. It’s a word so tied-in with Hi-Fi that “a stereo” is an alternative word for almost any music system, but what does it really mean? What makes a stereo recording, and how does it arrive at your ears?

From West London Trains, To 3D Audio

A steam train passing through a station, from a distance in black and white
The driver of this Great Western Railway train had no idea that he was making audio history.

As most of you will know, a mono recording uses a single microphone and a single channel while a stereo one uses two microphones recording simultaneously a left and right channel. These are then played back through a pair of speakers, and the result is a sense of spatial field for the listener. Instruments appear to come from their relative positions when recorded, and the sense of being in the performance is enhanced.

Stereo recording as we know it was first perfected as one of the many inventions credited to Alan Blumlein, then working for EMI in London. We have one of his stereo demonstration films in “Trains at Hayes“, filmed from the EMI laboratories overlooking the Great Western Railway, and featuring a series of steam-hauled trains crossing the field of view with a corresponding stereo sound field. His work laid down the fundamentals of stereo recording, including microphone configurations and what would become the standard for stereo audio recording on disk with the channels on the opposite sides of a 45 degree groove. Continue reading “Know Audio: Stereo”

3D Printing Aids Metal Polishing

While a machinist can put a beautiful finish on a piece of metal with their lathe or mill, to achieve the ultimate finish, a further set of polishing procedures are necessary. Successively finer abrasives are used in a process called lapping, which removes as far as possible any imperfections and leaves eventually a mirrored smoothness. It’s not without problems though, particularly at the edge of a piece it can result in rounded-off corners as the abrasive rubs over them. [Adam the machinist] has a solution, and he’s found it with a 3D printer.

To avoid the rounded edges, the solution involves fitting a piece of metal or wood flush with the surface to be lapped, such that the pressure doesn’t act upon the corner. This can be inconvenient, and the solution avoids it by 3D printing a custom piece that fits over the entire machined object providing a flat surface surrounding the edges. We see it being used with a demonstration piece that has three separate surfaces in the same plane to lap,something that would have been challenging without the 3D printed aid.

Lapping isn’t a process we see too often here. But it has cropped up as an extreme overclocking technique.

Continue reading “3D Printing Aids Metal Polishing”

A Vacuum Pick Up Tool For Not A Lot

When working with grain-of-dust surface-mount components, one of the tools which makes a huge difference is a vacuum pickup pen. Instead of trying to move the part with tweezers and succeeding only in flicking it into the middle distance, a tiny rubber suction cup with a vacuum feed allows you to pick it up and place it exactly where it is required. Unfortunately, good vacuum pickup tools come at a price, and very cheap ones aren’t worth the expenditure.

This is where [TDG (Béla)]’s SMD vacuum pickup tool comes in. The problem with the cheap tools is only that their manual vacuum is ineffectual, they come with the required array of probes with the suction cups. The solution is to take a small vacuum pump with a low voltage motor and attach it with a 3D printed adapter to the business end of a cheap vacuum tool and make a useful tool the result.

There’s a short video of the tool in action that we’ve placed below the break. It’s a bit noisy, but it’s obvious that it performs well. Control is via an air hole in the side of the 3D print, place a finger over it and the full suction is directed to the tip. The result is simpler and cheaper than previous contenders in the budget vacuum pickup stakes.

Continue reading “A Vacuum Pick Up Tool For Not A Lot”

The CPSC Says Plug To Socket, Not Plug To Plug, Please

When the power goes out, it goes without saying that all the lights and sockets in a house stop working. Savvy rural homeowners stock up with candles, batteries, LED lights, and inverters.  More foolhardy folks simply hook up their home electrical system to a generator using a mains lead with a plug on one end between the generator and a wall socket. This should be so obviously dangerous as to be unnecessary, but it’s become widespread enough that the US Consumer Product Safety Commission has issued a warning about the practice. In particular, they’re concerned that there’s not even a need to wire up a lead, as they’re readily available on Amazon.

The dangers they cite include electrocution, fire hazard from circumventing the house electrical protection measures, and even carbon monoxide poisoning because the leads are so short that the generator has to be next to the socket. Hackaday readers won’t need telling about these hazards, even if in a very few and very special cases we’ve seen people from our community doing it. Perhaps there’s a flaw in the way we wire our homes, and we should provide a means to decouple our low-power circuits when there’s a power cut.

It’s likely that over the coming decades the growth of in-home battery storage units following the likes of the Tesla Powerwall will make our homes more resilient to power cuts, and anyone tempted to use a plug-to-plug lead will instead not notice as their house switches to stored or solar power. Meanwhile, some of us have our own ways of dealing with power outages.

Plug image: Evan-Amos, Public domain.