Kinetic Clock Is A Clean Modern Way To Tell Time

Hackers and makers aren’t usually too interested in basic round analog clocks. They tend to prefer building altogether more arcane and complicated contraptions to display numbers for the telling of time. [alstroemeria] did just that with this nifty kinetic clock build.

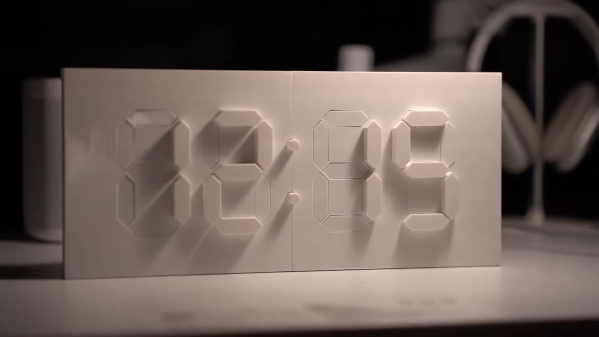
The basic concept of the kinetic clock is to have a flat plate, which individual segments raise out of to create a physical (instead of illuminated) 7-segment display. This is achieved with servos which push the segments in and out using a small rack mechanism. It’s not a sophisticated build; it simply uses 30 servos to handle all the segments needed to tell time. Thus, the Arduino Mega was the perfect tool for the job. With a sensor shield added on, it has an abundance of IO, driving a ton of servos is a cinch. There’s also a DS3231 real time clock to help it keep accurate time.

Incidentally, it’s a hefty thing to print, according to YouTuber [Lukas Deem] who replicated the project. It took around 85 hours to print, and a total of 655 grams of filament – not counting mistakes and trashed parts.

And if you think you’re having deja-vu, you might well be. We’ve seen a take on this exquisite design before. We liked it then, and we like it now.

Overall, it’s a stylish build that looks as good as your 3D printer’s output will allow. A resin printer would be a massive boon in this regard. Video after the break.

Continue reading “Kinetic Clock Is A Clean Modern Way To Tell Time”

Solar Chimneys: Viable Energy Solution Or A Lot Of Hot Air?

We think of the power we generate as coming from all these different kinds of sources. Oil, gas, coal, nuclear, wind… so varied! And yet they all fundamentally come down to moving a gas through a turbine to actually spin up a generator and make some juice. Even some solar plants worked this way, using the sun’s energy to heat water into steam to spin some blades and keep the lights on.

A solar updraft tower works along these basic principles, too, but in a rather unique configuration. It’s not since the dawn of the Industrial Age that humanity went around building lots of big chimneys, and if this technology makes good sense, we could be due again. Let’s find out how it works and if it’s worth all the bluster, or if it’s just a bunch of hot air.

Continue reading “Solar Chimneys: Viable Energy Solution Or A Lot Of Hot Air?”

E-Ink Photo Frame Is A Simple, Pleasing Design

Regular photo frames are good, but they tend to only display a single photo unless you pull them to bits and swap out what’s inside. [Ben] decided to make a digital photo frame using an e-ink display to change things up, and unlike some commercial versions we’ve seen, it’s actually pretty tasteful!

The build is based on a Nook Simple Touch Reader, which can be had pretty cheaply on the used market. It was chosen for the fact it runs Android, which makes it comparatively easy to hack and customize compared to some other e-readers on the market. Once it’s running a custom Android brew, it can be set to run an app called Electric Sign which simply shows a given website fullscreen and updates it at regular intervals. That turns the Nook into a remotely updateable photo frame in one fell swoop. From there, it just took a little trickery to access an iCloud album to update the frame with fresh pics. Then [Ben] just had to customize a nice photo frame to neatly mount the e-reader with room for the cable to subtly snake out the back.

It’s a simple build that relies on some existing tools already laying around the Internet. That’s nice, because it makes it easy for anyone to replicate themselves at home given the same materials. We’ve seen some other great digital photo frames before, too. If you’ve built your own neat and creative way to display your pics, don’t hesitate to drop us a line!

Weird Trashcan Is Actually Advanced 1990s Robot

[Clay Builds] found a bit of a gem at a recent auction, picking up a Nomadic Technologies N150 robot for just $100. It actually looks like something out of science fiction, with its cylindrical design, red bumpers, and many sensors. He decided to try and restore the research-grade robot to functionality with the aid of modern hardware.

Right away, it’s clear this was an expensive and serious bit of kit. It’s full of hardcore gears and motors for driving three rubber-tired wheels, each of which has a pivoting mount for steering the thing. Through his research, [Clay] was able to find some ancient websites documenting university work using the robots. His understanding is that the platform was designed for researchers experimenting with simultaneous localization and mapping (SLAM) algorithms, and other robotic navigation tasks.

[Clay] doesn’t just settle for a teardown, though. He’s been able to get the platform running again in one sense, using an Arduino to manually run the robot’s drive controls under the command of a gamepad. Without official software or resources, it’s perhaps unlikely he’ll be able to get the stock hardware to do much without completely rebraining it, so this method makes sense. In future he hopes to get the bumper sensors and sonar modules working too.

It’s a fair effort given [Clay] was working with no documentation and no supporting software. We’ve seen similar efforts for robotic arms before, too. Video after the break.

Continue reading “Weird Trashcan Is Actually Advanced 1990s Robot”

Voice Controlled Rover Follows Verbal Instructions To Get Around

Typically, when we want to tell a robot where to go, we either pre-program a route or drive it around with some kind of gamepad or joystick controller. [Robotcus] decided to build a simple robot platform that drove around in response to voice commands instead.

The robot is based around a Raspberry Pi Zero, charged with instructing the motor controllers to drive the ‘bot around. The Pi Zero is also in charge of interpreting the voice commands via Google’s speech recognition tool. The ‘bot itself is a fairly simple design using brushed gearmotors for propulsion and a 3D-printed chassis to tie everything together.

The car is capable of understanding five commands – drive, turn left, turn right, go backwards, and “attack”. The last command simply activates a flipper from the robot’s former life as a battlebot. Things ran okay at first, but the Pi Zero was slow at processing commands. The wheels also had minimal traction. A full-fat Raspberry Pi solved the latter issue, while a new chassis provided better grip.

It’s a simple project, but one that taught [Robotcus] plenty about programming and building small robots in the process. Like so many learning experiences, it’s easy to see how the robot starts out flailing uselessly and eventually starts to perform as intended. It’s always nice to see that progression. Video after the break.

Continue reading “Voice Controlled Rover Follows Verbal Instructions To Get Around”

Building A Loop Station With An RP2040

Loop stations are neat things, able to replay one or more loops of audio over and over again while you perform over the top of them. Musicians like [Marc Rebillet], [Reinhardt Buhr], and [Dub FX] have made careers out of this style of performance. [Yaqi Gao], [Xiaoyu Liang] and [Alina Wang] decided to build a loop station of their own, using the popular RP2040 chip.

At its simplest, a loop station must take in audio, record it, and then play it back. Generally, it can do this with several tracks and mix them together, while also mixing in the incoming audio as well. The group achieved this by inputting a guitar signal to the chip via an amplifier and the onboard analog-to-digital converter. The audio can be recorded as desired, and then played back via an external digital-to-analog converter. Live audio from the guitar is also passed through to allow performing over the recorded sound. The group also used an external half-megabyte FRAM chip to allow storing additional audio sample data, which can be trucked out over serial and saved.

It’s not the cleanest loop station in the world, with a relatively low sample rate causing some artifacts. Regardless, it definitely works, and taught the group plenty about working with digital audio in the process. For that reason alone, we’d call it a success.

Continue reading “Building A Loop Station With An RP2040”

Liquid Tin Could Be The Key To Cheap, Plentiful Grid Storage

Once expensive and difficult to implement, renewable energy solutions like wind and solar are now often the cheapest options available for generating electricity for the grid. However, there are still some issues around the non-continuous supply from these sources, with grid storage becoming a key technology to keep the lights on around the clock.

In the quest for cost-effective grid storage, a new player has entered the arena with a bold claim: a thermal battery technology that’s not only more than 10 times cheaper than lithium-ion batteries, but also a standout in efficiency compared to traditional thermal battery designs. Fourth Power is making waves with its “sun in a box” energy storage technology, and aims to prove its capabilities with an ambitious 1-MWh prototype.

Hot Stuff

Simple heating elements turn electricity into heat, putting it into liquid tin that then heats large graphite blocks. Credit: Fourth Power, Vimeo screenshot

The principle behind Fourth Power’s technology is deceptively simple: when there’s excess renewable energy available, use it to heat something up. The electrical energy is thus converted and stored as heat, with the idea being to convert it back to electricity when needed, such as at night time or when the wind isn’t blowing. This concept isn’t entirely new; other companies have explored doing this with everything from bricks to molten salt. Fourth Power’s approach involves heating large blocks of graphite to extremely high temperatures — as high as 2,500 °C (4,530 °F). Naturally, the hotter you go, the more energy you can store. Where the company’s concept gets interesting is how it plans to recover the heat energy and turn it back into electricity.

Continue reading “Liquid Tin Could Be The Key To Cheap, Plentiful Grid Storage”