Building A Small Keypad For Strategy Games

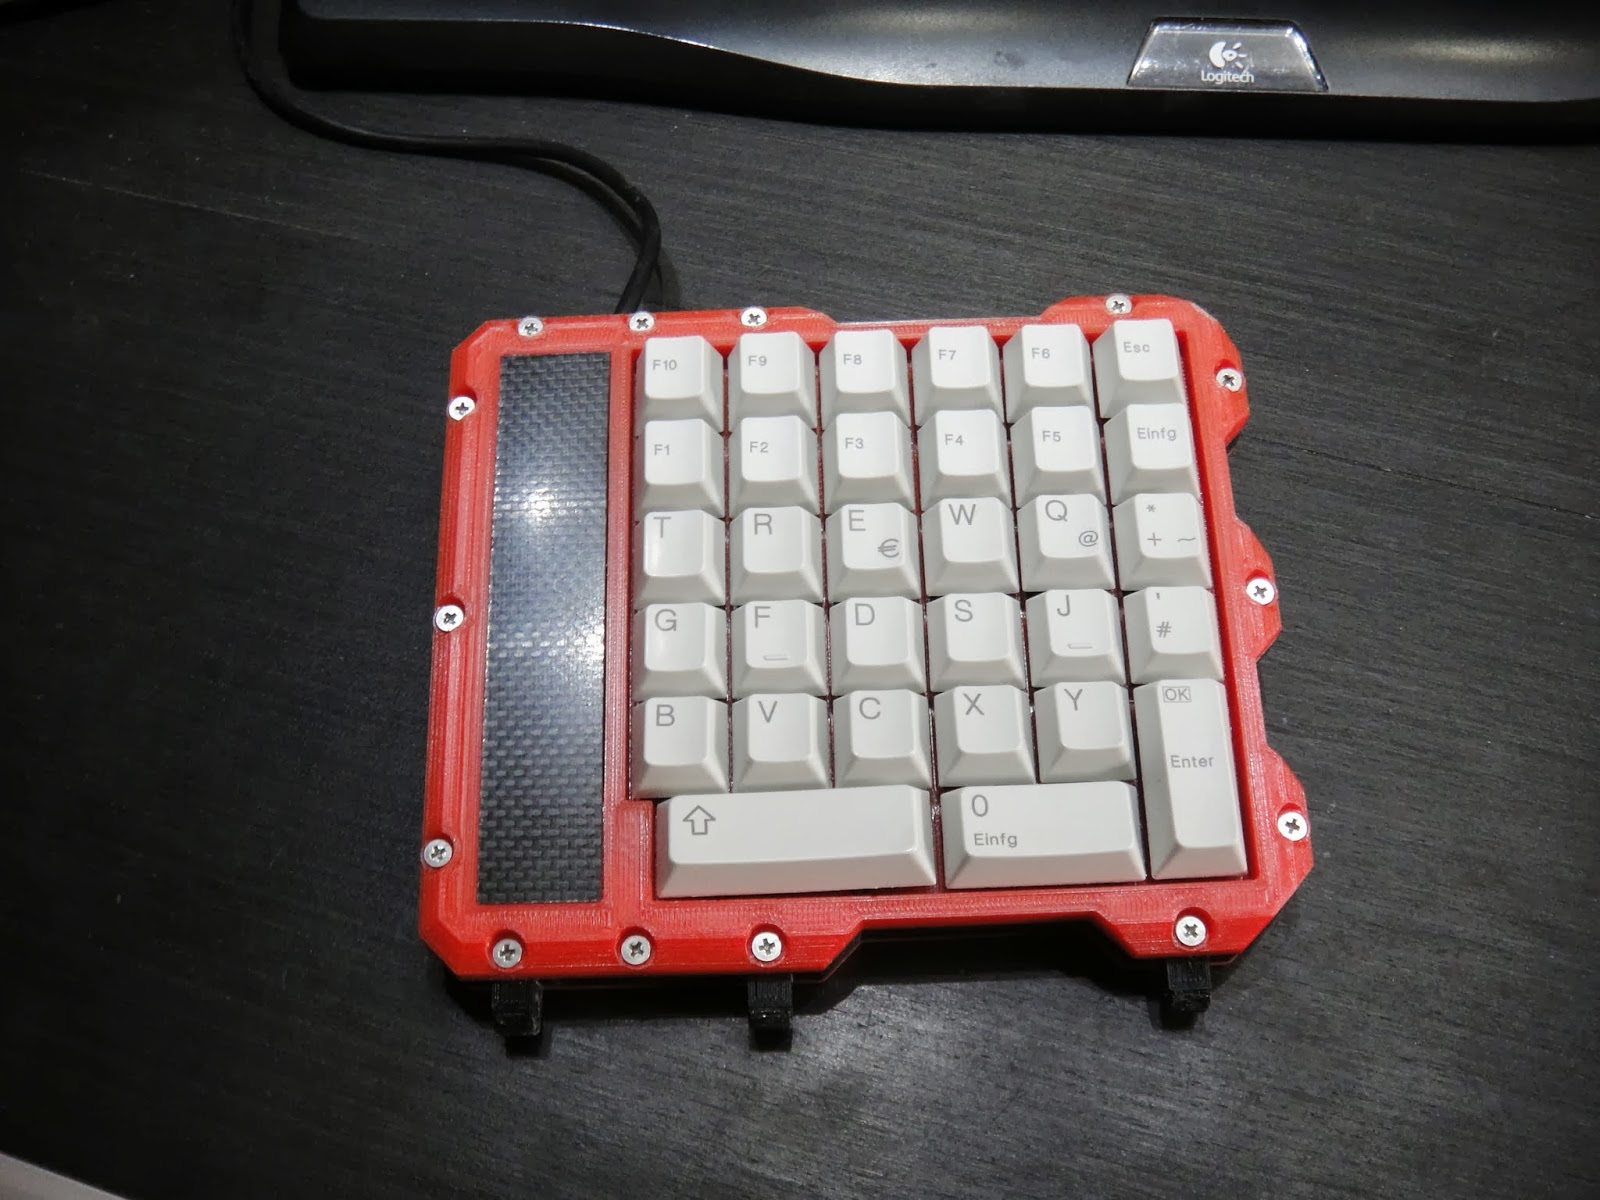
A month ago [Andreas] started playing Starcraft 2 again. As he was not comfortable with the default hotkeys on a normal keyboard, [Andreas] decided to build his own.

He started by salvaging keys from an old keyboard he had lying around, then 3D printed the case you see in the picture above to fit them. The keyboard electrical design is a simple matrix and it appears that he etched the PCB himself. To provide the required USB connectivity, the Atmega8U2 was chosen. It comes with a pre-programmed USB bootloader that [Andreas] chose to activate when the left key is pressed at the system startup. The HID class was implemented using the LUFA-USB Framework and the final product is definitely good looking.

All the files required to duplicate his design can be found here. You can also checkout another starcraft keyboard and an ergonomic keyboard that we previously featured.

Modifying The HC-05 Bluetooth Module Defaults Using AT Commands

The HC-05, a Bluetooth to serial bridge, can be found for around $5 on the internet and therefore may be the cheapest way to add Bluetooth connectivity to your project.

However, its default settings may need to be changed depending on your application. [Hazim] explains a way to enter the HC-05 AT command mode to benefit from the rich set of features that the device can provide. The process is fairly simple as it only consists of maintaining the key pin of the HC-05 high while powering on. The device then boots in AT command mode with a default 38400bits/s speed and listens for all of the AT command set (PDF). As an example [Hazim] provides a sketch allowing you to write the AT commands directly in your favorite terminal.

With the basics out of your way you may want to further research the hardware, especially if you will be using modules from different sources. They don’t always come with the same firmware.

A Weekend Trip To Verify General Relativity

8 years ago, for the 100th anniversary of the theory of relativity [Tom] decided to test the general theory of relativity.

As he was going to Mt Rainier (5400ft high) with his children for the weekend, he brought in his van 3 cesium clocks while leaving other atomic clocks at his home for comparison. The theory behind the test is that if you’re are at higher altitudes, then your speed (in a galactic coordinate system) is higher than the one you’d have at sea level and therefore time would go “slower” than at lower altitudes.

[Tom] brought 400 pounds of batteries, 200 pounds of clocks and left his car turned on during his 2 days stay in the ‘Paradise Lodge’. He used 120V DC to AC converters and chose to bring 3 cesium clocks to have a triple redundant  setup. When he came back home, he had the good surprise of finding a time difference of 23ns. This is a great application for those rubidium sources you’ve been scavenging.

[Thanks Indyaner via Reddit]

A Real Car Remote Controlled With An Arduino… What Could Go Wrong?

[Gilad] tipped us about his latest project, where he adds plenty of pneumatics and electronics into his wife’s car to remote control it.

The brake/throttle pedals are actuated by pistons controlled by electronic valves, and a standard DC motor is in charge of turning the wheel. The Arduino code tells us that the valves will be opened as long as the remote up/down channel is above/under given values. The frame is based on Festo aluminium profiles and we’re not sure where the mains used for the DC/DC converters is coming from.  As the valves use 24V and the motor 12V, standard N-Mosfets and power relays are used for voltage conversion. The remote controller [Gilard] used is actually 20 years old, so the output signal of the receiver isn’t actually really clean.

We do hope to never see this car on the road….

Tearing An Old Laptop Apart To Build A Ground Control Station

Being tired of assembling and disassembling parts/cables every time he went outside to fly his plane, [Elad] figured that he’d be better off building his own ground control station.

The core of the station is based on an old laptop with a broken screen he had laying around and (luckily) an older laptop screen he had found. As the latter only accepted LVDS, an adapter that could generate theses signals from the standard laptop’s VGA output was needed. [Elad] therefore disassembled his laptop and fit all the parts in a Pelican case he bought, as well as a lead-acid battery, a 12V to 19V stepup converter (to power the laptop), temperature/voltage/current sensors with their displays, 40mm fans, an AC/DC converter to charge the battery and finally a pico-UPS to allow uninterrupted use of the station when switching between power sources.

Because [Elad] didn’t have access to any machinery, PVC foam was used to maintain all the parts in place. Autonomy of his station is around 2.5hours on a single 12V 7Ah battery.

Building A ‘high-end’ USB Audio DAC

As [Jan-Erik] had already built a simple USB connected Digital-to-Analog Converter (DAC), he decided to make the high-end version of it.

The prototype you see in the picture above is based on:

  • the PCM2707C from Texas Instruments which takes care of the USB communication and outputs I2S audio data
  • the PCM1794A, a 132dB SNR 24-bit 192kHz DAC which receives I2S protocol
  • the OPA4134, a high performance audio operational amplifier

The on-board +3.3V and -5V voltages are generated by inductor-less power supplies. As [Jan-Erik] mentions in his write-up, the ‘high-end’ was put between single quotes because the PCB is single sided and uses through hole passive components. The board was designed using Kicad, etched by himself and put in a machined enclosure. All the production files can be downloaded from his website so you may produce it within a day.

Building An Ethernet Connected RFID Reader

For the last few years, [Lt_Lemming] was the president of Brisbane’s hackerspace. Until several months ago, access to the local was done using 125KHz RFID tags and an Arduino board with a prototyping shield. As the hackerspace gained members and moved to bigger facilities, [Lt_Lemming] decided to build himself a more compact and advanced platform.

His Simple NetworkAble RFID Controller (SNARC) is a platform which can be connected to an Ethernet network and different RFID readers in order to implement smart access control functionalities. Through hole components were selected so even solder apprentices may assemble it. The PCB was designed using Fritzing, and development can even be done inside the Arduino IDE as ISP and serial headers are available on the board. Finally, an N-channel mosfet controls the door locking mechanism.

The project is open hardware and software, and all the sources can be downloaded from [Lt_Lemming]’s github repo.