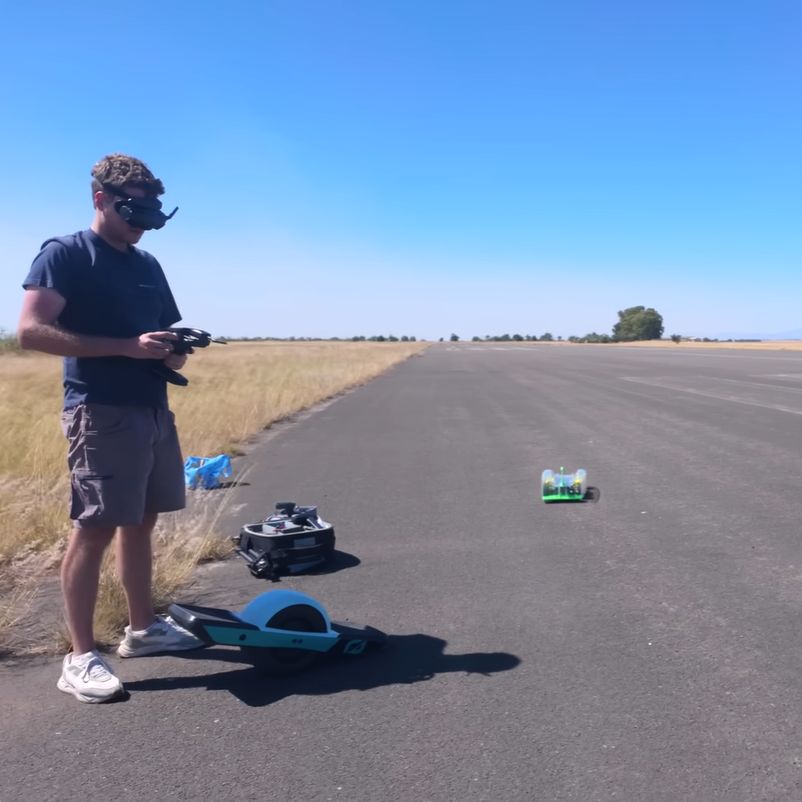
Raspberry Pi 500 And The Case Of The Missing M.2 Slot

Raspberry Pi just dropped the new Raspberry Pi 500, which like its predecessor puts the similarly named SBC into a keyboard. In a detailed review and teardown video, [Jeff Geerling] goes over all the details, and what there is to like and not like about this new product.

The new Raspberry Pi 500 with the new Raspberry Pi Monitor. (Credit: Jeff Geerling)

Most of the changes relative to the RP400 are as expected, with the change to the same BCM2712 SoC as on the Raspberry Pi 5, while doubling the RAM to 8 GB and of course you get the soft power button. As [Jeff] discovers with the teardown, the odd thing is that the RP500 PCB has the footprints for an M.2 slot, as seen on the above image, but none of the components are populated.

Naturally, [Jeff] ordered up some parts off Digikey to populate these footprints, but without luck. After asking Raspberry Pi, he was told that these footprints as well as those for a PoE feature are there for ‘flexibility to reuse the PCB in other contexts’. Sadly, it seems that these unpopulated parts of the board will have to remain just that, with no M.2 NVMe slot option built-in. With the price bump to $90 from the RP400’s $70 you’ll have to do your own math on whether the better SoC and more RAM is worth it.

In addition to the RP500 itself, [Jeff] also looks at the newly launched Raspberry Pi Monitor, a 15.6″ IPS display for $100. This unit comes with built-in speakers and VESA mount, but as [Jeff] notes in his review, using this VESA mount also means that you’re blocking all the ports, so you have to take the monitor off said VESA mount if you want to plug in or out any cables.

Continue reading “Raspberry Pi 500 And The Case Of The Missing M.2 Slot”

Debugging The UE1 Paper Tape Reader And Amplification Circuit

The tape reader and amplifiers mounted with the other UE1 modules. (Credit: David Lovett, YouTube)

After recently putting together the paper tape reader for his custom tube-based UE1 computer, [David Lovett] did get squiggles on the outputs, but not quite the right ones. In the most recent video, these issues are addressed one by one, so that this part of the UE1 1-bit computer can be called ‘done’. Starting off the list of issues were the odd readings from the photodiodes, which turned out to be due to the diodes being misaligned and a dodgy solder joint. This allowed [David] to move on to building the (obviously 6AU6 tube-based) amplifier for the photodiode output signals.

Much like the Bendix G-15’s tape reader which served as inspiration, this also meant adding potentiometers to adjust the gain. For the clock signal on the tape, a clock recovery PCB was needed, which should provide the UE1 computer system with both the clocks and the input data.

Using the potentiometers on the amplification board, the output signals can be adjusted at will to give the cleanest possible signal to the rest of the system, which theoretically means that as soon as [David] adds the permanent wiring and a few utility boards to allow the code to manipulate the tape reader (e.g. halt) as well as manual inputs. The UE1 computer system is thus being pretty close to running off tape by itself for the first time and with it being ‘complete’.

Continue reading “Debugging The UE1 Paper Tape Reader And Amplification Circuit”

Silicon Carbide May Replace Zirconium Alloys For Nuclear Fuel Rod Cladding

Since the construction of the first commercial light water nuclear power plants (LWR) the design of their fuel rods hasn’t changed significantly. Mechanically robust and corrosion-resistant zirconium alloy (zircalloy) tubes are filled with ceramic fuel pellets, which get assembled into fuel assemblies for loading into the reactor.

A 12' SiGa fuel assembly, demonstrating the ability to scale to full-sized fuel rods. (Credit: DoE)
A 12′ SiGa fuel assembly, demonstrating the ability to scale to full-sized fuel rods. (Credit: DoE)

Now it seems that silicon carbide (SiC) may soon replace the traditional zirconium alloy with General Atomics’ SiGa fuel cladding, which has been tested over the past 120 days in the Advanced Test Reactor at Idaho National Laboratory (INL). This completes the first of a series of tests before SiGa is approved for commercial use.

One of the main advantages of SiC over zircalloy is better resistance to high temperatures — during testing with temperatures well above those experienced with normal operating conditions, the zircalloy rods would burst while the SiC ones remained intact (as in the embedded video). Although normally SiC is quite brittle and unsuitable for such structures, SiGa uses a SiC fiber composite, which allows it to be used in this structural fashion.

Although this development is primarily part of the Department of Energy’s Accident Tolerant Fuel Program and its focus on melt-down proof fuel, the switch to SiC could also solve a major issue with zirconium, being its use as a catalyst with hydrogen formation when exposed to steam. Although with e.g. Fukushima Daiichi’s triple meltdown the zircalloy fuel rods were partially destroyed, it was the formation of hydrogen gas inside the reactor vessels and the hydrogen explosions during venting which worsened what should have been a simple meltdown into something significantly worse.

Continue reading “Silicon Carbide May Replace Zirconium Alloys For Nuclear Fuel Rod Cladding”

New Tullomer Filament Claims To Beat PEEK

Recently a company called Z-Polymers introduced its new Tullomer FDM filament that comes with a lofty bullet list of purported properties that should give materials like steel, aluminium, and various polymers a run for their money. Even better is that it is compatible with far lower specification FDM printers than e.g. PEEK. Intrigued, the folks over at All3DP figured that they should get some hands-on information on this filament and what’s it like to print with in one of the officially sanctioned Bambu Lab printers: these being the X1C & X1CE with manufacturer-provided profiles.

The world of engineering-grade FDM filaments has existed for decades, with for example PEEK (polyether ether ketone) having been around since the early 1980s, but these require much higher temperatures for the extruder (360+℃) and chamber (~90℃) than Tullomer, which is much closer (300℃, 50℃) to a typical high-performance filament like ABS, while also omitting the typical post-process annealing of PEEK. This assumes that Tullomer can match those claimed specifications, of course.

One of the current users of Tullomer is Erdos Miller, an engineering firm with a focus on the gas and oil industry. They’re using it for printing parts (calibration tooling) that used to be printed in filaments like carbon fiber-reinforced nylon (CF-PA) or PEEK, but they’re now looking at using Tullomer for replacing CF-PA and machined PEEK parts elsewhere too.

It’s still early days for this new polymer, of course, and we don’t have a lot of information beyond the rather sparse datasheet, but if you already have a capable printer, a single 1 kg spool of Tullomer is a mere $500, which is often much less or about the same as PEEK spools, without the requirement for a rather beefy industrial-strength FDM printer.

The £25,000 Tom Evans Pre-Amp Repair And A Copyright Strike

We were recently notified by a reader that [Tom Evans] had filed a copyright claim against [Mark]’s repair video on his Mend it Mark YouTube channel, taking down said repair video as well as [Mark]’s delightful commentary. In a new video, [Mark] comments on this takedown and the implications. The biggest question is what exactly was copyrighted in the original video, which was tough because YouTube refused to pass on [Mark]’s questions or provide further details.

In this new video the entire repair is summarized once again using props instead of the actual pre-amp, which you can still catch a glimpse of in our earlier coverage of the repair. To summarize, there was one bad tantalum capacitor that caused issues for one channel, and the insides of this twenty-five thousand quid pre-amp looks like an artistic interpretation of a Jenga tower using PCBs. We hope that this new video does stay safe from further copyright strikes from an oddly vengeful manufacturer after said manufacturer event sent the defective unit to [Mark] for a repair challenge.

Since this purportedly ‘audiophile-level’ pre-amplifier uses no special circuits or filtering – just carefully matched opamps – this is one of those copyright strike cases that leave you scratching your head.

Continue reading “The £25,000 Tom Evans Pre-Amp Repair And A Copyright Strike”

FlatMac: Building The 1980’s Apple IPad Concept

The Apple FlatMac was one of those 1980s concepts by designer [Hartmut Esslingers] that remained just a concept with no more than some physical prototypes created. That is, until [Kevin Noki] came across it in an Apple design book and contacted [Hartmut] to ask whether he would be okay with providing detailed measurements so that he could create his own.

Inside the 3D printed enclosure is a Raspberry Pi 4 running an appropriately emulated Macintosh, with a few modern features on the I/O side, including HDMI and USB. Ironically, the screen is from a 3rd generation iPad, which [Kevin] bought broken on EBay. There’s also an internal floppy drive that’s had its eject mechanism cleverly motorized, along with a modified USB battery bank that should keep the whole show running for about an hour. The enclosure itself is carefully glued, painted and sculpted to make it look as close to the original design as possible, which includes custom keycaps for the mechanical switches.

As far as DIY projects go, this one is definitely not for the faint of heart, but it’s fascinating to contrast this kind of project that’s possible for any determined hobbyist with the effort it would have taken forty years ago. The only question that’s left is whether or not the FlatMac would have actually been a practical system if it had made it to production. Although the keyboard seems decent, the ergonomics feel somewhat questionable compared to something more laptop-like.

Continue reading “FlatMac: Building The 1980’s Apple IPad Concept”

Ampere WS-1: The Other APL Portable Computer

When thinking of home computers and their portable kin it’s easy to assume that all of them provided BASIC as their interpreter, but for a while APL also played a role. The most quaint APL portable system here might be the Ampere WS-1, called the BIG.APL. Released in Japan in November of 1985, it was a very modern Motorola M68000-based portable with fascinating styling and many expansion options. Yet amidst an onslaught of BASIC-based microcomputers and IBM’s slow retreat out of the APL-based luggables market with its IBM 5110, an APL-only portable in 1985 was a daring choice.

Rather than offering both APL and BASIC as IBM’s offerings had, the WS-1 offered only APL, with a custom operating system (called Big.DOS) which also provided a limited a form of multi-tasking involving a back- and foreground task. Running off rechargeable NiCd batteries it could power the system for eight hours, including the 25 x 80 character LCD screen and the built-in microcassette storage.

Although never released in the US, it was sold in Japan, Australia and the UK, as can be seen from the advertisements on the above linked Computer Ads from the Past article. Clearly the WS-1 never made that much of a splash, but its manufacturer seems to be still around today, which implies that it wasn’t a total bust. You also got to admit that the design is very unique, which is one of the reasons why this system has become a collector’s item today.