DIY Furnace Smelts Magnetite Sand Into An Impressive Chef’s Knife

Some people order their raw materials from a factory, missing out on 99% of the fun… or suffering, we’re not sure which. To make that call, you need to look in on the process [IllyriaD] used to collect magnetite sand and turn it into a wicked-looking chef’s knife.

This began by collecting 150 pounds (!) of magnetic dirt from dry lake beds while hiking using a magnet pickup tool with release lever that he got from Harbor Freight. Several repeated magnetic refining passes separated the black ore from non-metallic sands ready for the furnace that he built. That is used to fire up the raw materials using 150 pounds of charcoal, changing the chemical composition by adding carbon and resulting in a gnarly lump of iron known as a bloom.

From there, it’s just a matter of beating the iron bloom into submission over at the anvil. [IllyriaD] details the process of flattening it out to a bar shape, then folding it over. Seven total folds are made for 128 layers, and in the gallery there’s a fantastic image that captures the striation when viewed on end. After being sharpened and polished, you can see where the bevel descends through those layers.

It’s delightful to see people working through the old ways and proving you don’t need a factory, as long as your true goal is to explore the process itself. Does this leave you wanting even more? [IllyriaD] left some insight about the process in the comments of the reddit thread. You probably also want to check out the tile-roofed hut built by [PrimitiveTechnology] without any modern tools.

AVR Configurable Custom Logic As A Frequency Divider At 4x Chip’s Clock Speed

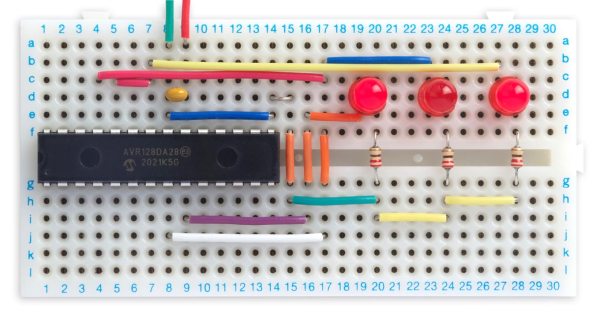
What a time to be alive when you can find inexpensive microcontrollers that come with programmable(ish) logic that can operate independently of the system clock. [David Johnson-Davies] recently built a proof of concept using the Configurable Custom Logic (CCL) that is available in some of the newer AVR microcontroller designs. It’s a simple implementation, a set of frequency dividers that blink three LEDs with up to a 90 MHz input signal. But the simplicity is the reason to love his write-up — you can wrap your head around it right away.

There are four lookup table (LUTs) used to form the frequency divider. Think of these like a NAND or XOR gate, but you get to decide how the output truth tables will perform. The output is fed into a sequencer which can be configured as a D/JK flip-flop or a D/RS latch, plus you can specify the signal edge, and of course define the clock source. An interesting trick here is to hold the G input of both D flip-flops high by feeding them LUTs set to all ones. Note that the output of the first divider (PA3) is feeding the external input (PD2) of the second divider.

While the CCL is configured using the C code you flash to the microcontroller, it’s a hardware peripheral capable of operating independent of the chip’s system clock. The AVR128DA28 that’s used here tops out at 24 MHz (double that if you use the PLL) but [David] got reliable results from his clock divider feeding a signal as high as 90 MHz to the input pin. Of course you have the option of feeding internal clock signals to the CCL, but that wouldn’t seem nearly as interesting here. For the demo, [David] is actually toggling an IO pin which is connected to PA2 as the external input for the logic. Make sure you click through to his write-up linked above as he does an excellent job of walking through the sample code (just a couple-dozen lines to set this all up). Here’s the datasheet for this chip (PDF, page 447 for pertinent registers) and for a deeper dive the appnote on CCL (PDF).

So what is this all good for? We already saw an answer to that question back in January when [SM6VFZ] used the CCL peripheral to build a software-defined switch-mode converter. How awesome is that?

Hackaday Podcast 108: Eulogizing Daft Punk Helmets, Bitcoin Feeling The Heat, Squeezing Soft Robots, And Motorizing Ice Skates

Hackaday editors Elliot Williams and Mike Szczys travel through the greatest hacks the week had on offer. Charge up your ice skates (literally) by adding spiked electric motors to push you across the frozen pond. If that’s too cold for early March, snuggle up with a good book under the warm light of a clever lamp made from a rotary-dial telephone. We discuss CAD and CAM in your browser, and a software tool to merge images with PCB gerber files. The episode wraps up with a discussion on the balance of quality versus speed when prototyping, and digesting the environmental impact of the Bitcoin network.

Take a look at the links below if you want to follow along, and as always, tell us what you think about this episode in the comments!

Direct download (~60 MB)

Places to follow Hackaday podcasts:

Continue reading “Hackaday Podcast 108: Eulogizing Daft Punk Helmets, Bitcoin Feeling The Heat, Squeezing Soft Robots, And Motorizing Ice Skates”

Volumetric OLED Display Shows Bladerunner Vibe, Curious Screen Tech

[Sean Hodgins] is out with his latest video and it’s a piece of art in itself. Beyond a traditional project show and tell, he’s spun together a cyberpunk vibe to premiere the volumetric display he built from an OLED stackup. Update: He’s also documented the build.

The trick of a volumetric display is the ability to add a third dimension for positioning pixels. Here [Sean] delivered that ability with a stack up of ten screens to add a depth element. This is not such an easy trick. These small OLED displays are all over the place but they share a common element: a dark background over which the pixels appear. [Sean] has gotten his hands on some transparent OLED panels and with some Duck-Duck-Go-Fu we think it’s probably a Crystalfontz 128×56 display. Why is it we don’t see more of these? Anyone know if it’s possible to remove the backing from other OLED displays to get here. (Let us know in the comments.)

The rest of the built is fairly straight-forward with a Feather M4 board driving the ten screens via SPI, and an MPU-6050 IMU for motion input. The form factor lends an aesthetic of an augmented reality device and the production approach for the video puts this in a Bladerunner or Johnny Mnemonic universe. Kudos for expanding the awesome of the build with an implied backstory!

If you can’t find your own transparent displays, spinning things are a popular trend in this area. We just saw one last week that spun an LED matrix to form cylindrical display. Another favorite of ours is a volumetric display that spins a helix-shaped projection screen.

New Contest: Data Loggin’

What are we gonna’ do with all this data? Let’s make it something fun! That’s the point of the just-launched Data Loggin’ contest. Do something clever to automatically log a data set and display it in an interesting way. Three winners will each receive a $100 Tindie gift certificate for showing off an awesome project.

One year of baby sleep patterns encoded by @Lagomorpho in a knitted blanket.

Data logging is often an afterthought when working on a project, but the way you collect and store data can have a big effect on the end project. Just ask Tesla who are looking at a multi-thousand-dollar repair process for failing eMMC from too much logging. Oops. Should you log to an SD card? Internet? Stone tablets? (Yes please, we actually really want to see that for this contest.) Make sure to share those details so your project can be a template for others to learn from in the future.

Next, consider Schrodinger’s dataset: if the data is never used does it actually exist? Grab some attention with how you use this data. That automatic donut slicer you built can be used to slice up a tasty pie-chart of the minutes you spent on the elliptical this week. Your energy consumption can be plotted if you connect that OpenCV meter reader up to your favorite cloud service to visualize the data or a NodeRED dashboard if you’d rather keep things local. You could also make some of that data permanent, like this blanket that encoded baby’s sleep patterns in the colors.

You probably already have something harvesting data. Here’s the excuse you need to do something silly (or serious) with that data. Tells us about it by publishing a project page on Hackaday.io and don’t forget to use that “Submit Project To” menu to add it to the Data Loggin’ contest.

Bottle Filler Perfectly Tops Your Cup

You know those bottle fillers at schools and airports? What if you had one of those at home?

We know what you’re going to say: “My fridge has one of those!” Well ours doesn’t, and even though [Chris Courses’] fridge did, his bottle of choice didn’t fit in the vertically-challenged water and ice hutch, nor did it fill autonomously. The solution was to build a dubiously placed, but nonetheless awesome custom bottle filler in his kitchen.

The plumbing for the project couldn’t be more straight-forward: a 5-year undersink water filter, electronically actuated valve, some tubing, and a T to splice into the existing water line going to the fridge. Where the rubber hits the road is making this look nice. [Chris] spends a lot of time printing face plates, pouring resin as a diffuser, and post processing. After failing on one formulation of resin, the second achieves a nice look, and the unit is heavily sanded, filled, painted, prayed over, and given the green light for installation.

For the electronics [Chris] went for a Raspberry Pi to monitor four buttons and dispense a precise allotment tailored to each of his favorite drinking vessels. While the dispenser is at work, three rows of LEDs play an animated pattern. Where we begin to scratch our heads is the demo below which shows there is no drain or drip tray below the dispenser — seems like an accident waiting to happen.

Our remaining questions are about automating the top-off process. At first blush you might wonder why a sensor wasn’t included to shut off the filler automatically. But how would that work? The dispenser needs to establish the height of the bottle and that’s a non-trivial task, perhaps best accomplished with computer vision or a CCD line sensor. How would you do it? Continue reading “Bottle Filler Perfectly Tops Your Cup”

Hackaday Podcast 107: FTDI Plays Music, LED Dimming Ain’t Easy, Measuring Poop Calories, And Sketchy Laser Cutters

Hackaday editors Mike Szczys and Elliot Williams gab about all of the geeky things. We had a delightful time watching NASA bring Perseverance down to the Red planet. In Kristina’s words, we pour one out for Fry’s Electronics. And then we jump into a parade of excellent hacks with a magnetic bearing for crooked ball screws, a science-based poop-burning experiment, and the music hack only microcontroller enthusiasts could love as an FTDI cable is plugged directly into a speaker. Smart circuit design is used to hack a dimmer into non-dimmable LED fixtures, and an octet of living clams are the early warning sensors for water pollution.

Take a look at the links below if you want to follow along, and as always, tell us what you think about this episode in the comments!

Direct download (~60 MB)

Places to follow Hackaday podcasts:

Continue reading “Hackaday Podcast 107: FTDI Plays Music, LED Dimming Ain’t Easy, Measuring Poop Calories, And Sketchy Laser Cutters”