Toroid Winding Cheat

When you need a toroid the easiest source is often to wind it yourself. The problem being that placing a few hundred windings around a ferrite ring is a real drag, especially if you have to make several of them. This cheat developed by [Jim W.] will save a lot of time. He cuts the ring in half for the winding and reassembles it afterward.

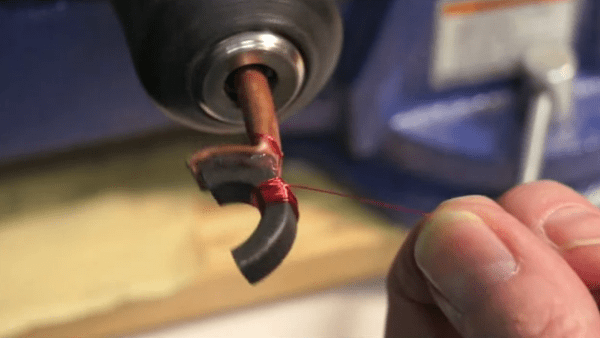
Here you can see that he has half of the core mounted in a drill chuck. To get to this point he scored the ferrite before clamping half in a vice and whacking the extruding half with a block of wood and a hammer. He hasn’t found a perfect solution for scoring the material (a utility knife or a triangular file both work but have drawbacks). Leave a comment if you’ve got any bright ideas.

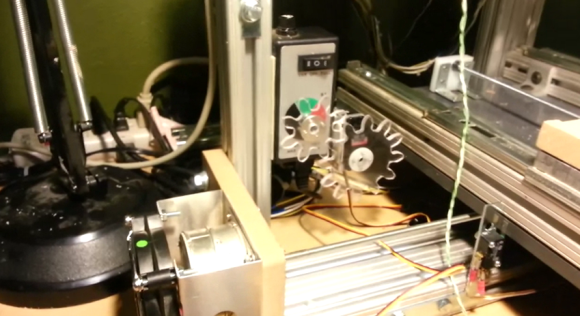
Once the core is in two pieces he used some copper pipe with one end flattened and bent to the shape of the ring segment. With it hot glued in place he takes it for a spin (shown in the clip after the break). Once the windings are done a bit of super glue recombines the halves. This sort of thing is great for monitoring power use.

Continue reading “Toroid Winding Cheat”

Hackaday Links: Valentine’s Day, 2013

It’s not too late to hack your own Valentine’s day gifts. Here’s four projects to get you headed in the right direction.

Heart-shaped box

links-hear-giftbox

[Ian] built what he calls the Valentine’s gift bomb. It’s a cigar box with this LED heart on the top. A servo motor latches the lid from the inside and won’t open until the thing goes off on the big day. (sorry, no link to this one as he just sent us the pictures found after the break).

A Blinky Bouquet

links-led-flowers

[Ryan] shows us how to make a felt bouquet and then light things up with some LEDs.

Pictures in a bottle

links-valentines-bulb

Reuse that old incandescent bulb by adding LEDs and heart-shaped pictures inside the glass enclosure.

Robot love

links-valentines-robot

This cocoa container turned robot cat calls, raises its eyebrows, and blinks the LEDs eyes when she presses the button on top.

Continue reading “Hackaday Links: Valentine’s Day, 2013”

Roll Your Own LoJack Clone

diy-lojack

If you’ve ever worried about your car getting stolen this hack can help give you some piece of mind. It’s a cellular enabled geolocation device. These things have been in use for some time, the most common brand we know of is the LoJack. That company gives you a little box to install on the vehicle and if it ever goes missing they can grab the coordinates and forward them to the authorities. This custom version builds a lot into an addon board for an EFM32 board.

The image above shows the main components of the add-on: the GPS module and the GSM modem. Along the top edge of the board is the voltage regulator circuits which aim to keep the standby power to the slightest of trickles so as not to drain the car’s battery. What you can’t see is the SIM card slot which is located on the underside.

You can find the Eagle files for the design at the link above. We’ve embedded the video description of the project after the break.

Continue reading “Roll Your Own LoJack Clone”

Wall-wart Retrofitted With A High-power LED Supply Circuit

high-power-LED-wall-wart-supply

This custom circuit board picks up some of the pieces from a wall wart to drive a high-power LED.  The basic concept is to keep the high-voltage components and swap out the low voltage ones for parts that will be able to drive the 10W load.

The PCB is custom designed, but you can see that it was shaped to match the wall wort’s original board. To the right is the original 500mA transformer. The low-voltage side uses an LM393 because of its dual-comparators. This provides feedback for both current and voltage and is a perfect compliment for the TOP242. We haven’t seen that part before, but [Mincior] says that it’s nice for this application as it has safety features that lock down the chip if power or temperature are above spec. Once the replacement is nestled inside of the plastic case it looks stock and makes sure that your custom LED fixtures will stand the test of time safely.

X-Labs Hackerspace Completes A Big 2-year Tesla Coil Build

It’s a bit difficult to estimate the size of the Tesla coil from this picture, but look closely at the hand rail on the red-orange wall to the left and that helps. The 10-foot tall musical Tesla Coil project has been on-going for about two years. But the team at X-Labs — a hackerspace affiliated with the University of South Florida — finished it just in time for the University’s engineering expo later in the month. There’s some information about it to be found in the recent student newspaper article on the project. A lot more build details are found on the groups website, although that post is quite old.

You can’t call it a musical coil unless there’s a demo video, and that can be seen after the jump. What better to test the thing than by playing the Super Mario Bros. theme? We’re actually more partial to the Imperial March (it’s also fun to hear played on stepper motors).

Continue reading “X-Labs Hackerspace Completes A Big 2-year Tesla Coil Build”

Lord Vetinari’s Clock Strikes Again

vetinari

Inspired by the maddening timepiece from Discworld, this clock keeps time, but anyone watching the seconds tick by may be mentally unstable for it. [Renaud Schleck] built the stuttering clock using very few components. He undertook the build after being inspired by the version which [Simon Inns] built.

The clock itself is a run-of-the-mill item which uses one battery to keep time. We’re always impressed by how these dirt-cheap things remain so accurate over the long haul — but we digress. The method of attack uses coil injection to drive the hands. [Renaud] used one of the microcontrollers from the MSP430 Launchpad, along with the clock crystal which also shipped with the kit, to gain control of the mechanism. The crystal triggers an interrupt which does the actual time-keeping. The seconds hand is driven rather sporadically based on an algorithm explained in his write-up.

You can watch the uneven ticking in the video after the break. Despite that visually disturbing functionality, the short and long ticks balance each other and the correct time continues to be displayed.

Continue reading “Lord Vetinari’s Clock Strikes Again”

Add Speed Control To A DIY CNC Machine

adding-speed-control-to-diy-cnc

[Jesse Merritt] bought a manual speed controller for his router. It’s used in the CNC mill he build and he figured, why not add the ability for the computer to control the speed.

The speed controller is a $20 unit from Harbor Freight. It comes with an On/Off switch and knob which adjusts the power going to the router. [Jesse] pulled off the knob and milled a gear which takes its place. The second gear is attached to the horn of a hobby servo mounted on the side of the speed controller. The video after the break demonstrates an Arduino driving the servo based on a potentiometer input as well as commands from the CNC controller board he’s using.

Design files for the gears and the Arduino code which drives the servo is available from his Github repository.

Continue reading “Add Speed Control To A DIY CNC Machine”