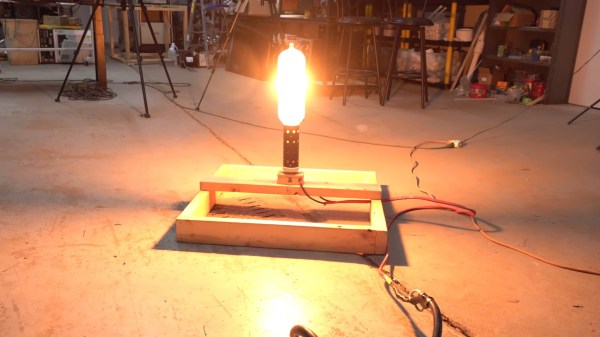
Over on YouTube [Drake] from the [styropyro] channel investigates what happens when you take an enormous tungsten incandescent light bulb and pump 30,000 watts through it.
The answer: it burns bright enough to light up the forest at night, and hot enough to cook food and melt metal. And why on Earth would anybody do such a thing? Well [Drake] said it was because he wanted to outdo [Photonicinduction] who had already put 20,000 watts through a light bulb. Nothing like a little friendly competition to drive… progress?
In many ways, living here in the future is quite exiting. We have access to the world’s information instantaneously and can get plenty of exciting tools and hardware delivered to our homes in ways that people in the past with only a Sears catalog could only dream of. Lasers are of course among the exciting hardware available, which can be purchased with extremely high power levels. Provided the proper safety precautions are taken, that can lead to some interesting builds like this laser harp which uses a 3W laser for its strings.
[Cybercraftics]’ musical instrument is using a single laser to generate seven harp strings, using a fast stepper motor to rotate a mirror to precise locations, generating the effect via persistence of vision. Although he originally planned to use one Arduino for this project, the precise timing needed to keep the strings in the right place was getting corrupted by adding MIDI and the other musical parts to the project, so he split those out to a second Arduino.
Although his first prototype worked, he did have to experiment with the sensors used to detect his hand position on the instrument quite a bit before getting good results. This is where the higher power laser came into play, as the lower-powered ones weren’t quite bright enough. He also uses a pair of white gloves which help illuminate a blocked laser. With most of the issues ironed out, [Cybercraftics] notes that there’s room for improvement but still has a working instrument that seems like a blast to play. If you’re still stuck in the past without easy access to lasers, though, it’s worth noting that there are plenty of other ways to build futuristic instruments as well.
Whilst microwave plasmas are nothing new around here, we were curious to see what happens at 20x the power, and since YouTuber [Styropyro] had put out a new video, we couldn’t resist seeing where this was going. Clearly, as your bog standard microwave oven can only handle at most one kilowatt; the ‘oven’ needed a bit of an upgrade.
A 16 kW water-cooled magnetron. Why not over-drive it to 20 kW for fun?
Getting hold of bigger magnetrons is tricky, but as luck — or perhaps fate — would have it, a 16 kW, water-cooled beast became available on eBay thanks to a tip from a Discord user. It was odd but perhaps not surprising that this Hitatch H0915 magnetron was being sold as a ‘heat exchanger.’
[Styropyro] doesn’t go into much detail on how to supply the anode with its specified 16 kW at 9.5 kVDC, but the usual sketchy (well down-right terrifying) transformers in the background indicate that he had just what was needed kicking around the ‘shop. Obviously, since this is a [Styropyro] video, these sorts of practical things have been discussed before, so there is no need to waste precious time and get right on to blowing stuff up!
Some classic microwave tricks are shown, like boiling water in five seconds, cooking pickles (they really do scream at 20 kW) and the grape-induced plasma-in-a-jar. It was quite clear that at this power level, containing that angry-looking plasma was quite a challenge. If it was permitted to leak out for only a few seconds, it destroyed the mica waveguide cover and risked coupling into the magnetron and frying it. Many experiments followed, a lot of which seemed to involve the production of toxic brown-colored nitrogen dioxide fumes. It was definitely good to see him wearing a respirator for this reason alone!
Is it purple or is it indigo? Beauty is in the eye of the beholder!
The main star of the demonstration was the plasma-induced emissions of various metal elements, with the rare indigo and violet colors making an appearance once the right blend of materials was introduced into the glassware. Talking of glassware, we reckon he got through a whole kitchen’s worth. We lost count of the number of exploded beakers and smashed plates. Anyway, plasma science is fun science, but obviously, please don’t try any of this at home!
While EV charging isn’t that tedious with a cable, for quick trips, being able to just park and have your car automatically charge would be more convenient. Researchers from Oak Ridge National Lab (ORNL) and VW have moved high-speed wireless EV charging one step closer to reality.
We’ve seen fast wireless EV chargers before, but what sets this system apart is the coil size (~0.2 m2 vs 2.0 m2) and the fact it was demonstrated on a functioning EV where previous attempts have been on the bench. According to the researchers, this was the first wireless transfer to a light duty vehicle at 270 kW. Industry standards currently only cover systems up to 20 kW.
The system uses a pair of polyphase electromagnetic coupling coils about 50 cm (19″) wide to transfer the power over a gap of approximately 13 cm (5″). Efficiency is stated at 95%, and that 270 kW would get most EVs capable of those charge rates a 50% bump in charge over ten minutes (assuming you’re in the lower part of your battery capacity where full speeds are available).
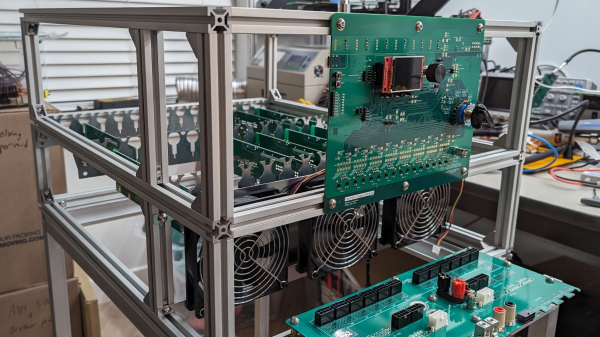
[tinfever] needed a high-power benchtop electronic load for an upcoming project, and by their own admission decided foolishly to build their own. And we’re glad they did. The thing is, whilst this isn’t exactly a super-cheap project to build, buying a commercial offering with a capability of 10 kW and up to 30 kW pulsed, is going to cost an absolute fortune.
A selection of small resistors
Built inside a cubic frame using what appears to be standard 2020 aluminum rails and fixturing, the modular construction is nice and clean, with plenty of space around the load boards to allow the cooling air to circulate.
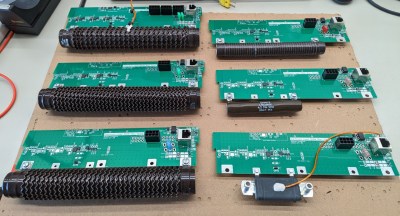
The operating principle is very simple; custom PCBs act in parallel to provide any load needed, by switching in the on-board load resistor. Each load board handles all the details of switching and dumping the power due to the inductance in the system wiring and the wire-wound resistors themselves.
Whilst we know that wire-wound resistors are reverse-wound to minimize inductance, there will still be some, and each load board will contribute a little more when the whole system is scaled up. Also, each load PCB handles its own temperature sensing, and current measurement passing these data off to the control PCB. A front-end connector PCB provides a variety of connection options to interface to the DUT (Device Under Test.) The system controller is based around an STM32 processor which deals with quite a lot more than you might think is needed on a first look.
The sense currents from each load need to be sensed, scaled, and summed to keep the overall load accuracy within the 1% spec. Also, it is on duty for PWM control of the cooling fans, handling the user interface, and any other remote connectivity. There are a lot of details on the project page, as we’re only skimming the surface here. If you’re interested in building an active load, this is a project you really should be digging into.
We shall watch with interest for when [tinfever] scales up this eight-slot prototype to the full specification of 52 stages! When working with power applications, there comes a point when you really need an electronic load, and to that end, here’s one with a very specific use case to get you started.
There is also the option of buying something cheap from the usual sources and hacking on some custom firmware to adapt it a little to your needs.
Despite the increasing popularity of various electric vehicles, the limits of battery technology continue to be a bottleneck in their day-to-day use. They don’t behave well in extreme temperatures, they can wear out quickly, and, perhaps most obviously, charging them is often burdensome. Larger batteries take longer to charge, and this can take a lot of time and space, but this research team from Chalmers University are looking to make this process just a little bit easier.
The group has been developing an inductive wireless charging method for large vehicles including cars, trucks, busses, and ferries that can deliver 500 kW across a 15 cm (6 inch) air gap. The system relies on a silicon carbide semiconductor and extremely thin copper wire in order to make all this happen, and eliminates the need for any human involvement in the charging process. This might not be too much of a hassle for plugging in an electric car, but for larger vehicles like busses and ferries traditional charging methods often require a robot arm or human to attach the charging cables.
While this technology won’t decrease the amount of time it takes batteries to charge, it will improve the usability of devices like these. Even for cars, this could mean simply pulling into a parking space and getting the car’s battery topped off automatically. For all the talk about charging times of batteries, there is another problem looming which is that plenty of charging methods are proprietary as well. This charger attempts to develop an open-source standard instead.
Control boards for 3D printers are a dime a dozen on the usual online marketplaces, and you usually get what you pay for. These boards can burn down your house thanks to a few terrible design choices. [Scott Rider] aka [Crow] took a look at the popular Melzi board, and what he found was horrifying. These boards overheat right at the connector for the heated bed, but the good news is these problems are easily fixed.
The Melzi board has a few problems with its PCB design. The first and most glaring issue is the use of thermals on the pads for the heated bed connector. In low-power applications, thermals — the method of not connecting the entire top or bottom layer to a hole or pad — are a great idea. It makes it easier to solder, because heat isn’t transmitted as easily to the entire copper layer. Unfortunately, this means heat isn’t transmitted as easily to the entire copper layer. In high-power applications, like a connection to a heated bed, these thermals can heat up enough to melt a plastic connector. Once that happens, it’s game over.
Other problems were found in the Melzi board, although you wouldn’t know it just by looking at the Eagle file of the PCB. [Scott]’s Chinesium Melzi board used 1-ounce copper, where 2-ounce copper would be more appropriate. The connector, too, should be rated above the design power loading.
[Scott] made a few tweaks to the board and also added a tiny DS1822Z temperature sensor to the high-current area of his version of a Melzi. Imagine that, 3D printer electronics with a temperature sensor. Slowly but surely, the state of 3D printer electronics is clawing its way to the present.