Air Harp Using The Leap Motion

leap-motion-air-harp

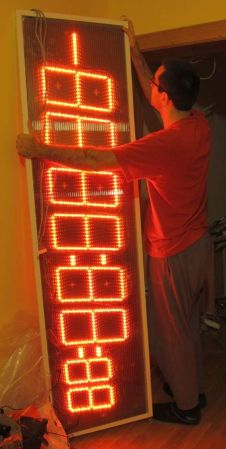
He’s just pointing in this image, but this Air Harp can be played using many fingers as once. It’s a demonstration which [Adam Somers] threw together in one weekend when working with the Leap Motion developer board. We first heard about this slick piece of hardware back in May and from the looks of it this is every bit as amazing as first reported.

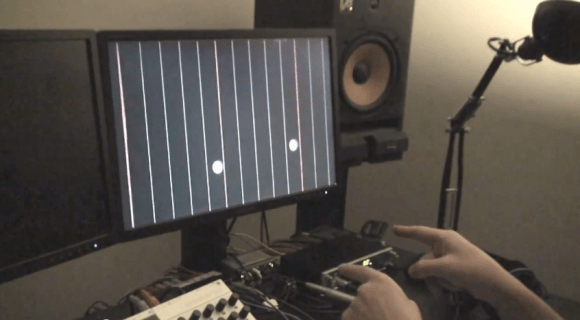
Part of what made the project come together so quickly is that [Adam] had already developed a package called muskit. It’s a C++ toolkit for making music applications. It puts the framework in place what we hear in the video after the break. The weekend of hacking makes use of the positional data from the Leap Motion and handles how your digits interact with the virtual strings. You can watch as [Adam] adds more and more strings to the virtual instrument for his finger to interact with. The distance from the screen is what decided is your finger will pluck or not. This is indicated with a red circle when your fingertip is close enough to interact with the phantom string.

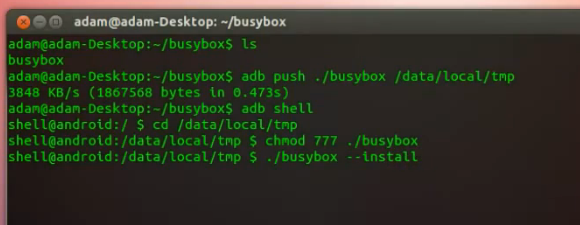
Get your hands on the code from his repositories.

Continue reading “Air Harp Using The Leap Motion”

Common Linux Tools On Android Without Root By Installing BusyBox

[Adam Outler] shows us how to expand the Linux tools available on Android without rooting the device. He does this by installing BusyBox. The binary is copied to the device using the Android Developer Bridge. He then opens an ADB shell, adds execution permissions to the binary, and runs it. BusyBox calls itself the Swiss Army Knife of Embedded Linux. It provides a set of very common tools which you’ll find useful in your tinkering. The one that [Adam] shows off in his video is the vi editor, but the basics that make a shell work are all there like: ls, mkdir, grep, dmesg, mount… you get the point.

So what are you going to do with your unrooted device now that you have these commands at your disposal? That’s really for you to figure out. [Adam] continues his demonstration by installing a package that does require root access. It’s BotBrew Basil, which adds apt-get and a few more complex packages. He then uses vi to write a C++ Hello World program, then compiles it and runs it. So if you’re looking to do some development on your phone this is one way.

Continue reading “Common Linux Tools On Android Without Root By Installing BusyBox”

Building A Pirate Cannon For Fun And Plunder

Our days by the pool are behind us for the year. But playing pirate ship with a 2-year-old does sound like quite a bit of fun. That’s why [The Stone Donkey] built this pirate cannon prop complete with firing sounds.

The simplicity of the design is pretty brilliant. Three segments of PVC and five fittings make for a realistic looking barrel that won’t throw your back out when you pull this one out for playtime. After some cutting and gluing the entire thing was sprayed with matte black paint. The bit of rope wrapped around the barrel is a nice touch. The base was made with some scrap pine, but it’s that little wooden box on top that makes it really special. It is the fuse box, and a tap of the finger gives a burning fuse sound and video followed by an earth-shattering kaboom. [The Stone Donkey] used his old Droid X Android phone and wrote an app for it that puts on the sound and light show. Take a look in the clip after the break.

Continue reading “Building A Pirate Cannon For Fun And Plunder”

Simplifying Fabrication Of Soft Robots

Soft robots are a peculiar wing of technology. They don’t use frames and motors for locomotion, but as the name implies they are made of soft materials. They move by pumping fluid — it could be air or liquid — in and out of bladders that push or pull against the body itself. [Matthew] points out that fabricating soft robots has traditionally been a time-consuming and difficult task. He’s trying to make it easier by 3D printing molds into which soft robots can be cast. This way the parts can be designed in CAD, converted to a mold design, and pushed to a 3D printer.

The object with which he’s been testing the technique functions like an octopus tentacle. The image at the bottom left illustrates the internal structure, with rings separated to allow the appendage to flex, and tubes running parallel to the appendage to provide the force needed to bend it. Above that image you can see one of the molds that was used, and the final product is on the right. The video after the break shows a demonstration of this bending left and right as air is pumped in using the bulb of a blood pressure cuff (or Sphygmomanometer for those paying attention).

Continue reading “Simplifying Fabrication Of Soft Robots”

DCF77 Signal Filtering And Decoding

dcf77-filtering-and-decoding

[Udo] decided to build a clock using the DCF77 radio module seen above. This of course has been done before: the hardware draws a clock signal from the atomic clock in Braunschweig, Germany. So he grabbed a library for Arduino and got to work. But he was getting rather poor results and upon further investigation realized that the library had been written for 20 Hz modules and his operates at 300 Hz. This means better accuracy but the drawback is that the hardware is more susceptible to noise.

So began his journey to filter, process, and decode the DCF77 protocol. That link goes to the project overview. It will be in several parts all of which will be linked on that page. So far he has applied a low-pass filter and coded some exponential smoothing. He has yet to write the other four parts, but does mention that early testing shows that this technique will make the reception better than what is achieved with commercially available clocks. He was able to lock onto a signal that had more than 80% noise ratio. That’s impressive!

Just want to see a clock that uses a DCF77 module? Check out this PIC-based atomic clock.

Clock Display Taller Than You Is Just What Your Living Room Has Been Missing

huge-countdown-clock

Sure, it’s time to get the countdown clocks ready to ring in the new year, but why limit it to just one night? If you end up building a six-foot digital display you can count down trivial events; like the remaining seconds of freedom before you have to pimp yourself out in that drab cubicle.

This seven-segment display is homemade and boasts six full-sized digits and two smaller digits with each pair separated by colons. You have probably already guessed that the construction was greatly simplified by using LED strips rather than individual components. This is part of the reason for the size of the display. The strips can be cut, but only down to a minimum of 3 LEDs per segment. That explains the small digits, with their larger siblings doubled in size. But there is a benefit to this constraint, it means that current limiting is already taken care of for you.

The main assembly is a wooden frame surrounding two polycarbonate sheets. The LED strips are sandwiched between those sheets, with segment and digit driver buses exiting a one point on the side. The build doesn’t detail a driver for the display but it shouldn’t be hard to find a multiplexing example that will serve the purpose.

A Study Of GCC And The TI Stellaris

hard-look-at-stellaris-and-gcc

There are several things that we really like about the TI Stellaris. We think the peripheral library — called Stellarisware — has a pretty intuitive API that makes it easy to get into. But we’re also quite impressed that the software comes with makefiles that build the libraries and examples using your own GCC cross compiling toolchain. We spent quite a bit of time pawing through those makefiles and the makedefs settings file to figure out how TI was doing things. Now if you don’t want to do that sleuthing yourself you can head on over to the GCC with TI Stellaris Launchpad guide which [Brandon] just published.

Shown above is the helpful chart of compiler flags which he pulled from the files with his added comments on what each does. He did the same for the linker flags, and then discusses the program calls made during compilation and linking. He then delves into how the driver library on the chip’s ROM can be accessed in code. This is just the first in a four-part series he plans to write. We can’t wait to see what he has to say about the hardware FPU as we haven’t had time to explore that for ourselves quite yet.