Robot Stroller Lets Baby Steer Without Mowing Down Other Toddlers

We’ve seen strollers and car seats that have a steering wheel for the baby to play with (like in the opening of The Simpsons). But what we hadn’t seen is a stroller that allows baby to actually steer. You might think that a putting a motorized vehicle in the hands of someone so young is an accident waiting to happen. But [Xandon Frogget] thought of that and used familiar hardware to add some safety features.

The stroller seen above is a tricycle setup, making it quite easy to add motors to the two rear wheels. These are controlled by a tablet which you can see nestled on the canopy of the stroller (look for the light reflected on the glass). This interfaces with two Kinect sensors, one pointing forward and the other pointing back. They continually scan the environment, looking for obstacles in the stroller’s path. You can see [Xandon’s] little girl holding a Wii Wheel, which connects with the tablet to facilitate steering. A test run at the playground is embedded after the break.

Continue reading “Robot Stroller Lets Baby Steer Without Mowing Down Other Toddlers”

Developing A Thermostat For A Heat Pump That Only Has A Timer

The heat pump which cools [Chris LeBlanc’s] home lacks the sort of control he was looking for. It’s just got a timer, which switches it off automatically. He wanted to the ability to schedule the cooling cycle like you would with a thermostat-driven arrangement. He ended up build his own controller to automate the cooling process.

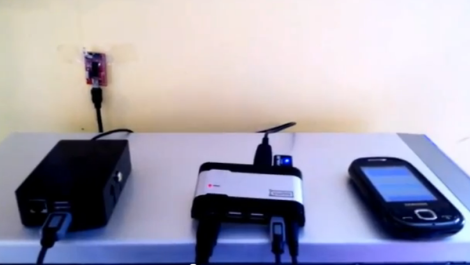
The heat pump came with an IR remote control which provides the access point for the project. [Chris] set out to emulate the remote protocol which saved him the trouble of having to crack open the unit and wire in a controller. He went with the IR Toy from Dangerous Prototypes as this device is able to record and transmit IR signals — it’s basically a universal remote for your USB port. His Raspberry Pi, seen to the left, controls the system. It’s connected to the red IR Toy board via a USB hub which is used to interface a WiFi dongle as well. The system works alongside Google Calendar to allow [Chris] to schedule his home’s cooling just by adding an appointment. A Python script queries the calendar, then selects and sends the appropriate IR command. He shows off the build in the clip after the break.

Continue reading “Developing A Thermostat For A Heat Pump That Only Has A Timer”

Heat-seeking Firebot Drowns Out The Flames

This robot can find and extinguish fires automatically. It is the culmination of an Embedded Design class project from last school year. [Dan] and his classmates developed a turret that holds both a spray nozzle and heat sensor which would be a fantastic building block for a real-life tower defense game.

The jewel of the sensor array is a TPA81 thermopile array. Note the use of the term ‘array’ in the name. This is more like eight temperature sensors aligned with each other. By monitoring them all, the direction from which the most heat is coming can be determined. Once it’s zeroed in on the fire getting water to the right place can be a difficult task. That’s where the other sensors come into play. An accelerometer allows the bot to determine the angle of the spray nozzle (a weed sprayer was used in this case). An ultrasonic range finder and few algorithms let the Arduino which drives it all make sure that the arc of the water lands on the hot spot. This is all shown quite clearly in the clip below the jump.

Continue reading “Heat-seeking Firebot Drowns Out The Flames”

Nikon WU-1a WiFi Dongle Hacking

Here’s a pretty tricky piece of consumer electronics reverse engineering. [Joe Fitz] came across the Nikon WU-1a. It’s a dongle that plugs into a Nikon D3200 camera, producing a WiFi connection which can be picked up and controlled from a smart phone. The app shows you the current image from the viewfinder, allows you to snap the picture, then pulls down the picture afterwards. The problem is that the same functionality for his D800 camera will cost him $1200, when this dongle can be had for $60. That’s a powerful incentive to find a way to use the WU-1a with his camera model. This is more than just rerouting some wires. It involves sniffing the USB traffic and drilling down in the datasheets for the chips used in the hardware. We’re not certain, but he may have even rolled new firmware for the dongle.

Details are a bit scarce right now. Your best bet is to watch the video embedded after the break. There is also a set of slides which [Joe] put together for a talk at this weekend’s BsidesPDX. It will give you a general overview of the process he went through. But he also started a forum thread and we hope to learn much more from that as the conversation gets going.

Continue reading “Nikon WU-1a WiFi Dongle Hacking”

Scripting To Automate Your Mindless Android Games

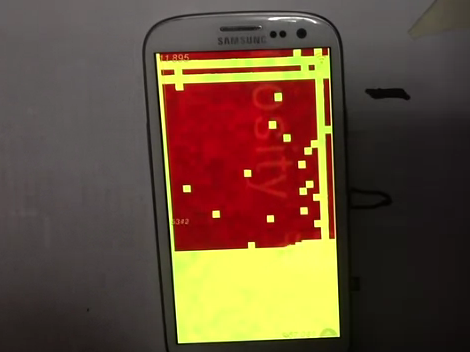
There’s a silly little Android game making some noise on the Interwebs. It’s called Curiosity which is a 3D cube with something inside. The thing is, every single pixel on the cube must be clicked in order to get through a layer. There are of course multiple layers, and… well, you get the point. [Stephen] figures this is a perfect thing for a bit of scripting and set out to find a way to automatically play the Android game.

As you can see above he’s got a pretty good start. To use the script in its current form he finds a part of the cube that is mostly solid green. The Android device is plugged into a computer using the USB cable, and the Android Debug Bridge runs the script. It’s amazingly simple, as it uses the monkeyrunner package which comes with the SDK. The proof is there, and it’s just a matter of whether or not he wants to spend his time to fully automate the playing of the game. You can see a demo of the script embedded after the break.

[Stephen’s] not new to automating things that he doesn’t want to do himself. Here’s an example of his code beating the PlayThru CAPTCHA.

Continue reading “Scripting To Automate Your Mindless Android Games”

Adding Charging Back To Old Apple Accessories

From time-to-time we’ve been frustrated by the lack of backwards compatibility for Apple accessories. We have a great Monster FM transmitter that used the screen of the original iPod to select a channel. That was a feature we just loved which it never worked with any future hardware. We may not be able to get that back, but perhaps this hack can help us implement the ability to charge newer Apple devices using older accessories.

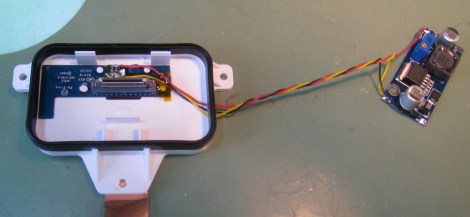
Seen above is the mounting dock from the iPod Hi-Fi speakers released back in 2006. Apparently the sound out of this set of speakers is just great, but you won’t be able to charge your modern device while it’s playing music. That is unless you’re not afraid to solder on a few simple components and roll in a switching regulator which can source at least one Amp of current. As we’ve seen in the past, Apple uses a couple of voltage dividers to identify modern chargers. These are installed on the D+ and D- lines of the USB connector and are pretty easy to recreate if you know the voltage levels the device is looking for. In this case a 39K, two 51k, and one 75k surface mount resistors are free-formed right next to the connector on the Hi-Fi’s dock PCB. The regulator on the right supplies the juice for charging. It’ll charge modern devices now, and even work with the iPhone five if you use a simple dock connector adapter.

Laser Charged Glowing Display

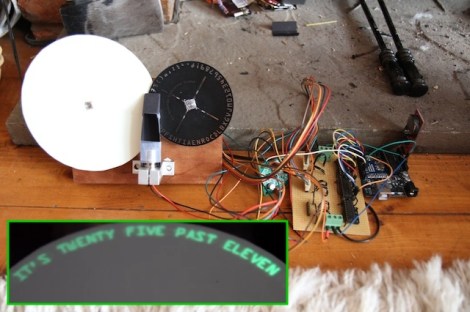
Here’s one of the best takes on a glowing display that we’ve ever seen. Currently [H] is using his creation as a fuzzy clock, but it is certainly capable of displaying just about any messages.

The project uses a wheel of luminous paper as the display surface. This has a glow-in-the-dark quality to it which can be charged up using a bright light source. In this case a UV laser diode was used. This is perhaps the best possible source as its intensity will allow for very quick charging. The innovation here is the use of a second disk as a stencil. Look closely in the image above and you will see that the laser diode is mounted perpendicular to the display surface itself. A mirror reflects — and we believe slightly spreads — the laser dot. It then passes through a cut-out on the black wheel which is shaped as the desired character. As you can see in the video after the break, this results in a crisp and clear glowing letter.

Compare this project to the one that moves the diode itself like a plotter and we think you’ll agree this is a simpler implementation which still looks great!

Continue reading “Laser Charged Glowing Display”