All-in-one All Grain Brewing For Your Kitchen Counter

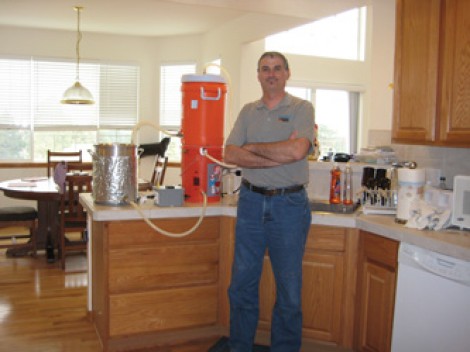
All grain brewing is a labor and equipment intensive endeavor, but it produces the highest quality beer compared to partial mash or extract brewing. [Jeff Karpinski] started out with the latter two methods, but as his enthusiasm for the hobby mounted he found himself brewing all-grain batches with just an electric kettle. He developed the system seen above as an easy method of automating the all grain process, and he managed to make it tidy enough to do in the kitchen.

All-grain brewing usually involves five or ten gallon (or more) boils. This type of volume is usually what demands that the brewing process move out of the kitchen. But since [Jeff] is the only beer drinker in the house he limits his sessions to three gallons. This means all of the equipment takes up less room. Here he’s got a five-gallon bucket, cooler, and brew kettle on just one small piece of the counter. In between the kettle and bucket you can see the controller box he built. This is responsible for switching power to the heating element in the brew kettle, and the electric pump in the bucket. The bucket has a permanent counterflow chiller which brings the wort down to a suitable temperature before pitching the yeast. It’s pretty amazing how well contained the liquid is from start to finish!

[Thanks ScottInNH]

Kilonode: How To Test A Huge Xbee Mesh Network

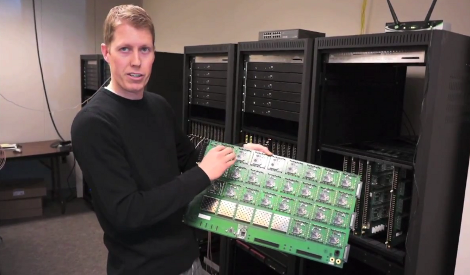
So let’s say that you’re a developer on the Xbee team. You need to test the extremes of what the RF radio modules can do when in a large network. But in addition to numerous nodes, you also need to test the effects of distance on the radios. Since it’s not reasonable to distribute hundreds of the devices (each with their own power source) throughout town, you build a test setup like the 1 kilonode Xbee rig which the project manager, [Jared Hofhiens] is showing off.

He’s holding one blade from the rack-mounted system. Each of those squares is an Xbee module, there’s 32 etched onto the board. On the edge furthest from him there are a set of connectors which mate with the rack connectors, hooking the blade up to a set of terminal servers. These servers allow developers to ssh into individual modules. On the near side of the blade there’s a set of attenuation adjustment circuits. They allow adjustments of 0-40 dB of attenuation in 10 dB increments to adjust how strong the RF signals are, simulating distance between modules.

Thirty-two of these cards are mounted in the three racks seen above to make up the 1024 module node. We really appreciate this look behind the scenes and think you’ll enjoy the video tour after the break. If it leaves you wanting more check out how one company builds cloud storage. Continue reading “Kilonode: How To Test A Huge Xbee Mesh Network”

Data Logging Directly To Google Docs (Google Drive)

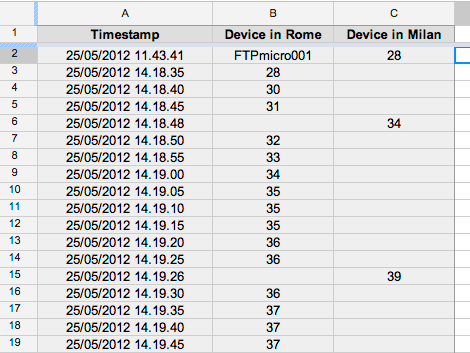
[Emanuele] is using Google Docs to log his temperature sensor data automatically (translated). We can see a few benefits gained by using this system. One is that you don’t have to visit the site of the logging hardware to harvest the data, another is that Google will automatically graph the data for you. Of course this means you need some way to connect your logger to the Internet, but we’ve seen buckets of different techniques for doing so. In this case, [Emanuele] is using PIC hardware that has a NIC on the board. But the technique could be used from a computer just as easily as from a microcontroller.

The meat and potatoes of the hack is sniffing out the HTTP header and syntax for writing to cells on a Google Docs (soon to be Google Drive) spreadsheet. After making a new spreadsheet and copying the URL and key from the address bar, he loads up the page using a header-viewer web service. With all the pertinent info in hand he crafts about a dozen lines of code to assemble the HTTP packet, and rolls the timestamp and temperature reading into it dynamically. See the system in action after the break.

Continue reading “Data Logging Directly To Google Docs (Google Drive)”

Triangle-grid LED Display

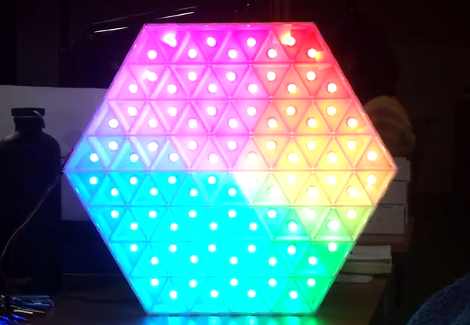
[Dearmash] put together this RGB LED display using triangles for each pixel. It’s an interesting deviation from the traditional grid layout. There are two video demos after the break. The first is a plasma-style pattern generated in Processing. The second is a spinning color wheel which would be perfect if synchronized with your Photoshop color spinner.

So the physical build is done, and now [Dearmash] is looking for a purpose for the device (isn’t that always the way it happens?). He mentions that the triangular layout looks cool, but makes text display almost impossible. Does anyone have any ideas on how to make this work? Right off the bat we could see side-scrolling a font similar to the Metallica logo’s M and A. Bu there must be some way to group these pixels together into readable characters. If you always use an upward and downward pointed triangle on the same row as a pixel it makes a parallelogram which would be used to display italicization characters.

Continue reading “Triangle-grid LED Display”

LED Bicycle Hack Makes Sure You’re Seen At Night

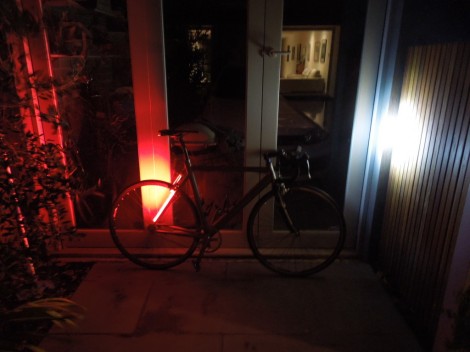
The bicycle tail and head lights that we’re accustomed to are small add-on modules. This take on the idea uses strips of LEDs to protect you from behind. They’re very bright, matching the pair of LED headlights that are attache to the handlebars.

Apparently [A.Davis12] had some LED strips laying around. There’s not what we’re used to seeing, but they have a similar footprint so you should be able to substitute the kind that come on a spool and may be cut to length. The majority of the build time was spent integrating the lights and their control wires with the frame of the bike. The frame already has holes in it for feeding the control wires for brakes and gear shifting inside the tubing. It sounds like it was a pain, but eventually he managed to get all of the routing done. Two red strips are zip-tied to the back of the seat stays. They are powered by a lithium battery inside the project box which mounts under the back of the saddle. A flip switch on the case lets you turn them on without stopping.

[Thanks Arpad]

Dollar Store Arc Reactor Build

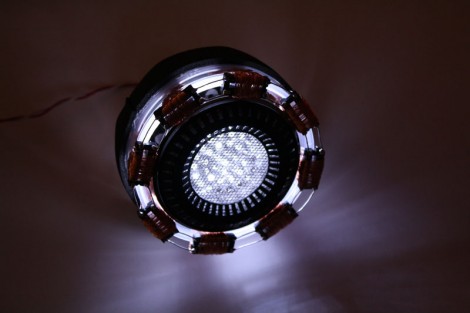
Some people have a real knack for sourcing parts at the dollar store. [James] is one of those people, having built this Arc Reactor replica using mostly dollar store goods.

The light source is an LED disk light that was removed from its enclosure. A sink strainer, the plastic holder from a package of sewing pins, and some wire mesh go together to make the first layer of the bezel. The push-pin holder is what has the ring of narrow rectangles around the bright center. It was painted black and attached to the sink strainer which provides the concentric holes in the center of the device.

For the detail around the outside [James] went with some clear-plastic drinking cups. By cutting off the top centimeter of each and stacking three together he gets the clear base he was after. The rest of the parts were gathered from his electronics supplies. DIP sockets straddle the drinking glass rims, and are wound with copper wire for the look seen here.

We put this near the top of the dollar store builds along with this Blade Runner umbrella.

Remote Shutter Module Uses LCD Screen For Setup

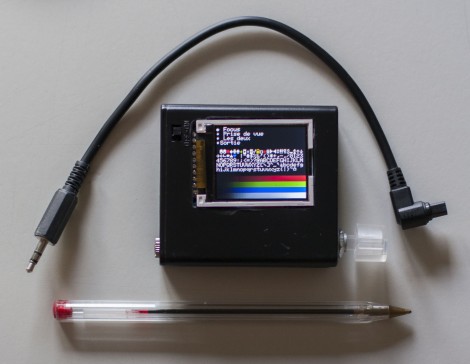
Here’s a full-featured remote shutter project which [Pixel-K] just finished. It seems that he’s interested in taking time-lapse images of the cosmos. Since astrophotography happens outside at night, this presented some special design considerations. He wanted something that he could configure in the dark without zapping his night-vision too much. He also wanted it to be easily configured with a pair of gloves on.

The project enclosure is a 4x AA battery box. He removed the partitions between each cell, leaving plenty of room for the guts. Inside you’ll find a lithium battery and a micro-USB recharger board. It powers the Arduino mini pro which drives the 1.8″ LCD screen and actuates the optoisolator which is responsible for triggering the camera. On the right you can see the clear knob of the clickable rotary encoder. All of the user settings are chosen and selected using just this one knob.

He’s already tried it out on a 6-hour shoot and had no battery life problems or other issues.