PS3 Controller Spoofing Advancing With Leaps And Bounds

Development has been progessing quite nicely on [Matlo’s] PlayStation 3 controller spoofing project. This is a package that allows you to identify a PC as a PS3 controller. We know what you’re thinking: why would you want to do that? When we originally looked in on the project about a year ago we mentioned that this allows you to use any Linux-friendly peripheral as a PS3 controller. In the clip embedded below you’ll see that nothing beats a good keyboard and gaming mouse when it comes to first-person shooters. [Matlo’s] solution not only allows you to use alternative control hardware, but there’s almost unlimited configurability.

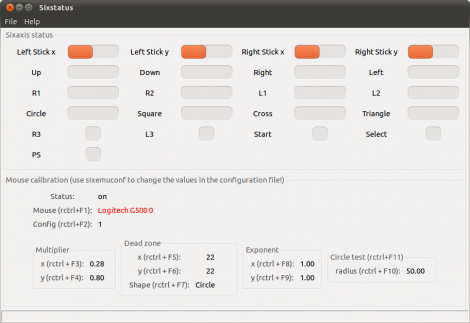
And speaking of configuration, he’s done a ton of work on the GUI. After the initial package installation no terminal typing needs to be done to get the system configured. Once in place, you can set the MAC address of a Bluetooth dongle to spoof the address of your SixAxis controller. From there you can set up the button mapping, calibrate mouse hardware and the like, and even program macros (fantastic). Now go out and pwn everyone at deathmatch now that the PlayStation Network is back up and running.

Continue reading “PS3 Controller Spoofing Advancing With Leaps And Bounds”

Color Object Tracking With An 8-bit Microcontroller

[Craig] sent in a link to this project which manages to implement color tracking on an 8-bit microcontroller at 60 frames per second. That’s some pretty incredible performance, but we’re also not talking about using a hobby-grade microcontroller. The C8051F360 is an ARM microcontroller with 100 MIPS throughput and with a system clock that can operate at up to 100 MHz. You also must consider that the chip will be able to do nothing else while in the tracking mode. Even with those gotchase, it’s still pretty incredible.

The setup uses an Omnivision OV7720 camera module. It has its own 24 MHz clock, which is used as the clock signal on the microcontroller’s PLL to generate a 96 MHz system clock. The code, which is written in a combination of C and assembly language, pushes captured tracking data to a PC via a serial port connection. After the break you can watch a bare-bones demo video that illustrates what the camera sees and what data shows up on the PC.

If you had the system in hand, what would you use it for? Perhaps it’s a perfect addition to that paintball sentry gun at which you’ve been hacking away?

Continue reading “Color Object Tracking With An 8-bit Microcontroller”

RF Robot Controlled From A Terminal Window

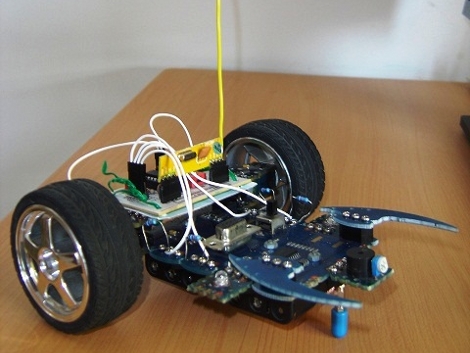
This robot can be controlled from the terminal window of your computer. You can see a manilla-colored board mounted between the wheels. This is the RF receiver which has quite a long antenna that we’ve cropped out to get a better look at the bot itself. [Ashish] picked up an RF transmitter/receiver pair for about $4 and after the break you can watch him walk us through the method he’s using for control.

First off, he had to find a way to interface the transmitter with his computer. He decided to use an Arduino because sending data to it from the computer is as simple as writing to /dev/ttyUSB0. The Arduino sketch just listens for incoming characters on the serial connection and pushes them over the RF transmitter.

We like his development methods. In the video he shows the command syntax used to drive and stop the robot. Once he figured that out he wrote a shell script to send the bot on a preprogrammed square path. From there a bit more coding would give him real-time control which could be extended to something like a web-based interface for smartphone control.

Oh, and if you’re wondering about the bot itself it’s a kit robot which normally uses IR control. [Ashish] upgraded to RF since it doesn’t require line-of-sight to work.

Continue reading “RF Robot Controlled From A Terminal Window”

Turn A Logic Analyzer Into A Signal Generator Using Only Software

One thing we learned by watching [Alton Brown] on all of those Good Eats episodes is that a multitasker is way better than a unitasker. [Joost] is thinking along the same lines by taking a fantastic tool and adding a useful function to it. His software project turns a USB Saleae Logic Analyzer into a signal generator.

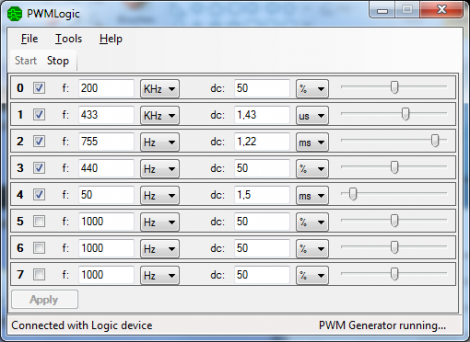
There are already a multitude of reasons to own one of these fantastic tools. But the ability to use it to generate up to 8 channels of PWM signals is a welcome addition. It is capable of producing frequencies from 1Hz up to 1MHz at a sample rate of 4 MHz. It uses the original SDK and doesn’t require any changes to the hardware (we would’ve thought new firmware was necessary, but happily that’s not the case). The one caveat is that right now this only works with Windows machines running the .NET version 3.5 or higher. It looks like an MSI installer package is all that’s available for download so the thoughts of easily porting this to other operating systems have been dashed unless [Joost] decides to share his source code.

Edit 7/12/2016: [Joost]’s webpage is down, but he moved it to Github.

Facebook Notifier Uses Some Papercraft And Simple Electronics

This weekend project will tell you when you’ve got something new to look at on your Facebook page (translated). The yellow flag on the side of the mini-mailbox automatically goes up, alerting you to your recent online popularity.

[Rocco’s] craftwork on this project is fantastic. We love the scale, the colors, and especially the artificial grass that adorns the base. Inside the mailbox an Arduino controls a small servo motor attached to the new mail flag. As with other Arduino-based notifiers (be it the Internet Furby, or our own troll sniffing rat) the USB connection makes it incredibly easy to convert online information to real-world signals. The client side of this is a Python script. It uses a package that we were previously unfamiliar with called mechanize. We’ve just made a cursory examination of how that package is used, but we’re going to keep it in mind as an alternative to our usual go-to package, BeautifulSoup, which tends to be a bit hairy when you’re just looking for some basic data.

Generating Pink Noise

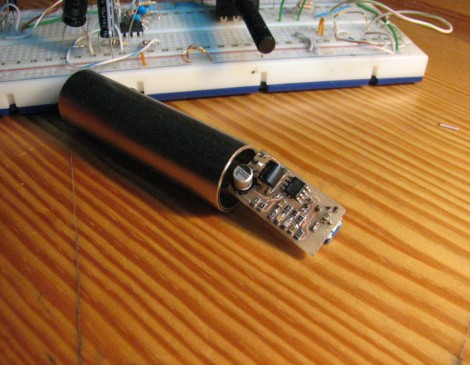
[Miceuz] just finished his first surface mount electronics project. It’s a pink noise generator that is used for testing audio equipment (scroll down that link for the English version of his writeup).

Pink noise is somewhere in between red noise and white noise. Didn’t realize there were more colors than just white when it comes to noise? The benefit of testing with pink noise is that it the power of the audio signal is stable through each octave of sound – white noise increases in power with each additional octave which can damage the tweeters in a sound system.

The goal in this design was to build a noise generator that fit into an XLR connector. [Miceuz] started with an existing design, and altered it to suit his needs. Much like a condenser microphone, the pink noise generator uses phantom power instead of a standalone power source. For instance, the design he based this on required two 9v batteries. The size, the choice of case, and the absence of a battery all spell WIN for this project.

Automated Chess Set Does It From Below

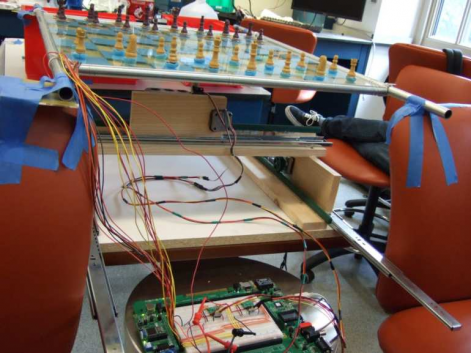
You can get class credit for the coolest things these days. Take for instance, this Automatic Chessboard that [Brian] and [James] built for the final project in one of their classes this spring. We just looked at a robotic chess setup on Monday that used a gripper mounted on a gantry to move the pieces. This one’s a lot more user-friendly and borders on magical. That’s because the moving parts are all located below the board and could be hidden from view if a proper case were built around the edges.

There are two main components to this build. The first is a grid of reed switches that detect the moves made by a human. This works because each piece the human player uses has a weak magnet glued to the bottom which is just strong enough to actuate the reed switch and let the computer sense what move was just made. On the robotic side of things this works like a plotter. Each of the computer’s pieces has a metallic disc glued to the base. What basically amounts to a plotter under the board uses rare-earth magnets to grab the computer’s piece and drag it to the next playing position.

The use of two separate magnetic systems provides some interesting design challenges. You can see the device in action in the video after the break, and a full writeup and source code package is available at the blog linked at the top of this feature. But for your convenience we’ve also mirrored the PDF whitepaper after the break which lays bare all of the juicy details.

Continue reading “Automated Chess Set Does It From Below”