Metal Race Combines Operation And Calculator Game

metal_race

[Greg] was feeling nostalgic about the game RACE for to TI-83 graphing calculator. In the game, your car is stationary with controls to move the scrolling maze from side to side in order to avoid a crash. He set out to build a physical version of the game with a don’t-touch-the-side concept that reminds us of Operation.

The game board is a wire frame constructed from paperclips then attached to a motorized frame. The vehicle is also metal and is attached to the lens sled from a scrapped CD-ROM drive. The maze scrolls from left to right with up and down vehicle motion controlled by two arcade buttons. An Arduino controls the motors and monitors the button inputs. He has plans to add a buzzer that sounds when the metal car “crashes” in to the wire walls of the maze. We’ve embedded video of the working game after the break. For more build photos take a look at his flickr set. Continue reading “Metal Race Combines Operation And Calculator Game”

Installing A Starscape Ceiling

fiber-optic-star-ceiling

[Mike Galloway] set out to install a lighted starscape in the ceiling of the baby room. We remember first coming across this type of thing at a Planet Hollywood restaurant at least 10 years ago. We’ve always wondered how difficult this type of thing is to install.

This setup involves an LED based illuminator and bundles of fiber optics. [Mike] first mounted the illuminator in the corner of the room at ceiling level and ran the bundles of fiber optics up into the attic. He then used a cordless dremel to drill 1/16″ holes, one for each fiber in the bundle. This translates to a lot of holes! Once everything was in place, he filled the holes with glue to hold the fibers in place, and snipped off the excess from the room-side using a fingernail clipper. We’ve embedded his video of the system in action after the break.

This may take some time, but it seems easy enough and now we know how these ceilings work.

Continue reading “Installing A Starscape Ceiling”

Ik-a-sketch Collaborative Scribbling

ik-a-sketch

At this year’s PICNIC conference [Neil Mendoza] and [Edwin Dertien] built a giant Etch-a-Sketch to help bring attendees together. The drawing area is a rear-projection screen, rather than a physical powder based setup, and is surrounded by the familiar red frame with vertical and horizontal control knob. Because the two knobs are too far apart for one person to use at the same time, two people must work together to move the stylus.

To help break the ice the device was designed to incorporate social networking. Each knob requires that an RFID (embedded in the conference badges) be scanned by the person controlling it. Both users are then connected as friends through a social network and when they’re done “making art”, the beauty of their creation is delivered to them via email.

We don’t know about you, but our etch-a-sketch attempts have always been crappy. There are some folks who can turn out a masterpiece on the thing, but this is really just meant to grab your interest for a minute or two and help you meet some people. One feature that should be noted, this giant device requires shaking to erase the image.

Barcode Challenge – Part 2

HaD_barcode

Yesterday we issued a barcode challenge in honor of the Barcode’s birthday. Congratulations to [The Moogle] for winning this challenge. His submission offers a very detailed explanation of how he solved the puzzle using Photoshop, OpenOffice Calc, and some web resources. We’ve got a detailed writeup on it after the break.

Honorable mentions go to [nex] for putting up a Java solution and to [jwmaag] for showing a Python solution. Finally, kudos to all who used a CueCat in one way or another to decode the string. Just having one of those still around is pretty hack-it-y.

Because of the ubiquity of Barcode scanners and online image translation programs the challenge might have been a bit too easy. Do you think you’re up for a greater challenge? Download the new barcode and get to work. This one should be quite a bit harder to decipher. Once again, leave a comment that includes the message stored in the Barcode. Please remember, only entries that solve the puzzle and include a full description of the process will be considered. Good luck, and let the games begin.

Update: It only took [JP] 19 minutes to post a correct solution to the new Barcode.  Great work!

Continue reading “Barcode Challenge – Part 2”

William Kamkwamba Talks Windmills With Jon Stewart

Last night [Jon Stewart] interviewed [William Kamkwamba] on The Daily Show. [William] is the young man from Malawi who at the age of 14 built a windmill generator out of discarded items. Now at 22 years old, [William] is working on his SAT scores in hopes that he can attend college in the US. We get a bit more insight about him and his build as he promotes his new book.

[William] was 14 when he completed the three month long build of his generator. He had previously dropped out of school because “my country was experiencing some famine”. The only resource he had at his disposal was a library that is funded by the US government (sounds like that turned out to be a good investment!).

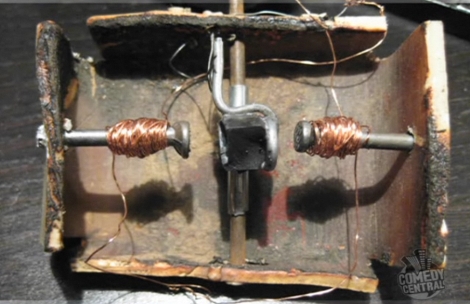
After seeing a photograph of a windmill he was driven to succeed by the mantra: “somewhere somebody did it, it didn’t fall from the sky”. He goes on to explain how he built a circuit breaker (pictured above) to prevent a short circuit from burning his house down. Two nails are wrapped in wire with a magnet in the middle. If there is a short circuit, one of the nails will repel the magnet while the other attracts it. The nail is connect to a switch and when it moves to one side the switch is opened, breaking the circuit. Upon hearing this, [Stewart] makes the obvious comparison between [Macgyver] and [Kamkwamba].

One of the most endearing points in the interview is a story [William] shares about his first experience with the Internet. He was invited to the TED conference in 2007 and someone asked him if he’d used the Internet. Of course he hadn’t and they then started talking about using Google. When the search engine was explained to him he suggested that “windmill” be entered as a query. When millions of hits were returned his revelation was “Where was this Google all this time?”.

This is an amazing story that we can’t get enough of here at Hack a Day. Make sure you don’t miss the interview which starts 12:25 into the episode.

Hack A USB Port Into Your 2010 Prius

prius_usb_port

[Rosenberger31] did a nice job of adding a USB port to his 2010 Toyota Prius. He removed the access door on the console where the traditional “cigarette lighter” 12 volt port is located. A Dynex 12-volt to USB adapter was piggy-backed onto the power lines and the USB connector was then fit into the blank accessory plate next to it.

There is no data connection here, the port only provides 5v regulated power to devices plugged into it. None the less, it is still a pretty nice looking alternative to having a power adapter hanging out of the dash all the times. If you try this, heed one of the warnings from the comments and make sure you add a switch if you vehicle powers the 12 volt port even when the car is not running.

This makes us wonder: will this void your warranty?

Center Speaker Amp For An IPod

center_speaker_ipod_amp

A few weeks ago we saw [Jaroslaw’s] universal credit card spoofer. Now he’s sent in a project that incorporates an amplifier into a center speaker for use with an iPod or any device with an audio jack.

The build has two main components; an LM4950 audio amplifier and a center channel speaker he picked up for $3 at Goodwill. The circuit used is straight from the datasheet and he’s provided the four necessary resistor values for you in his writeup. An old set of headphones was butchered for the audio connector and DC power can be provided by any 6-12V source.

The final circuit was built on some protoboard. The speaker housing has plenty of room to fit everything in for a nice finished look. Pretty simple, and except for the IC, this should be an easy salvage project for most folks.