shadeydaves_lawnbot

How Not To Build A Robotic Lawnmower

[shadeydave] wanted to build his own Lawnbot, but he had no idea where to start. He purchased some DIY plans online which looked like they would get the job done, but then he strayed from the path in a big way and spent gobs of money in the process.

In his Instructable writeup, he details each misstep he made, explaining why his choices were bad as well as how much each mistake cost him. It sounds like pretty much everything that could go wrong did go wrong, from spending money on unnecessary microcontrollers to choosing the wrong wheels. Our favorite part is where he mentions that he couldn’t figure out how to create a “kill switch” for the Lawnbot in the event that his transmitter loses contact with the speedy whirling death machine.

[shadeydave] is well aware of how poorly his build went, and primarily wrote it up as a cautionary tale to others out there who might decide to take on a similar project. He says that the Lawnbot works for the most part, but with his newfound wisdom he will be revising the bot, having learned from his mistakes.

We actually like to see this kind of writeup as they can be quite beneficial to someone trying to put together a similar project. So if you have some major flubs under your belt, don’t be shy about digging them out and letting us know. As Thomas Edison said, “I have not failed. I have just found 10,000 ways that won’t work.”

Continue reading to see a quick video tour of [shadeydave’s] mostly working Lawnbot.

Continue reading “How Not To Build A Robotic Lawnmower”

Controlling Dioder Light Strips Wirelessly

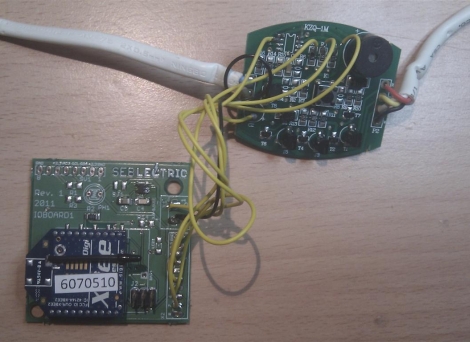
dioder_universal_io

[SeBsZ] does a lot of work in home automation, using Xbee modules, LEDs, and other home lighting systems. Naturally, people look to him for help with different electronics projects, but one thing he has been asked time and time again is if he can make a simple mood lighting solution that can be easily installed.

He has always been interested in playing around with RGB LEDs, but he wasn’t looking to reinvent the wheel with this project. Instead he based his work off the Ikea Dioder product, an off-the-shelf set of adjustable LED strips. As we’ve seen before, the control module for these LEDs leaves a bit to be desired, so he removed the Dioder’s onboard PIC and wired up a controller of his own. His “Universal IO Board” uses an Atmega88 for control and has all the pins required to attach an Xbee wireless module. With everything wired up, he now has full wireless control of the Dioder light strips, without a ton of fuss.

Although he’s selling a few different hardware kits, the schematics for his IO board are freely available on his site, should you want to make your own. The only thing that we didn’t see was the code for the Atmega, but we’re guessing he has that posted somewhere as well.

Vintage Phone Has A Dirty Android Secret

android_based_vintage_phone

Instructables user [apple_fan] likes vintage telephones from the early 1900s, but while they are nice to look at, they’re clearly not too useful nowadays. He decided to change that, and retrofitted an old operator-dialed telephone with some modern amenities.

He gutted the phone, stripping out the large electromagnets and capacitor that were once used to facilitate placing and receiving calls. He added an Archos 28 tablet to the box, wiring it an IOIO board, allowing him to interface it with his Android phone. The old microphone and speaker were swapped out for updated components, and a new ringer actuator was built to replace the bulky old unit. The tablet and ringer, along with the rest of the components were then carefully hidden away inside the box as not to alter the aesthetics.

To place and receive calls, he installed CMU Sphinx on the Archos tablet, allowing him to interact with the phone using voice recognition, as if he was talking to a live operator.

It’s a pretty neat project, and while we might have opted for a small micro combined with a Bluetooth headset, [apple_fan] makes it clear why he made the hardware decisions he did. We’re always up for letting people show us a different way to get a job done, so we’re down with that.

Check out a short video demo of the phone in action after the jump.

Continue reading “Vintage Phone Has A Dirty Android Secret”

When Airsoft Gets Boring, Build A Coil Gun!

airsoft_coilgun

Here at Hackaday, we’re all about repurposing old items you no longer use. Reader [Liquider] wrote in to share his latest creation, a coil gun built from an old Airsoft pistol.

He removed a handful of components from the pistol and installed a 800 uF/300V capacitor inside the grip. A small storage compartment was added under the barrel, which houses the AA battery he uses to drive the circuit. A modified reloading mechanism makes it easy to drop a metal projectile right in front of the coil before firing.

Once the pistol is charged up, a switch installed behind the trigger discharges the cap, creating a magnetic pulse that accelerates the metal projectile forward. [Liquider] estimates that the kinetic energy produced by the coil is 0.1 Joules, which fires of the slug at a reasonable speed.

Continue reading to see a quick video demo of the pistol in action.

Continue reading “When Airsoft Gets Boring, Build A Coil Gun!”

The Dish-o-Tron 6000 Is Back And Better Than Ever

dish_o_tron_6000_extreme

When designing a circuit on the bench, sometimes things work far better than they do in real life. [Quinn Dunki] learned this lesson over the last few months as she struggled with one of her recent creations, the Dish-o-Tron 6000. We featured the Dish-o-Tron back in April, and at that point things seemed to be working out well for [Quinn]. As time passed however, she found the device to be an unreliable power hog. Aside from eating through a battery every few weeks, it kept spontaneously switching states from ‘Dirty’ to ‘Clean’ and back. It was time to take the Dish-o-Tron back to the bench for some debugging.

The random status flip from ‘Dirty’ to ‘Clean’ was a relatively easy fix, and required a small capacitor between the set pin and ground to eliminate the electrical noise that was tripping things up. She nailed down the spontaneous ‘Clean’ to ‘Dirty’ flip to a stuck tilt switch, which she swapped out for a mercury-based model, making things far more reliable. She solved her battery problems by wiring in a 12v wall wart, which might not be any more energy efficient, but it does save her from swapping out batteries all the time.

It’s always nice to see how projects evolve over time, and how the inevitable bugs are worked out of an initial design.

Forget That Boring Old Fire Pit, Build A Flame Tree Instead!

maker_faire_bay_area_2011_fire_tree

Maker Faire is a great event to attend not only because you get to see all sorts of cool designs and machinations, but because you can participate as well. At Maker Faire Bay Area 2011, maker [Brett Levine] put together a fun and interactive display he likes to call the DIY Flame Tree.

The concept is pretty simple, and he says everyone who participated got a pretty good kick out of lending a hand. Each participant was given a piece of copper tubing and allowed to bend, twist, and sculpt it to their liking before using a drill to add holes wherever they pleased. They were then allowed to choose where their portion of the project would be mounted on the existing tree.

With everyone standing a safe distance away from the display, [Brett] pumped it full of propane and lit the various sections on fire. In the video below, you can see that the display was blown around a bit by the wind, but we imagine it would look pretty awesome on a still summer evening.

Even if you’re not into this sort of art, you have to admit that it certainly beats a boring old fire pit!

Continue reading “Forget That Boring Old Fire Pit, Build A Flame Tree Instead!”

All Your I/O Pins Belong To ArduinoDashboard

arduino_dashboard

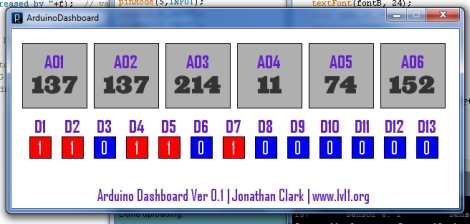
So if you’re knee deep in an Arduino-based project and you want to constantly monitor all of the micro’s pins, what’s the best way to go about it? [Jonathan Clark] from LVL1 in Louisville was looking to keep a closer eye on his board and whipped up an application he calls ArduinoDashboard.

Programmed in Processing, the application gives you a look at all of your Arduino board’s analog and digital pins in a simple to use display. All that’s required to run the application is a bit of code inserted at the top of your sketch, which can be called anywhere in your program’s loop. Once the code snipped is called, all of the board’s pins are read and the data is sent to your PC.

ArduinoDashboard is still very much in beta at the moment, but it looks to be stable enough for everyday use. [Jonathan] has plenty of improvements and new features in mind, so be sure to check back often to see what’s changed.

[via Adafruit Blog]