An Audio Based USB Oscilloscope And Signal Generator For $20

SoundScope

Are you interested in building a 20kHz 2-channel oscilloscope and a 2-channel signal generator for only $20 with minimal effort? Be sure to check out [Jana Marie’s] Instructable that goes over how to build this awesome tool from a cheap USB audio card.

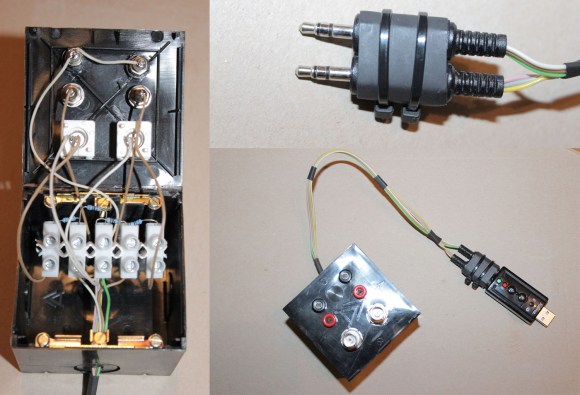
We have featured tons and tons of DIY oscilloscopes in the past, but this effort resulted in something very well put together while remaining very simple to understand and easy to build. You don’t even need to modify the USB audio card at all. One of the coolest parts of this build is that you can unplug your probe assembly from your USB audio card, and bring it wherever your hacking takes you. After the build, all you need is [Christian Zeitnitz’s] Soundcard Oscilloscope program and you are good to go. One of the major downsides that is often overlooked when using an audio based oscilloscope, is that it is “AC coupled”. This means you cannot measure low-frequencies (including DC signals) using a sound card. Be sure to heed [Jana’s] advice and do not use your built in audio card as an oscilloscope. With no protection circuitry, it is a sure fire way to fry your computer.

What analog projects have you built around an audio interface? We have seen such an interface used for many different applications, including a few fun medical related hacks (be sure to keep safety your first priority). Write in and let us know!

A Wireless Computer Remote That Emulates A USB Keyboard

PCRemote

If you are anything like [Antoine], you would love to be able to control your PC with a simple hand-held remote control from anywhere in your house. [Antoine] wrote in to tell us about his wireless computer remote that emulates a USB keyboard, making it suitable for any device that uses a USB keyboard.

His blog post is very well written and contains a ton of design information and background on the project. He initially wanting to easily control his PC’s music from anywhere in his house without needing to be within line of sight of his computer. The end result is a very handy remote that can be used to change music, video, and even launch applications on his computer. The system consists of a base station for his remote that connects to the computer and acts as a USB keyboard, and the remote itself. The base station uses V-USB on an Arduino to interface with the computer, and VirtualWire to handle the wireless protocol for the remote. For those of you who don’t know about VirtualWire (now superseded by RadioHead), it is a very cool Arduino library that lets you easily use raw wireless interfaces (also called vanilla wireless interfaces).

Without going into too much detail here (be sure to see the actual post for more information), the remote itself was redesigned after the initial proof of concept to maximize battery life. The final power consumption is very impressive, resulting in a battery life of more than two years! This remote system is very well put together and contains many aspects that can easily be reused for other projects.

The PebblyPi: A Smart Doorbell

PebblyPi

A Pebble smart watch, and a Raspberry Pi. They are a perfect match. This is probably what [Daniel] thought when he embarked upon his latest project, a smart doorbell called the PebblyPi (tip submitted by [Ben]).

The actual project is quite easy to implement. All you need really need is a Raspberry Pi, a switch, a resistor, and a Pebble Smart Watch (plus a smart phone). Using a simple Python script on the Raspberry Pi, button press notifications are sent to Pushover, which allows the notification to arrive on your smart phone (and thus your Pebble Smart Watch). Pushover is a very cool notification service for Android devices, iPhones, iPads, and your Desktop. The concept behind this project is great, and the fact that it is so simple to implement opens up many other possibilities for interfacing your home electronics with the Pebble Smart Watch (or even just your smart phone). The ability to create custom notifications on any of your devices using any internet connected system is amazing!

You could receive notifications from your absurdly accurate weather station, or even your soil moisture monitor. Have you used Pushover in any of your projects? The possibilities are endless!

Continue reading “The PebblyPi: A Smart Doorbell”

The Smallest ATtiny85 Based USB Board

Nanite 86

“Possibly the smallest ATtiny85 based ‘duino derivative”. Indeed! When Olimex announced the Olimexino 85s as the smallest Arduino ever, [Tim] took that as a challenge. His very small Arduino based USB devboard is quite a bit smaller than the Olimexino!

The Nanite 85 was carefully designed to be both small and functional. Not only is it 20% smaller than the Olimexino, but also sports a reset button! One of the coolest aspects of this design is that it has the same pinout and size as a DIP ATtiny85. This means that you can use the Nanite 85 for developing your code with the USB bootloader, and then you can directly replace it with a standard (pre-programmed) ATtiny85. The major downside to using this device over the aforementioned devices, is that it does not include a voltage regulator for powering the device via USB (or battery), the device is simply hooked directly to the 5V rail from the USB connector.

We can’t help but be impressed with this well-thought-out design. It is also easy to assemble since it uses larger surface mount components. If smaller components were used, even more features (such as a regulator) could be included. Do you have an even smaller USB Arduino? The race is on for the smallest Arduino ever!

A Webcam Based Posture Sensor

Webcam based posture sensor

Even for hobby projects, iteration is very important. It allows us to improve upon and fine-tune our existing designs making them even better. [Max] wrote in to tell us about his latest posture sensor, this time, built around a webcam.

We covered [Max’s] first posture sensor back in February, which utilized an ultrasonic distance sensor to determine if you had correct posture (or not). Having spent time with this sensor and having received lots of feedback, he decided to scrap the idea of using an ultrasonic distance sensor altogether. It simply had too many issues: issues with mounting the sensor on different chairs, constantly hearing the clicking of the sensor, and more.  After being inspired by a very similar blog post to his original that mounted the sensor on a computer monitor, [Max] was back to work. This time, rather than using an ultrasonic distance sensor, he decided to use a webcam. Armed with Processing and OpenCV, he greatly improved upon the first version of his posture sensor. All of his code is provided on his website, be sure to check it out and give it a whirl!

Iteration leads to many improvements and it is an integral part of both hacking and engineering. What projects have you redesigned or rebuild? Let us know!

2014 Imagine RIT: An Innovation And Creativity Festival In Rochester, NY

Metal Imagine RIT Sign

Every year, the Rochester Institute of Technology hosts Imagine RIT, an innovation and creativity festival “that showcases the innovative and creative spirit of RIT students, faculty and staff.” The festival is free to the public and really brings the community together to celebrate technology, science, art, innovation, and creativity! We had the chance to attend this weekend and we had a blast looking at all of the engineering projects on display.

Continue reading “2014 Imagine RIT: An Innovation And Creativity Festival In Rochester, NY”

Arduino Electronic Load

A Simple Programmable Electronic Load Using The Arduino

Some projects are both educational and useful. We believe that [Jasper’s] Arduino based electronic load is one of those project.

[Jasper’s] electronic load can not only act as a constant current load, but also as a constant power and constant resistive load as well. The versatile device has been designed for up to 30V, 5A, and 15W. It was based on a constant current source that is controlled by a DAC hooked up to the Arduino. By measuring both the resulting voltage and current of the load, the system can dynamically adapt to achieve constancy. While we have seen other Arduino based constant loads before, [Jasper’s] is very simple and straight forward compartively. [Jasper] also includes both the schematic and Arduino code, making it very easy to reproduce.

There are tons of uses for a voltage controlled current source, and this project is a great way to get started with building one. It is an especially great project for putting together your knowledge of MOSFET theory and opamp theory!