Taking Apart IKEA’s Latest Air Quality Sensor

Whether it’s because they’re concerned about worsening pollution or the now endemic variants of COVID-19, a whole lot of people have found themselves in the market for a home air quality monitor thee last couple of years. IKEA noted this trend awhile back, and released the VINDRIKTNING sensor to capitalize on the trend.

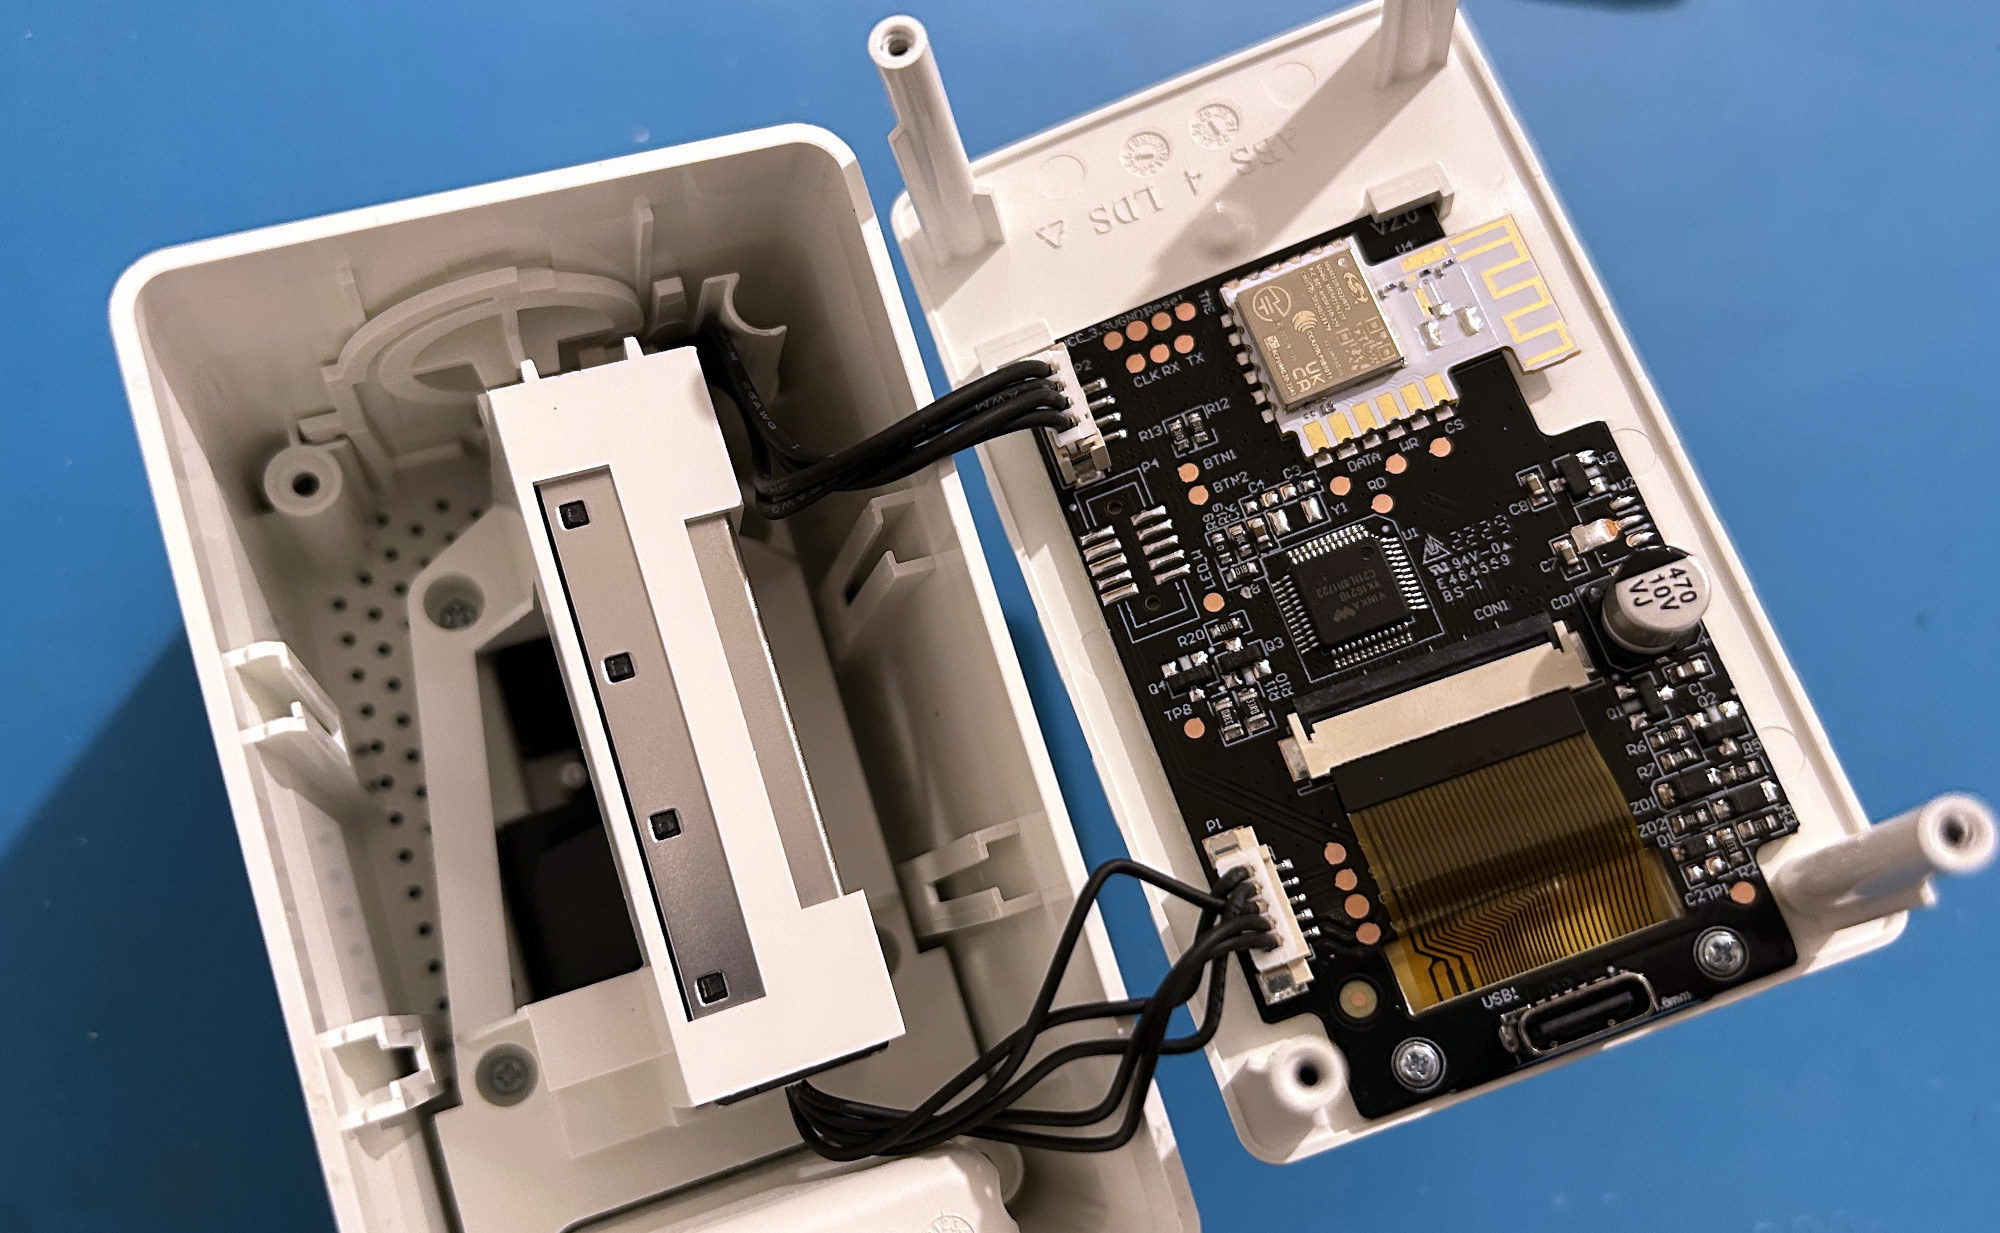
The device must have sold pretty well, because last month the Swedish flat-packer unveiled the considerably more capable (and more expensive) VINDSTYRKA. Now thanks to the efforts of [Oleksii Kutuzov] we’ve got a fantastic teardown of the new gadget, and some more information on the improvements IKEA made over its predecessor.

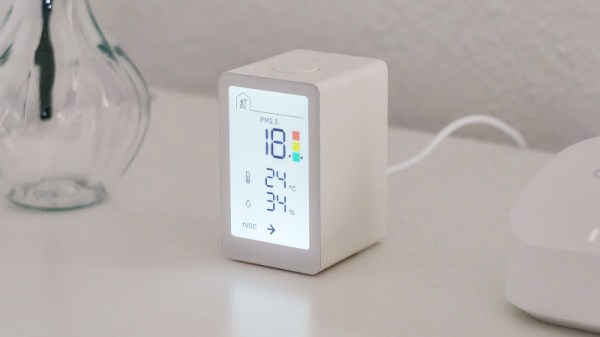
Certainly the most obvious upgrade is the addition of an LCD readout that displays temperature, humidity, and how many particulates the device detected in the air. There’s even a “traffic light” colored indicator to show at a glance how bad your air supply is. The other big change is the addition of wireless, though unlike the WiFi hacks we saw for the VINDRIKTNING, this built-in capability uses Zigbee and is designed to plug into IKEA’s own home automation ecosystem.

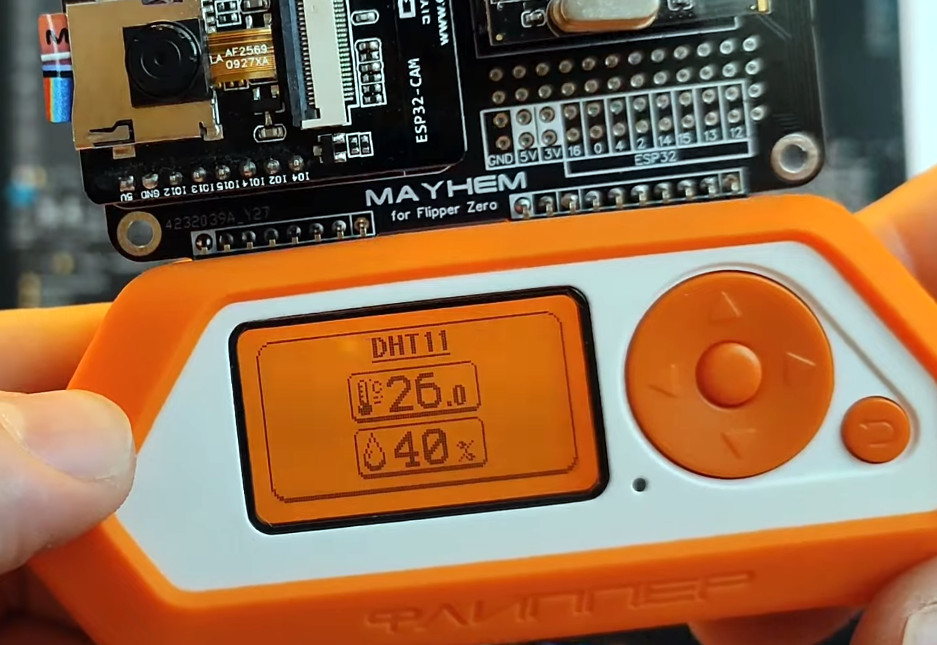
Speaking of those hacks, a GitHub user by the name of [MaartenL] chimes in to say they’ve managed to hook an ESP32 up to test pads on the VINDSTYRKA motherboard, allowing the parasitic microcontroller to read the device’s sensors and report their data on the network over a service like MQTT, without impacting the sensor’s normal operations. This is how the first hacks on the older VINDRIKTNING were pulled off, so sounds like a promising start.

But even if you aren’t looking to modify the device from its original configuration (how did you find this website?), it seems pretty clear the VINDSTYRKA is a well-built piece of kit that will serve you and your family well. Which is more than what could be said for some of the cheapo environmental sensors flooding the market.

Thanks to [killergeek] for the tip.

Modded See ‘N Say Teaches The Sounds Of City Life

The Fisher-Price See ‘n Say was introduced back in 1964, and since then has helped teach countless children the different sounds made by farm animals. But what about our urban youth? If they’re going to navigate a concrete jungle, why not prepare them to identify the sound of a jackhammer or the chime that plays before an announcement goes out over the subway’s PA system?

That’s the idea behind this hacked See ‘n Say [John Park] put together for Adafruit. Now we should note up front that no vintage toys were sacrificed during the production of this gadget — it seems Fisher-Price (predictably) dropped the tiny record player these toys used to use for a cheap electronic board sometime in the 90s. A quick check with everyone’s favorite A-to-Z megacorp shows you can pick up one of these new-school models for around $25 USD.

The modern electronic version of the toy is easy to mod.

Cracking open the electronic version of the See ‘n Say reveals a circular PCB with a series of membrane buttons that are pressed by the mechanics of the spinning pointer. As it so happens, there are handy test points next to each of these buttons, which makes it simple to wire up to a microcontroller.

In this case, it’s Adafruit’s KB2040, which is connected to a MAX98357A amplifier board over I2S. A small boost converter module is used to wring 5 volts out of the toy’s pair of AA batteries. The original speaker is repurposed, though [John] adds a physical power switch to keep the boost converter from flattening the alkaline batteries when not in use.

On the software side, all you’ve got to do is load the MCU with your sounds and write a bit of code that associates them with the button being pressed on the PCB. [John] gets his city sounds from Freesound, a community-maintained database of Creative Commons Licensed sounds, and provides the CircuitPython code necessary to tie everything together.

The last step is the artwork. For this project, [Brian Kesinger] provided some swanky vintage-looking imagery that perfectly fits the See ‘n Say style. The art is available under the NonCommercial-ShareAlike Creative Commons license, so you’re free to use it in your own version. Though naturally, that assumes you’ve decided to use the same sounds as [John] — the beauty of this project is that you could easily load it up with whatever sounds you’d like Hacker Junior to learn. Possibly a well-known Australian YouTuber?

If anyone feels inclined to build a Hackaday-themed See ‘n Say based on this project, we’ve love to see it.

Continue reading “Modded See ‘N Say Teaches The Sounds Of City Life”

Flipper Zero Mayhem Hat Adds Camera, More Radios

For a device advertised as the “Multi-tool Device for Hackers”, the Flipper Zero already offers a considerable list of onboard capabilities. But some hard decisions had to be made to get the retail price down, so features like WiFi and Bluetooth had to be left off. Luckily, there’s an expansion interface along the top of the device which makes it possible to plug in additional hardware.

One of those expansions is the “Mayhem Hat” from [Erwin Ried]. This board adds many requested features to the Flipper Zero, as well as some that might not seem as obvious. The addition of an ESP32-CAM brings WiFi and Bluetooth to the party, while also unlocking access to the highly-capable ESP32Marauder firmware and the plethora of security research tools therein.

But the camera also enables some interesting features, such as motion detection and the ability to read QR codes. It even lets you use the Flipper as an impromptu digital camera, complete with an onscreen viewfinder reminiscent of the Game Boy Camera.

What’s more, the Mayhem Hat features its own expansion capabilities. There’s a spot to plug in either a CC1101 or NRF24l01 radio module, both of which are supported by community developed plugins that allow the user to sniff out and hijack signals. There are also extra pins for connecting your own sensors or hardware. In the demo video below you can see the device automatically detect the popular DHT11 environmental sensor and display the current temperature and humidity readings.

[Erwin] has the Mayhem Hat up for sale on Tindie, but as of this writing, is currently out of stock. Apparently, demand for the add-on boards is just as high as for the Flipper Zero itself — not a huge surprise, given the excitement we saw around this platform during its $4.8 million Kickstarter campaign.

Continue reading “Flipper Zero Mayhem Hat Adds Camera, More Radios”

A Parts Bin Cyberdeck Built For Satellite Hacking

While there’s little in the way of hard rules dictating what constitutes a cyberdeck, one popular opinion is that it should be a piecemeal affair — a custom rig built up of whatever high-tech detritus the intrepid hacker can get their hands on, whether it be through trades or the time-honored tradition of dumpster diving. It should also be functional, and ideally, capable of some feats which would be difficult to accomplish with a garden variety laptop.

If you’re looking for an example that embraces these concepts to the fullest, look no further than the Spacedeck built by [saveitforparts]. Combining a touch screen all-in-one computer pulled from a police cruiser in the early 2000s, an RTL-SDR, and the contents of several parts bins, the rig is designed to work in conjunction with his growing collection of motorized satellite dishes to sniff out signals from space.

As you can see in the build video below, the design for this mobile satellite hacking station was originally very different, featuring considerably more modern hardware with all the buzzword interfaces and protocols you’d expect. But [saveitforparts] couldn’t get all the parts talking satisfactorily, so he went in the closet and dug out one of the surplus police terminals he’d picked up a while back.

He didn’t have the appropriate connector to power the machine up, but by cracking open the case and tracing out the wires, he figured out where he needed to inject the 12 V to get it spun up. From there he installed a new Mini PCI WiFi adapter, loaded up an era-appropriate build of Linux, and got the standard software-defined radio tools up and running.

What really sets this build apart are the two custom panels. The top one offers access to the various ports on the computer, as well as provides a sort of switchboard that connects the RTL-SDR to various onboard filters. The lower panel includes the hardware and controls necessary to aim different styles of motorized satellite dishes, as well as a USB hub and connector that leads into a commercial satellite meter tucked into the case.

At the end of the video [saveitforparts] demonstrates the various capabilities of the Spacedeck, such as the ability to pull in imagery from weather satellites. Considering the sort of satellite sniffing we’ve seen him pull off in the past, we have no doubt this machine is going to be listening in on some interesting transmissions before too long.

Continue reading “A Parts Bin Cyberdeck Built For Satellite Hacking”

Large E-Paper Slow Movie Player Offers Great Docs

Over the last couple of years we’ve seen several iterations of the “slow movie player” concept, where a film is broken up into individual frames which are displayed on an e-paper display for a few minutes at a time. This turns your favorite movie into a constantly changing piece of long-term art. Unfortunately, due to the relatively high cost of e-paper panels, most of the examples we’ve seen have only been a few inches across.

Of course, technology tends to get cheaper with time, which has allowed [szantaii] to put together this beautiful 10.3-inch version. With a 1872 × 1404 Waveshare panel capable of displaying 16 shades of gray and a Raspberry Pi Zero 2 W installed in a commercially purchased frame, the final product looks very professional. It certainly wouldn’t look out of place in a well-appointed living room.

It’s not just a large display that sets this project apart. [szantaii] has done a phenomenal job documenting both the hardware and software of this project, which includes the “Slow Movie Player service” Python software he’s written. Even if you aren’t using an identical hardware setup, his MIT-licensed code will absolutely get you going in the right direction.

We especially liked the several example configurations provided, as well as the explanation of how ImageMagick’s various grayscale conversion options impact the appearance of the final image.

All in all, this is not only a beautiful and well implemented version of the slow movie player concept — but it’s also the kind of project that helps elevate the entire community thanks to its transparency. We wouldn’t be surprised to see this latest iteration inspire more folks to pick up an e-paper panel and build one of their own. Could 2023 be the year of the slow movie player? We certainly hope so.

This Open Hardware Li-Ion Charger Skips The TP4056

There’s a good chance that if you build something which includes the ability to top up a lithium-ion battery, it’s going to involve the incredibly common TP4056 charger IC. Now, there’s certainly nothing wrong with that. It’s a decent enough chip, and there are countless pre-made modules out there that make it extremely easy to implement. But if the chip shortage has taught us anything, it’s that alternatives are always good.

So we’d suggest bookmarking this opensource hardware Li-Ion battery charger design from [Shahar Sery]. The circuit uses the BQ24060 from Texas Instruments, which other than the support for LiFePO4 batteries, doesn’t seem to offer anything too new or exciting compared to the standard TP4056. But that’s not the point — this design is simply offered as a potential alternative to the TP4056, not necessarily an upgrade.

[Shahar] has implemented the design as a 33 mm X 10 mm two-layer PCB, with everything but the input and output connectors mounted to the topside. That would make this board ideal for attaching to your latest project with a dab of hot glue or double-sided tape, as there are no components on the bottom to get pulled off when you inevitably have to do some rework.

The board takes 5 VDC as the input, and charges a single 3.7 V cell (such as an 18650) at up to 1 Amp. Or at least, it can if you add a heatsink or fan — otherwise, the notes seem to indicate that ~0.7 A is about as high as you can go before tripping the thermal protection mode.

Like the boilerplate TP4056 we covered recently, this might seem like little more than a physical manifestation of the typical application circuit from the chip’s datasheet. But we still think there’s value in showing how the information from the datasheet translates into the real-world, especially when it’s released under an open license like this.

A Retro-Style Trainer For Motorola’s 1-Bit Chip

If you want to program a microcontroller today, you pop open your editor of choice, bang out some code, and flash it over USB. But back in ancient times, when your editor was a piece of paper and you didn’t even have a computer of your own, things were a bit different. In that case, you might have reached for a “trainer”: a PCB that included the chip you wanted to program along with an array of switches, LEDs, and maybe even a hex keypad for good measure. Grab yourself the programming manual (printed on paper, naturally), and you’re good to go.

So when [Nicola Cimmino] became curious about the Motorola MC14500, a 1-bit ICU (Industrial Control Unit) from the 1970s, he could think of no more appropriate way to get up close and personal with the chip than to design an era-appropriate trainer for it. The resulting board, which he’s calling the PLC14500 Nano, is festooned with LEDs that show the status of the system buses and registers. Thanks to the chip’s single-step mode, this gives you valuable insight into what’s happening inside this piece of classic silicon.

An early breadboard version of the trainer.

But just because the board looks like it could have come from the 1970s doesn’t mean you have to live in the past. There’s an Arduino Nano on the backside of the trainer that handles communicating with a modern computer. [Nicola] even provided an assembler that lets you write your code in ASM before shuttling the binary off to the board for execution.

Interested in getting your hands on one? Not a problem. The design is completely open source for anyone who wants to build one at home. In fact, [Nicola] even got his trainer OSHW Certified. He’s also selling kits on Tindie, though at the time of this writing, they’re sold out.

This project has actually been a long time coming. We covered an early breadboard prototype of the concept back in 2015. We’re glad to see that [Nicola] was finally able to bring this one across the finish line. It’s a beautiful piece of hardware, and thanks to its open-source nature, something that the whole community can enjoy and learn from.