As we’ve learned from past experience, videos from [HowToLou] tend to be a bit controversial. His unique style of expedient engineering isn’t everyone’s cup of tea, especially when it’s combined with a devil-may-care attitude towards safety. On the other hand, there’s no arguing that his methods get results. His video on converting an 18 HP riding mower into something akin to a go-kart is a perfect example.
The first phase of the project involves removing all the hardware related to mowing, as obviously you won’t be cutting any grass while pushing speeds of 48 kph (30 mph). This both saves weight, and removes a lot of mechanical complication that would be in the way of further modification. That said, it also leaves the mower immobile, as there’s no longer be any connection between the engine and transaxle.
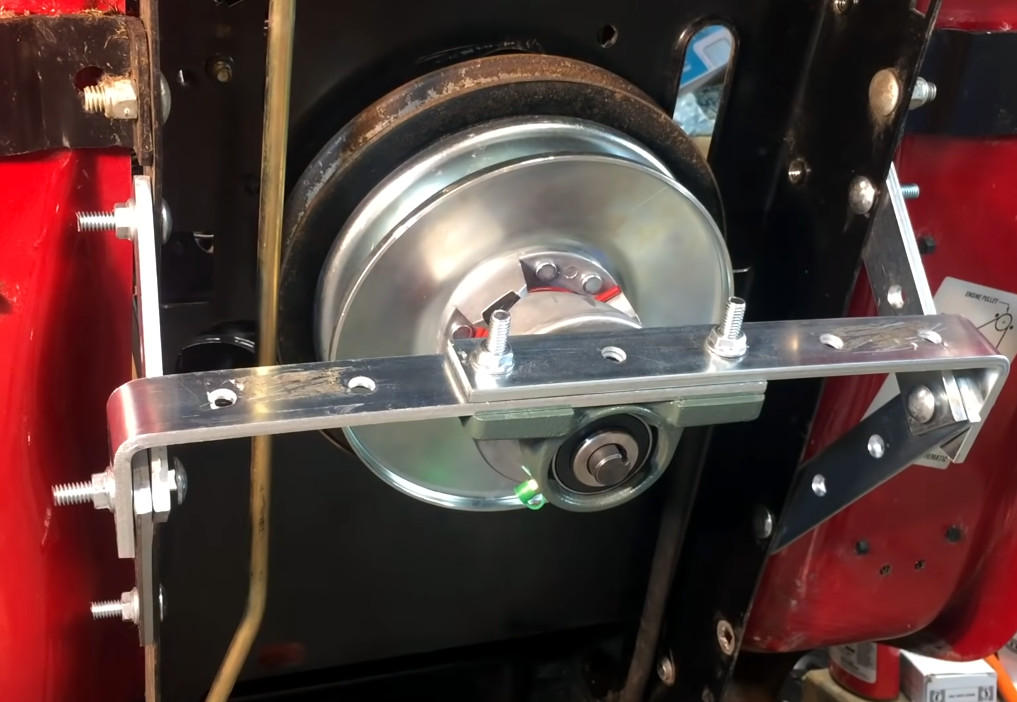
The new drivetrain features some beefy bracing.
In its place, [HowToLou] installs an off-the-shelf torque converter kit that uses a continuously variable transmission (CVT) clutch. As he quickly demos, the CVT technology allows the gear ratio to automatically adapt to the engine RPM thanks to pulleys that change their size depending on how fast they’re spinning. It’s a big improvement over the system he originally yanked out, though as you might expect, fitting it into the mower required some custom work. The final step was to pull the old pulley off of the transaxle and replace it with one that’s less than half the original size.
Wearing his protective flip-flops, [HowToLou] hops on the souped-up mower and is nearly thrown off the back of it as soon as he steps on the gas. Clearly the modifications were a success, and the video ends with some open road testing — presumably he’s riding off to the store to go buy a helmet.
We actually missed this video when it first made the rounds, but it has since picked up steam and is pulling in some impressive numbers. [HowToLou] tells us he thinks it’s due to the fact that a lot of people are upgrading to more modern zero-turn mowers, meaning there’s a surplus of these second-hand mini tractors on the market. Whatever the reason, we’re happy to see this backyard engineer get some mainstream success; his methods might not always be by the book, but they’re always entertaining.
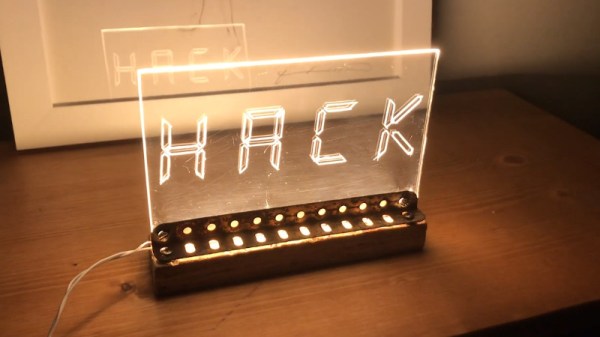
Whether in a shop window or mounted to the top of consoles in NASA’s Mission Control Center, edge lit acrylic is a popular choice for making high visibility signs. Partly because of their striking hologram-like appearance, but also because they’re exceptionally cheap and easy to produce. Just how cheap and easy? Take a look at this recent video from [Hack Modular] for a perfect example.
Now you might think you’d need something like a CNC router to produce a sign like this, and for more complex images, that’s arguably the case. But if you’re only concerned with text, and have a fairly steady hand, you can pull off the etching step with nothing more exotic than a printed template and a razor blade. Of course, the LCD style font that [Hack Modular] picked for this sign is particularly well suited to hand cutting — if you’re interested in edge lit calligraphy, this method probably isn’t what you’re looking for.
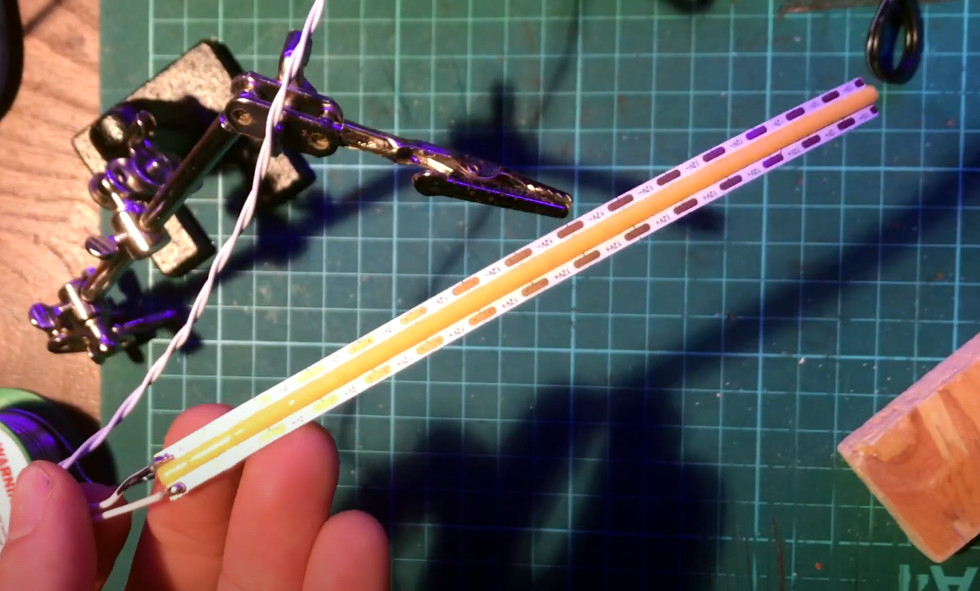
This linear LED provides a more consistent light.
With the text carved into the acrylic, the only missing ingredient is light. For that, [Hack Modular] is using a 12 volt linear LED strip light. That is, instead of being dotted with individual LEDs like traditional strips, it provides a continuous band of light that’s perfect for this application. That gets stuck down to a scrap piece of wood, and a rusty angle bracket from an old Meccano set is used to hold the acrylic right on the center-line. If you think the final product looks like something that was created from trash, don’t feel bad, that was the intent.
The end result looks great. In fact, if we’re being honest, it’s a lot better than we would have thought was possible using hand tools. Granted the choice of font has a lot to do with that, but then again, we wouldn’t mind if all our edge lit acrylic signs ended up looking like big seven-segment displays either.
It’s no surprise that the hacking and making community has traditionally had something of a love affair with movie props, especially those of the science fiction variety. Over the years we’ve seen folks put untold hours into incredible recreations of their favorite pieces of fictional gear — and by the time this post goes out, our 2022 Sci-Fi Contest will be entering into the final stretch. So it’s a safe bet that if you make your living by creating the electronics behind all that Hollywood movie magic, you’ll find ours to be an especially welcoming community.
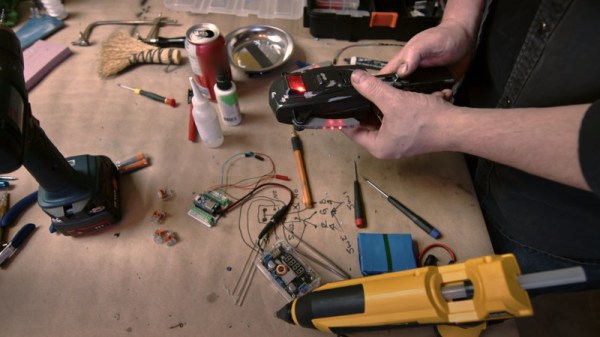
We were fortunate enough to see this in action this week when Ben Eadie stopped by to host the Hack Chat. It’s no exaggeration to say that he’s been living out what most of us would consider a dream, having worked on films from iconic franchises such as Star Trek and Predator. But perhaps his most enviable credit is that of propmaster for 2021’s Ghostbusters: Afterlife, where he got the chance to work on the proton packs and ghost traps; arguably some of the most well-known props in the history of cinema.
Not bad for a guy who only recently got in the game. Ben spent 20 years working as an aerounatical engineer until a friend from his local maker space mentioned they were working on a film and could use a hand. Suddenly he found himself behind the scenes of Star Trek: Beyond in 2015, helping to design and fabricate one of the largest rotating sets ever made. He figures he must have done something right, because Hollywood has been calling ever since.
This anecdote about his first time working on a feature film helped answer what many wanted to know early on in the Chat, which was how one manages to get into the prop and special effects industry. Ben once again confirmed a truth well known to this community: that what you’re capable of is far more important than where you went to school and what you studied. There’s not a lot of formal education out there that can train you to make the impossible possible, and Ben says the majority of his day-to-day knowledge came from a lifetime of fiddling around with electronics. In fact, he attributes much of his professional success with hanging out in maker spaces, reading Hackaday, and watching YouTube. If that’s the recipe, then we should all be in pretty good shape.
Over the last few years, Ben has been trying to pay that forward by documenting some of the tricks of the trade on his own YouTube channel. In a particularly interesting piece of marketing on Sony’s part, some of Ben’s videos have even been featured on the official Ghostbusters YouTube channel as part of a “Maker Monday” series. In fact, we first got in contact with Ben when he left a comment on our coverage of his “PKE Meter” prop build. This is the kind of advertisement we can get behind, and wish more companies would embrace the hacker and maker culture with this kind of interactive content. Ben says the best way to make initiatives like this more popular is to consume it — if Sony sees people watching and sharing this kind of content, hopefully more will follow.
Of course, it wouldn’t be a Hack Chat unless some arcane compartmentalized technical knowledge was dished out. In this case, several of the questions were about the unique challenges posed by operating custom electronics on a movie set. For example, Ben says he always uses addressable LEDs controlled by the APA102 chip as it offers an external clock pin that he can feed with a different frequency to avoid on-screen flickering. The radio spectrum also tends to be pretty noisy on set, so if at all possible, you want to make sure your gear has a wired connection. Otherwise, you’ll need to get intimately acquainted with what other RF signals are being used on set so as not to interfere with the production.
Ben’s creations include the Remote Trap Vehicle (RTV) from Ghostbusters: Afterlife.
But while some of the challenges he has to deal with might seem pretty foreign to us, the technology itself is in some cases more familiar than you might think. It turns out there’s plenty of Sparkfun and Adafruit gear behind the scenes, with Ben specifically mentioning the Feather nRF52 as one of his go-to microcontrollers. Sometimes the graybeards on set grumble about his “consumer grade” tech, but when his gear is up and running in half the time, it’s usually he who gets the last laugh.
Towards the end of the Chat, Ben says the most important thing he’s learned over the years is to always have backups. His motto is “One is None”, and if he can help it, he usually builds four of everything: that gives him two to learn from, and a pair to actually use for whatever the project is. Even if our own projects don’t quite rise to the level of a key prop from a summer blockbuster, there’s no certainly no harm in being prepared.
We want to thank Ben Eadie for taking the time to talk with the community and sharing some of his fascinating stories and tips with us. At the risk of sounding a bit sappy, stories like his are what motivates us here at Hackaday. If we can provide even a small part of the what it takes to help people like Ben achieve their goals, that’s reason enough for us to keep the lights on.
The Hack Chat is a weekly online chat session hosted by leading experts from all corners of the hardware hacking universe. It’s a great way for hackers connect in a fun and informal way, but if you can’t make it live, these overview posts as well as the transcripts posted to Hackaday.io make sure you don’t miss out.
It’s one of those things that certainly sounds simple enough: take a picture of a receipt, run it through optical character recognition (OCR), and send the resulting information to whatever expense-tracking website or software you wish. There are companies that offer such a service, so it can’t be too difficult to replicate on your own…right?
That’s what [Marcel Robitaille] thought when he set out to create his homebrew “Receipt Ingestion” system, anyway. But in reality it took so much time to troubleshoot and implement that he says it would have been faster to just enter in all his receipts by hand. We’re happy he stuck with it though, otherwise you wouldn’t be reading about it on Hackaday, and we wouldn’t be able to learn anything from the detailed account he’s provided.
It only took an evening to hack together a rough demo, and the initial results were very promising. The code could detect the edges of the receipt, rotate the captured image appropriately, and then pull out the critical information such as date, total amount, business name, etc. He was then able to decipher the API for Splitwise, an online service for splitting bills, by capturing the data sent by his browser while adding a new bill. With this information, writing up some Python code to push his captured data into the service was trivial. So far, so good.
Using a QR code as reference point.
But like so many horror films that begin with a happy family starting a new life in a beautiful home, there was a monster lurking in the shadows. It’s one thing to capture data from perfectly clean and flat receipts, but quite another to get any useful info out of one that spent half the day crumpled up in your back pocket. The promising proof of concept that worked a treat under controlled conditions failed completely in the real-world, with [Marcel] reporting that only 1 in 5 receipts he tried to scan actually went through.
In the end, [Marcel] realized that the best way to handle the unreliable condition of the receipts was to focus on a different object in the image. He came up with a QR code marker that he could put on the table with the receipt to be scanned, which his software can use as a known point of reference. This greatly improves the reliability of the image rotation and transformation, which in turn makes the OCR more reliable. It also makes it much easier to tell which images need to be scanned — if there’s no QR code found, the software just skips that shot and keeps looking.
The unique challenges of digitizing large amounts of printed content using OCR makes for some fascinating problem solving, and we’re glad [Marcel] shared this particular story with us. While there’s still some edge cases that need chasing down, he’s using the software on a nearly daily basis, and has posted it up on GitHub for anyone who might wish to build on his efforts.
As far as input devices go, the potentiometer is pretty straightforward: turn it left, turn it right, and you’ve pretty much seen all there is to see. For many applications that’s all you need, but we can certainly improve on the experience with modern technology. Enter this promising project from [upir] that pairs a common potentiometer with a cheap OLED display to make for a considerably more engaging user experience.
To save time, the code is fine tuned in a simulator.
The basic idea is to mount the display over the potentiometer knob so you can show useful information such a label that shows what it does, and a readout of the currently detected value. But you’ll likely want to show where the knob is currently set within the range of possible values as well, and that’s where things get interesting.
In the video after the break, [upir] spends a considerable amount of time explaining the math behind details like the scrolling tick marks. The nearly 45 minute long video wraps up with some optimization, as getting the display to move along with the knob in real-time on an Arduino UNO took a bit of extra effort. The final result looks great, and promises to be a relatively cheap way to add an elegant and functional bit of flair to an otherwise basic knob.
With the code and this extensive demonstration of how it all works, adding a similar capability to your next knob-equipped gadget shouldn’t be too much of a challenge. Perhaps it could even be combined with the OLED VU meters we’ve covered previously. Be sure to let us know if you end up using this technique, as we’d love to see it in action.
This weekend the InfoAge Science and History Museum in Wall, New Jersey will once again play host to the Vintage Computer Festival East — the annual can’t-miss event for anyone who has even a passing interest in the weird and wonderful machines that paved the way for the supercomputers we now all carry around in our pockets. Ticket holders will have access to a program absolutely jam packed with workshops, talks, and exhibits that center around the dual themes of “Women in Computing” and “Computers for the Masses”, plus a consignment and vendor area that almost guarantees you’ll be going home a little poorer than when you got there. But hey, at least you’ll have some new toys to play with.
For those that can’t make the pilgrimage to the tropical wonderland that is the Jersey Shore in April, all three days of the Festival will be live-streamed to the VCF YouTube page. There’s even an official Discord server where you can chat with other remote attendees. We’re glad to see more events adopting a hybrid approach after two years of COVID-19 lockdown, as it gives the far-flung a chance to participate in something they would otherwise miss completely. That said, there’s no virtual replacement for the experience of browsing the exhibits and consignment areas, so if it’s at all possible we recommend you get yourself to InfoAge for at least one of the days.
Incidentally, don’t worry if you’ve got the sneaking feeling that it hasn’t been anywhere near a year since the last time the VCF descended on Wall Township. The 2021 Festival got pushed to October because of the lingering plague, but rather than permanently change the date going forward, the 2022 Festival has returned to its traditional season. Of course that means the wait until VCF 2023 will seem unusually long after this double-shot, so here’s hoping we see another swap meet at the InfoAge campus before the end of the year.
The 2022 Hackaday Prize is on, and we’ve already seen some incredible submissions by folks who believe their idea just might have what it takes to make the world a better place. But as with all contests, it’s good to understand all the rules before you get too involved. We promise nothing’s hidden in the fine print, but we certainly don’t fault anyone who wants to make sure.
Which is why Majenta Strongheart, Head of Design and Partnerships at our parent company Supplyframe, stopped by this week’s Hack Chat to answer any and all questions the community had about this global hardware design challenge. A lot of ground was covered in an hour, with Majenta making sure everyone’s questions and concerns were addressed to their satisfaction. After all, with a residency at the Supplyframe DesignLab and a total of $125,000 in prize money up for grabs, we want to make sure everyone’s got the facts straight.
So what burning questions did the Hackaday community have about this year’s Prize? Several people wanted to know more about the themes of sustainability, circularity, and climate crisis resiliency. For example, what exactly does circularity mean in this context? While Challenge #2 “Reuse, Recycle, Revamp” most clearly exemplifies the idea, Majenta explained that this time around the judges will be giving particular consideration to ideas that limit the extraction of raw materials and the production of waste.
For a practical example, 2022 Hackaday Prize judge James Newton pointed to the direct granule extruder designed by Norbert Heinz. The project, which took 5th place last year, allows waste plastic to easily be repurposed in a desktop 3D printer. This includes objects which the printer itself produced, but for whatever reason, are no longer desired or needed. This “life-cycle” for printed objects, wherein the same plastic can be printed over and over again into new objects, is a perfect encapsulation of circularity within the context of this year’s prize.
Others were looking for clarification on the contest rules. Specifically, there was some confusion about entering existing projects into the competition. Did it have to be a completely new idea? What if you’d already been working on the project for years, but had never shown it publicly before? Not to worry — existing projects can absolutely be entered into the 2022 Hackaday Prize. In fact, even if the project had already been entered into the Hackaday Prize previously, it’s still fair game.
But there is an important caveat: to be eligible for this year’s Prize, the project MUST be documented on a new Hackaday.io page. Additionally, if it’s a project that has previously been entered into a Hackaday contest, you’ll have to show that it is “significantly different from when previously entered and show meaningful development during the course of the Contest“, as stated in the official rules. In layman’s terms, it means that anyone who tries to submit and old and outdated Hackaday.io page into the competition will find their entry disqualified.
Towards the end of the Chat, Erin Kennedy, a Hackaday Prize veteran that readers may know better as “Erin RobotGrrl” brought up the subject of mentors. In previous years, hardware luminaries like Andrew “Bunnie” Huang and Mitch Altman were made available to offer advice and guidance to the individuals and teams behind the Prize entries. While very proud of this effort, Majenta explained that at least for now, Mentor Sessions are on hold until that aspect of the program can be retooled. The main issue is figuring out the logistics involved; planing video calls between several groups of busy folks is just as tricky as it sounds. That said, bringing the Mentor Sessions back for 2022 isn’t completely out of the question if there’s enough interest from the competitors.
We appreciate Majenta taking the time to directly answer questions from the community, and hope that those who had their questions or concerns addressed during the Chat will ultimately decide to toss their hat into the ring. With a worthy goal and plenty of opportunities to win, we sincerely want to see as many people as possible get their entries in before the October 16th deadline. If you’re ready to take the next step, head over to the Contest page and show us what you’ve got.
The Hack Chat is a weekly online chat session hosted by leading experts from all corners of the hardware hacking universe. It’s a great way for hackers connect in a fun and informal way, but if you can’t make it live, these overview posts as well as the transcripts posted to Hackaday.io make sure you don’t miss out.