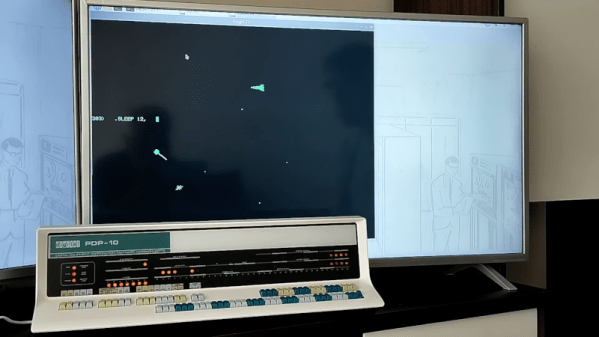
Integration Taught Correctly

[Math the World] claims that your calculus teacher taught you integration wrong. That’s assuming, of course, you learned integration at all, and if you haven’t forgotten it. The premise is that most people think of performing an integral as finding the area under a curve or as the “antiderivative.” However, fewer people think of integration as adding up many small parts. The video asserts that studies show that students who don’t understand the third definition have difficulty applying integration to real-world problems.

We aren’t sure that’s true. People who write software have probably looked at numerical integration like Simpson’s rule or the midpoint rule. That makes it pretty obvious that integration is summing up small bits of something. However, you usually learn that very early, so you’re forgiven if you didn’t get the significance of it at the time.

Continue reading “Integration Taught Correctly”

Radioactive 3D Printed Flower Glows And Glows

Glow-in-the-dark projects aren’t that uncommon. You can even get glow-in-the-dark PLA filament. However, those common glowing items require a charge from light, and the glow fades very quickly. [Ogrinz Labs] wasn’t satisfied with that. His “Night Blossom” 3D-printed flower glows using radioactive tritium and will continue to glow for decades.

Tritium vials are available and often show up in watches for nighttime visibility. The glow doesn’t actually come directly from the radioactive tritium (an isotope of hydrogen). Instead, the radioactive particles excite phosphor, which glows in the visible spectrum.

Once you have the vials, it is easy to understand how to finish off the project. The flower contains some long tubes inside each petal. There are also a few tiny vials in the center. The whole assembly goes together with glue.

Continue reading “Radioactive 3D Printed Flower Glows And Glows”

Ask Hackaday: What If You Did Have A Room Temperature Superconductor?

The news doesn’t go long without some kind of superconductor announcement these days. Unfortunately, these come in several categories: materials that require warmer temperatures than previous materials but still require cryogenic cooling, materials that require very high pressures, or materials that, on closer examination, aren’t really superconductors. But it is clear the holy grail is a superconducting material that works at reasonable temperatures in ambient temperature. Most people call that a room-temperature superconductor, but the reality is you really want an “ordinary temperature and pressure superconductor,” but that’s a mouthful.

In the Hackaday bunker, we’ve been kicking around what we will do when the day comes that someone nails it. It isn’t like we have a bunch of unfinished projects that we need superconductors to complete. Other than making it easier to float magnets, what are we going to do with a room-temperature superconductor? Continue reading “Ask Hackaday: What If You Did Have A Room Temperature Superconductor?”

What Is X86-64-v3?

You may have heard Linux pundits discussing x86-64-v3. Can recompiling Linux code to use this bring benefits? To answer that question, you probably need to know what x86-64-v3 is, and [Gary Explains]… well… explains it in a recent video.

If you’d rather digest text, RedHat has a recent article about their experiments using the instructions set in RHEL10. From that article, you can see that most of the new instructions support some enhancements for vectors and bit manipulation. It also allows for more flexible instructions that leave their results in an explicit destination register instead of one of the operand registers.

Of course, none of this matters for high-level code unless the compiler supports it. However, gcc version 12 will automatically vectorize code when using the -O2 optimization flags.

Continue reading “What Is X86-64-v3?”

Tetris Goes Round And Round

You’ve probably played some version of Tetris, but [the Center for Creative Learning] has a different take on it. Their latest version features a cylindrical playing field. While it wouldn’t be simple to wire up all those LEDs, it is a little easier, thanks to LED strips. You can find the code for the game on GitHub.

In all, there are 5 LED strips for a display and 13 strips for the playing area, although you can adjust this as long as there are at least 10 rows. The exact number of LEDs will depend on the diameter of the PVC pipe you build it on.

Continue reading “Tetris Goes Round And Round”

Your Scope, Armed And Ready

[VoltLog] never has enough space on his bench. We know the feeling and liked his idea of mounting his oscilloscope on an articulated arm. This is easy now because many new scopes have VESA mounts like monitors or TVs. However, watching the video below, we discovered there was a bit more to it than you might imagine.

First, there are many choices of arms. [VoltLog] went for a cheap one with springs that didn’t have a lot of motion range. You may want something different. But we didn’t realize that many of these arms have a minimum weight requirement, and modern scopes may be too light for some of these arms. Most arms require at least 2 kg of weight to balance the tensions in their springs or hydraulics. Of course, you could add a little weight to the mounting plate of the arm if you needed it. The only downside we see is that it makes it hard to remove the scope if you want to use it somewhere else.

Assuming you have a mount you like, the rest is easy. Of course, your scope might not have VESA mounting holes. No problem. You can probably find a 3D printed design for an adapter or make (or adapt) your own. You might want to print a cable holder at the same time.

Honestly, we’ve thought of mounting a scope to the wall, but this seems nicer. We might still think about 3D printing some kind of adapter that would let you easily remove the scope without tools.

Of course, there is another obvious place to mount your scope. Monitor arms can also mount microscopes.

Continue reading “Your Scope, Armed And Ready”

Mirror, Mirror, Electron Mirror…

If you look into an electron mirror, you don’t expect to see your reflection. As [Anthony Francis-Jones] points out, what you do see is hard to explain. The key to an electron mirror is that the electric and magnetic fields are 90 degrees apart, and the electrons are 90 degrees from both.

You need a few strange items to make it all work, including an electron gun with a scintillating screen in a low-pressure tube. Once he sets an electric field going, the blue line representing the electrons goes from straight to curved.

Continue reading “Mirror, Mirror, Electron Mirror…”