Failing At Making Ferrofluid

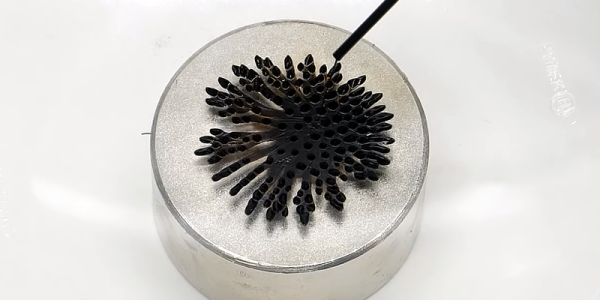
[NileRed] admits that while ferrofluid has practical uses, he simply wanted to play with it and didn’t want to pay the high prices he found in Canada. A lot of the instructions he found were not for making a true ferrofluid. He set out to create the real thing, but he wasn’t entirely successful. You can see the results — which aren’t bad at all — in the video below.

We’ve always said you learn more from failure than success. The process of creating ferrofluid involves two key steps: creating coated nanoparticles of magnetite and removing particles that are too large or improperly coated. After the first not entirely satisfactory attempt, [NileRed] tried to purify the material using solvents and magnets to create better-quality particles. Even the “bad” material, though, looked fun to play with along with a powerful magnet.

You’ll see that the material is clearly magnetic, it just doesn’t spike like normal ferrofluid. [NileRed] had commercial ferrofluid for testing and found that if he diluted it enough, it behaved like his homemade fluid. So while not conclusive, it seems like he diluted the batch too much.

We hope to see a better batch from him soon. The base material he used for the first patch was homemade — he covers that in a different video. However, for the second batch, he is going to start with commercial ferric chloride — what we know as PCB etchant.

Even though the experiment was not entirely successful, we enjoyed seeing the process and watching the performance of both the homemade batch and the commercial ferrofluid. He’s getting a lot of advice and speculation in the video comments, and it is very possible a Hackaday reader might be able to help, too.

We’ve seen other reports of unsuccessful ferrofluid production. If you need a practical reason to make or buy some, how about a clock?

Competitive Surface Mount Soldering Comes To Supercon

Who will show the best soldering skills at the Hackaday Superconference next week? We have a little — in fact, a very little — challenge for you: solder surface mount components down to a tiny 0201 package. This is the SMD Soldering Challenge and successfully finishing the board at all shows off the best of hand soldering skills, but during the weekend we’ll also keep a running leader board.

Ballpoint pen for scale

For the event we’re using the SMD Challenge board by MakersBox which utilizes a SOIC8 ATtiny85 to drive LED/resistor pairs in 1206, 0805, 0603, 0402, and 0201 packages. There will be a 5 minute inspection time at the start of the heat to open the kit, get familiar with the board, and confirm that you have all of the components and tools you need. We suggest not sneezing while placing that 0201 part down on the board — there is a spare set of 0201 parts only in the kit so you might get one extra chance with the smallest parts if you need it, but replacements will not be provided for parts lost during the heat.

There will be eight heats of six people participating so make sure you get signed up as soon as you get to Supercon. You can only compete once and you must use our soldering iron and solder. We will also have magnifiers, tweezers, flux, and desoldering braid on hand. You can bring reasonable tools and other support materials; Supercon staff running the challenge are the arbiters of “reasonable” in this case.

Scoring is based on time, completion, functionality (of the circuits you attempted to complete), neatness, and solder joint quality. If the top score is a tie, the fastest time across all the heats will be the winner. The official rules are on the event page so take a moment to look them over.

Don’t think it is going to be easy. Here’s a quote from the SMD Challenge board project page:

Be warned that trying to hand solder a 0201 package, which is just slightly larger than a grain of sand, may be considered evidence of insanity and get you committed to bad places by your loved ones and/or arch nemesis

The real prize is the bragging rights of being the Hackaday soldering virtuoso. Do you have what it takes? Someone reading this right now will be. But the first step is to show up at the Hackaday Superconference. See you there and good luck!

Paper Airplane Database Has The Wright Stuff

We’ve always had a fascination with things that fly. Sure, drones are the latest incarnation of that, but there have been RC planes, kites, and all sorts of flying toys and gizmos even before manned flight was possible. Maybe the first model flying machine you had was a paper airplane. There’s some debate, but it appears the Chinese and Japanese made paper airplanes 2,000 years ago. Now there’s a database of paper airplane designs, some familiar and some very cool-looking ones we just might have to try.

If you folded the usual planes in school, you’ll find those here. But you’ll also find exotic designs like the Sea Glider and the UFO. The database lets you select from planes that work better for distance, flight time, acrobatics, or decoration. You can also select the construction difficulty and if you need to make cuts in the paper or not. There are 40 designs in all at the moment. There are step-by-step instructions, printable folding instructions, and even YouTube videos showing how to build the planes.

Continue reading “Paper Airplane Database Has The Wright Stuff”

3D Printed Bridge Goes Dutch

If you’ve ever been to Amsterdam, you know there are plenty of canals and, therefore, plenty of bridges. Next year, a unique pedestrian bridge in the old city center will go into service. The stainless steel bridge will be 3D printed and also embed a number of sensors that will collect data that the printer — MX3D — and their partners Autodesk, the Alan Turing Institute, and the Amsterdam Institute for Advanced Metropolitan Studies, hope will help produce better 3D printed structures in the future. The bridge will cross the Oudezijds Achterburgwal which is near the city’s infamous red light district.

Since the bridge matches exactly with the model used to print it, scientists hope to be able to map the sensor data to a virtual twin of the bridge very easily. You can see a few videos about the bridge’s construction below. This month, during Dutch Design Week, visitors had a chance to walk across the bridge to generate some of the first live datasets.

Continue reading “3D Printed Bridge Goes Dutch”

Linux Fu: Marker Is A Command Line Menu

The command line. You either love it or hate it, but if you do anything with a Unix-like system you are going to have to use it eventually. You might find marker — a system billed as a “command palette for the terminal” — a useful program to install. We couldn’t decide if it was like command history on steroids or more of a bookmark system. In a way, it is a little of both.

Your history rolls off eventually and also contains a lot of small commands (although you can use the HISTIGNORE variable to ignore particular commands). With marker, you save specific commands and they stay saved. There are no extra commands nor do the ones you save ever roll off.

Of course, you could just make a shell script or an alias if that’s all there was to it. Marker lets you add a description to the command and then you can search through the commands and the descriptions using a fuzzy incremental search. In addition, you can put placeholders into your command lines that are easily replaced. There are some built-in commands to get you started and the same bookmarks will work in bash and zsh, if you use both.

Continue reading “Linux Fu: Marker Is A Command Line Menu”

One Man’s Quest To Build His Own Speakers

Why build your own stereo speakers? Some people like to work on cars in their garage. Some people build fast computers. Others seek the perfect audio setup. The problem for a newcomer is the signal to noise ratio among audiophile experts. Forums are generally filled with a vocal group of extremists obsessing on that last tiny improvement in some spec.  It can be hard for a beginner to jump in and learn the ropes.

[Ynze] had this problem. He’d finished a custom amplifier and decided to build his own speakers. He found a lot of spirited debates about what was important for good speakers. He tried to wade through the discussions and determine which things had real practical value. The results and his speaker build are documented in a post that you’ll want to check out if you would like to design and build your own speakers.

Some of the topics ranged from solder type to capacitor construction and 700 Euro capacitors. [Ynze’s] goal was to build something that sounded good while keeping costs in line. He claims he spent about 250 Euro and wound up with speakers equivalent to 750 Euro store-bought speakers.

Continue reading “One Man’s Quest To Build His Own Speakers”

$3 Multimeter Teardown

[Diode Gone Wild] and his cat decided to see how a $3 meter worked inside. The meter was marked as a DT-830B and he already had an older one of the same model, and he wondered how they could afford to sell it — including shipping — for $3. You can see a video of his testing, teardown, and reverse engineering below.

What was odd is that despite having the same model number, the size of the meter was a bit different. When he opened the case to install a battery, he noticed the board didn’t look like it had fuses or components appropriate for the rated voltages. He decided the missing parts might be under the board and tested the meter.

Continue reading “$3 Multimeter Teardown”