3D Printed Speaker Uses DSP For Ultimate Performance

Speaker design used to be as much about woodwork as it was about advanced acoustic mathematics. In recent decades, technologies such as digital signal processing and 3D printing have changed the game significantly. Leaning heavily on these techniques, [ssashton] developed a design called Mr. Speaker.

The speaker contains a 3″ woofer for good bass response, and twin tweeters to deliver stereo audio. Using WinISD to help do the requisite calculations on porting and volume, [ssashton] designed a swooping 3D printed enclosure with a striking design. Sound comes into the unit through an off-the-shelf Bluetooth module, before being passed to an ADAU1401 digital signal processing unit. From there, it’s passed to a mono amp to drive the woofer and a stereo one for the tweeters.

To get the flattest frequency response possible and maintain linear phase, it’s all about DSP in this case. RePhase software was used to design a DSP filter to achieve these goals, helping the speaker to produce the desired output. The ADAU1401 DSP was then programmed using Sigma Studio, which also allows the designer to do things such as split outputs for seperate woofer and tweeter drives.

[ssashton] does a great job of explaining both DSP principles and old-school speaker design tricks, from phase plugs to reflections. The use of 3D printed parts to rapidly iterate the design is impressive, too. We’d love to see the final enclsoure get an acetone smoothing treatment to really take it over the edge.

If you’re into serious speaker design and want more, be sure to check out this advanced transmission line design. For those of you with your own builds with some nifty tricks, drop us a note on the tipline.
 

Simple Plasma Cutter Collision Detection System

Machine tools often have powerful drive motors, allowing them to work quickly and accurately to get the job done fast. However, this can cause major damage if the tool head collides with an unexpected object. To protect against such occurances, [Xnaron] developed a simple system to shut down his plasma cutter in the event of a crash.

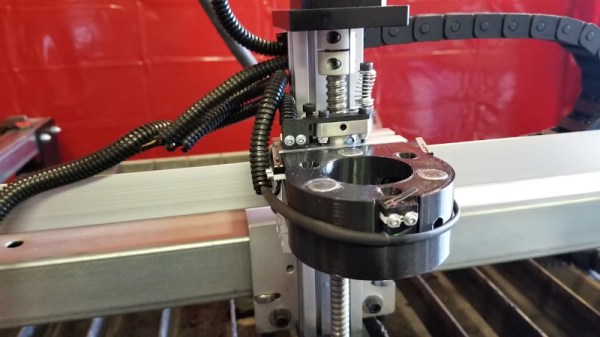
The system consists of a 3D printed collar that fits around the plasma cutting torch. The collar has two mating parts, which are held together with three magnets and three ball bearings to act as a key, maintaining the correct orientation. Three limit switches are then fitted, held closed by the two mating halves. When the torch collides with an object, this causes the magnetic coupling to seperate, triggering one or more of the limit switches, and shutting down the machine safely.

Video of an unplanned collision shows the device working well. It’s a neat solution that could probably be adapted to other types of machine tool that don’t experience high lateral forces. Of course, if you don’t yet have a plasma cutter, you can always make your own. Video after the break.

Continue reading “Simple Plasma Cutter Collision Detection System” →

Wobble Disk Coffee Roaster Gets The Beans Just Right

Coffee roasting is an art or a science, depending on who you talk to. Both camps will however agree that attention to detail is key. Many diehard beanheads, as they’re known, will go so far as to create their own roasting hardware to get the job done just right. [Larry Cotton] is one such builder, who has created an elegant roaster to get his brew just right.

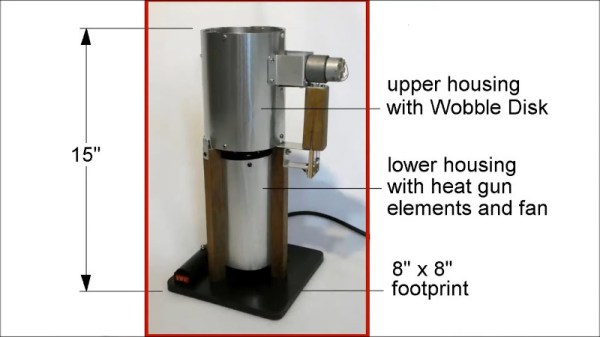
The build is based around a wobble disk design. This consists of a round plate fixed at a 45-degree angle to a rotating shaft. As the shaft spins, the disk gently sweeps and agitates the roast, allowing the batch to heat up evenly without burning the beans. It’s a two-part design, with heat gun parts in the base to generate the hot air for the roasting process. The bean basket sits on top, held in place by magnets that also act as a conduit for the wobble disk motor’s power supply.

It’s a tidy build, which allows for accurate roasting and easy dumping of the beans once finished. If you’re a serious beanhead yourself with a few hacks up your sleeve, be sure to let us know! Video after the break.

Continue reading “Wobble Disk Coffee Roaster Gets The Beans Just Right” →

384 Neon Bulbs Become Attractive Display

Neon lights have inspired much prose over the years, with their attractive light output receiving glowing adulation. [Pierre Muth] is a big fan, and decided to spend lockdown creating something suitably pretty for his desk.

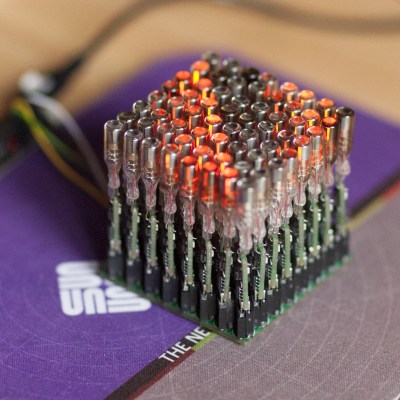
An 8×8 segment of the total panel. The display draws 40W at 5V with all pixels on at the same time.

The project consists of an 8×48 matrix display constructed out of INS-1 (ИНC-1) tubes. These tiny neon tubes are 6.5 mm in diameter, showing a bright orange dot of light when powered up. Requiring just 100 V and 0.5 mA to light, they’re a touch easier to drive than the famous Nixie.

[Pierre] decided to go all out, wishing to replicate the capabilities of smart LEDs like the WS2812. These contain a microcontroller built in to each LED, so [Pierre] would have to do the same. Each of the 384 neon tubes got its own bespoke PCB, containing a PIC16F15313 microcontroller, step up voltage circuitry, and a 6-pin connector. (Whoah!) When each bulb was soldered to its PCB, they were then plugged into a backplane. An ESP32 was then employed to drive the display as a whole.

Creating a display in this fashion takes a huge amount of work, with most of it being soldering the 384 individual bulb PCBs containing 11 components each. We have a lot of respect for [Pierre]’s work ethic to get this done during lockdown, and the final result is a gloriously retro neon matrix display. We’ve featured other neon matrixes recently, too. Video after the break. Continue reading “384 Neon Bulbs Become Attractive Display” →

Die Lapping For Better CPU Performance

CPUs generate their heat in the silicon die that does all those wonderful calculations which make our computers work. But silicon conducts heat fairly poorly, so the thinner your CPU die, the better it will conduct heat out to the heatsink. This theoretically promises better cooling and thus more scope for performance. Thus, it follows that some overclockers have taken to lapping down their CPU dies to try and make a performance gain.

It’s not a simple process, as the team at [Linus Tech Tips] found out. First, the CPU must be decapped, which on the Intel chip in question requires heating to release the intermediate heat spreader. A special jig is also required to do the job accurately. Once the bare CPU is cleaned of all residual glue and heat compounds, it can then be delicately lapped with a second jig designed to avoid over-sanding the CPU.

After much delicate disassembly, lapping, and reassembly, the CPU appears to drop 3-4 degrees C in benchmarks. In overclocking terms, that’s not a whole lot. While the process is risky and complicated for little gain, the underlying premise has merit – Intel thinned things out in later chips to make minor gains themselves. Video after the break.

Continue reading “Die Lapping For Better CPU Performance” →

Flipping A Coin 10,000 Times With A Dedicated Machine

Flipping a coin is often the initial example used to help teach probability and statistics to maths students. Often, there is talk of how, given a fair coin, the probability of landing heads or tails should approach 0.5. Of course, if you want to test this, it pays to have a machine do the hard work for you. [Andrew Consroe] has the rig to do just that.

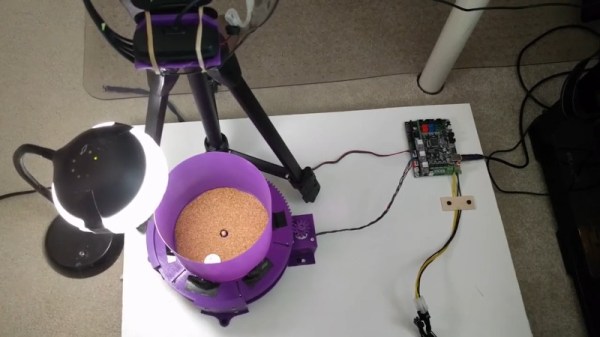
The build consists largely of 3D printed parts. A large cylindrical shroud is used to keep the coin within the flipping area. A spring-loaded dowel is actuated by a stepper motor spinning a cam, which flips the coin. Once the coin has landed, it is photographed with a webcam. An image processing pipeline then determines whether the coin landed heads or tails. A black spot is used on one side of the coin to aid analysis, as the poor-quality webcam images weren’t good enough to recognise the coin in its standard form. Once the flip has been analysed, a sliding aperture is used to push the coin back towards the flipper for the next cycle.

The machine completes a flip approximately every two seconds, meaning 10,000 flips would take approximately 2.5 days. Unfortunately, due to noise and occasional coin escapes, [Andrew] hasn’t yet been able to achieve his goal. He aims to increase speed significantly before making an all-out attempt.

Coin flips can make for decent random numbers, but if you need better ones, perhaps NIST can help you out. Video after the break.

Continue reading “Flipping A Coin 10,000 Times With A Dedicated Machine” →

Life Size Lancer Becomes Gears Of War Motion Controller

Gears of War is a franchise famous for its giant gun with a big chainsaw on the front. [Eric] laid his hands on a toy replica, and decided it had to become a usable motion controller for the game.

The build is straightforward, following the usual format for motion controller builds. Fitted with a gyroscope and accelerometer, it’s interfaced to the PC using a microcontroller. The toy has a trigger which is hooked up to the fire button in game. Additional buttons were added to the shell for movement and other actions such as reloading and finding cover. As a nice final touch, the large pull handle on the left of the weapon is used to activate the chain saw in-game.

While it’s unlikely to be competitive with a mouse or even gamepad in practice, it’s hard to argue against the fun of wielding a full-size, 10-pound weapon when playing Gears of War 5. [Eric] has also shared a basic controller hacking guide for those eager to get into similar builds themselves. We’ve featured [Eric]’s work before, too – with this epic Minecraft pickaxe build. Video after the break.

Continue reading “Life Size Lancer Becomes Gears Of War Motion Controller” →