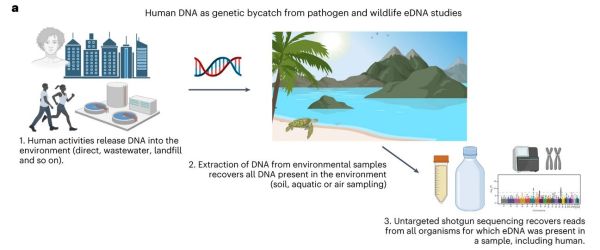
Scavenging CDs For Flexible Parts

CDs are becoming largely obsolete now, thanks to the speed of the internet and the reliability and low costs of other storage media. To help keep all of this plastic out of the landfills, many have been attempting to find uses for these old discs. One of the more intriguing methods of reprurposing CDs was recently published in Nature, which details a process to harvest and produce flexible biosensors from them.

The process involves exposing the CD to acetone for 90 seconds to loosen the material, then transferring the reflective layer to a plastic tape. From there, various cutting tools can be used to create the correct pattern for the substrate of the biosensor. This has been shown to be a much more cost-effective method to produce this type of material when compared to modern production methods, and can also be performed with readily available parts and supplies as well.

The only downside to this method is that it was only tested out on CDs which used gold as the conducting layer. The much more common aluminum discs were not tested, but it could be possible with some additional research. So, if you have a bunch of CD-Rs laying around, you’re going to need to find something else to do with those instead.

Thanks to [shinwachi] for the tip!

Ask Hackaday: What Was Your First Electronics Win?

Back in high school, I joined the stage crew — because of course I did. As student theater groups go, it was pretty active, and with two shows to produce each year, there was always a lot of work to do. I gravitated to the lighting crew, which was a natural fit for me. Besides the electrical part of the job, there was also a lot of monkeying around on scaffolding and rickety ladders to hang the lights, which was great fun for the young and immortal. Plus there was the lighting console to run during performances, a job I eventually took over for my last two years.

Unfortunately, the lighting system was a bit pathetic. The console was mounted in the stage right wings, rather than out in the front of the house where a sensible person would put it. And despite being only about ten years old, the dimmers were already starting to fail. The board had about 20 channels, but you could always count on one of the channels failing, sometimes during a show, requiring some heroics to repatch the lights into one of the dimmers we always left as a spare, just for the purpose.

Continue reading “Ask Hackaday: What Was Your First Electronics Win?”

R2Home Is Ready To Bring Back Your High Altitude Payload

With high-altitude ballooning, you are at the mercy of the winds, which can move your payload hundreds of kilometers and deposit it in some inaccessible spot. To solve this [Yohan Hadji] created R2Home, an autonomous parachute-based recovery system that can fly a payload to any specified landing site within its gliding range.

We first covered R2Home at the start of 2021, when he was still in the early experimental phases, but the project has matured massively since then. It just completed its longest and highest test flight. Descending autonomously from a release altitude of 3500 m, with an additional radiosonde payload, it landed within 5 m of the launch point.

R2Home electronics with it's insulated enclosure
R2Home electronics with its insulated enclosure

R2Home can fly using a variety of steerable canopies, even a DIY ram-air parachute, as demonstrated in an earlier version. [Yohan] is currently using a high-performance wing for RC paragliders.

A lot of effort went into developing a reliable parachute deployment system. The main canopy is packed carefully in a custom “Dbag”, which is attached to a drogue chute to stabilize the system during free-fall and deploy the main canopy at a preset altitude. This is done with a servo operated release mechanism, while steering is handled by a pair of modified winch servos intended for RC sailboats.

All the electronics are mounted on a stack of circular 3D printed brackets which fit in a tubular housing, bolted together with threaded rods. With the help of a design student [Yohan] also upgraded the simple tube housing to a lockable, foam-insulated design to help it handle temperatures at high altitudes.

The flight main flight computer is a Teensy 4.1  plugged into a custom PCB to connect all the navigation, communication, and flight systems. The custom Arduino-based autopilot takes inputs from a GPS receiver, and pilots the system to the desired drop zone, which it circles until touchdown.

The entire project is extremely well documented, and all the design files and code are open source and available on Github. Continue reading “R2Home Is Ready To Bring Back Your High Altitude Payload”

Dead Spider Becomes Robot Gripper: It’s Necrobotics!

Robot arms and grippers do important work every hour of every day. They’re used in production lines around the world, toiling virtually ceaselessly outside of their designated maintenance windows.

They’re typically built out of steel, and powered by brawny hydraulic systems. However, some scientists have gone for a smaller scale approach that may horrify the squeamish. They’ve figured out how to turn a dead spider into a useful robotic gripper.

The name of this new Frankensteinian field? Why, it’s necrobotics, of course!

Continue reading “Dead Spider Becomes Robot Gripper: It’s Necrobotics!”

Re-Creating The Unique Look Of Unobtainable Aerochrome Film

Ever heard of Aerochrome? It’s a unique type of color infrared film, originally created for the US military and designed for surveillance planes. Photos taken with Aerochrome film show trees and other vegetation in vivid reds and pinks, creating images that aren’t quite like anything else.

A modified method of trichrome photography is the key behind re-creating that unique Aerochrome look. Click to enlarge.

Sadly, Aerochrome hasn’t been made for over a decade. What’s an enterprising hacker with a fascination for this unobtainable film to do? [Joshua] resolved to recreate it as best he could, and the results look great!

Aerochrome isn’t quite the same as normal film. It is sensitive to infrared, and photos taken with it yield a kind of false color image that presents infrared as red, visible reds as greens, and greens are shown as blue. The result is a vaguely dreamy looking photo like the one you see in the header image, above. Healthy vegetation is vividly highlighted, and everything else? Well, it actually comes out pretty normal-looking, all things considered.

Why does this happen? It’s because healthy, leafy green plants strongly absorb visible light for photosynthesis, while also strongly reflecting near-infrared. This is the same principle behind the normalized difference vegetation index (NDVI), a method used since the 70s to measure live green vegetation, often from satellite imagery.

Aerochrome may be out of production, but black and white infrared film is still available. [Joshua] found that he could re-create the effect of Aerochrome with an adaptation of trichrome photography: the process of taking three identical black and white photos, each using a different color filter. When combined, the three photos (acting as three separate color channels) produce a color image.

To reproduce Aerochrome, [Joshua] takes three monochromatic photos with his infrared film, each with a different color filter chosen to match the spectral sensitivities of the original product. The result is a pretty striking reproduction of Aerochrome!

But this method does have some shortcomings. [Joshua] found it annoying to fiddle with filters between trying to take three identical photos, and the film and filters aren’t really an exact match for the spectral sensitivities of original Aerochrome. He also found it difficult to nail the right exposure; since most light meters are measuring visible light and not infrared, the exposure settings were way off. But the results look pretty authentic, so he’s counting it as a success.

We loved [Joshua]’s DIY wigglecam, and we’re delighted to see the work he put into re-creating an authentic Aerochrome. Fantastic work.

Self-Hosted Pi Pico Development

Older readers and those with an interest in retrocomputing may remember the days when a computer might well have booted into a BASIC interpreter. It was simultaneously a general purpose device that could run any software it would load, and also a development environment. Not something that can be said for today’s development boards which typically require a host computer on which to write code. Have we lost something along the way? Perhaps an answer to that question can be found in [lurk101]’s self-hosted development environment for the Raspberry Pi Pico.

It presents itself as a shell, with a flash file system, a port of the vi editor, and a C compiler. We might think of vi as being more at home on a UNIX-derived system, but in this case it’s a port of the vi included in BusyBox. Meanwhile the compiler comes from amacc project.

Of course, this still requires a terminal of some type which in practice will mean a host computer. But the feat is nevertheless an interesting one, and we can see that it might not be impossible given the Pico’s surprising versatility to being some of the terminal features onto the chip itself.

It’s worth noting that this isn’t the first attempt we’ve seen to put a command line interface on a development board.

Trippy Bicycle Uses Multiple Partial Wheels

Bicycles need at least two wheels to be rideable, but [The Q] realized you don’t necessarily need the wheels to be in one piece. As long as you have at least two points of rolling contact with the ground, you can spread the load across multiple partial wheels. He demonstrated this by splitting the rear wheel of his bike first in half and then thirds to create an absolute head turner.

Since a conventional bicycle wheel with tensioned spokes would collapse if cut apart, [The Q] used single-piece aluminum wheels instead. The tires were cut into pieces, and the inner tubes were replaced with sections of thick-walled HDPE pipe that won’t collapse under the weight of a human. The tires and the HDPE “inner tubes” were riveted to the wheels.

To mount the additional wheels on the frame, [The Q] welded a set of extensions to the back with mounting points for the partial wheels. To keep them synced, timing is done with chains running on sprockets welded to the disc brakes. In the second video, he tries to also split the front wheels, but found the front forks can’t handle the torque and would flex dangerously when the contact point is too far forward. Instead, he settled for three wheels on the back.

Much like his hubless bicycle, it’s not designed to be better than a standard bicycle, but is excellent for attracting attention. Though at least in some situations, the all-wheel drive bike he built last year might come in handy.

Continue reading “Trippy Bicycle Uses Multiple Partial Wheels”