Supercon 2024: An Immersive Motion Rehabilitation Device

When you’ve had some kind of injury, rehabilitation can be challenging. You often need to be careful about how you’re using the affected parts of your body, as well as pursue careful exercises for repair and restoration of function. It can be tedious and tiring work, for patients and treating practitioners alike.

Juan Diego Zambrano, Abdelrahman Farag, and Ivan Hernandez have been working on new technology to aid those going through this challenging process. Their talk at the 2024 Hackaday Supercon covers an innovative motion monitoring device intended to aid rehabilitation goals in a medical context.

Continue reading “Supercon 2024: An Immersive Motion Rehabilitation Device”

A Forgotten Consumer PC Becomes A Floating Point Powerhouse

[Michael Wessel] found some of his old DOS 3D graphics software and tried to run it on an 8088 PC. The tale of adding an 8087 co-processor to speed up the rendering was anything but straightforward, resulting in a useful little project.

There was a point around the end of the 1980s when the world of PCs had moved on to the 386, but the humble 8086 and 8088 hung around at the consumer end of the market. For Europeans that meant a variety of non-standard machines with brand names such as Amstrad and Schneider, and even surprisingly, later on Sinclair and Commodore too.

Of these the Schneider Euro PC was an all-in-one design reminiscent of an Amiga or Atari ST, packing a serviceable 8088 PC with a single 3.5″ floppy drive. A cheap machine like this was never thought to need an 8087, and lacked the usual socket on the motherboard, so he made a small PCB daughter board for the 8088 socket with space for both chips.

It’s a surprisingly simple circuit, as obviously the two chips were meant to exist together. It certainly had the desired effect on his frame rate, though we’re not sure how many other Euro PC users will need it. It does make us curious though, as to how quickly a modern microcontroller could emulate an 8087 for an even faster render time. Meanwhile if you’re curious about the 8087, of course [Ken Shirriff] has taken a look at it.

Pixel Graphics From An HD44780, By Cutting Wires

[Felipe Tavares] wasn’t satisfied with the boring default fonts on an HD44780-based display. And while you can play some clever tricks with user-defined characters, if you want to treat the display as an array of pixels, you’ve got to get out your scalpel and cut up a data line.

The hack builds on work from [MisterHW] who documented the bits going from the common display driver to the display, and suggested that by cutting the data line and sending your own bits, you could send arbitrary graphics. The trick was to make sure that they’re in sync with the display, though, which means reading the frame sync line in user code.

This done, it looks like [Felipe] has it working! If you can read Rust for the ESP32, he has even provided us with a working demo of the code that makes it work.

We can’t help but wonder if it’s not possible to go even lower-level and omit the HD44780 entirely. Has anyone tried driving one of these little LCD displays directly from a microcontroller, essentially implementing the HD44780 yourself?

Any way you slice it, this is a cool hack, and it opens up the doors to DOOM, or as [MisterHW] suggests, Bad Apple on these little displays . If you do it, we want to see it.

If your needs aren’t so exotic, the classic HD44780 display is a piece of cake to get working, and an invaluable tool in anyone’s toolbox.

A weather station with an E-ink display

Low Power Challenge: Weather Station Runs For Months Thanks To E-Ink Display

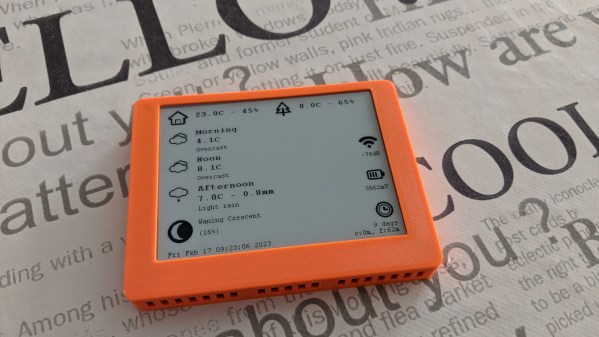
Having a device in your living room that shows weather information is convenient, and building one of those is a great project if you enjoy tinkering with microcontrollers and environmental sensors. It’s also a great way to learn about low-power design, as [x-labz] demonstrated with their e-ink weather station which works for no less than 60 days on a single battery charge. It has a clear display that shows the local temperature and humidity, as well as the weather forecast for the day.

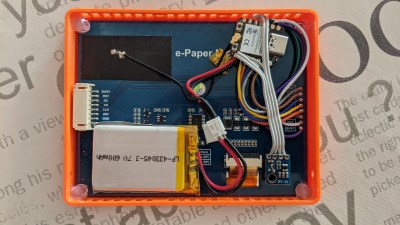
The display is a 4.2″ e-paper module with a resolution of 400 x 300 pixels. It uses just 26 mW of power for a few seconds while it updates its image, and basically zero watts when showing a static picture. It’s driven by a tiny ESP32C3 processor board, which downloads the weather forecast from weatherapi.com every two hours. The indoor climate is measured by an SHT-21 temperature and humidity sensor mounted behind the display, while the outdoor data is gathered by a WiFi-connected sensor installed on [x-labz]’s balcony.

The inside of an e-ink powered weather stationThe key to achieving low power usage here is to keep the ESP32 in sleep mode as much as possible. The CPU briefly wakes up once every five minutes to read out the indoor sensor and once every fifteen minutes to gather data from outside, using the relatively power-hungry WiFi module.

To further reduce power consumption, the CPU core is driven at the lowest possible clock speed at all times: 10 MHz when reading the indoor sensor, and 80 MHz when using the WiFi connection. All of this helps ensure that just one 600 mAh lithium battery can keep everything running for those 60 days.

E-ink displays are perfect for text and simple graphics that don’t change too often, which is why they’re very popular in weather stations. With a bit of tweaking though, LCDs can also be optimized for low power.

Open World 3D Game Runs On The RP2040 Microcontroller

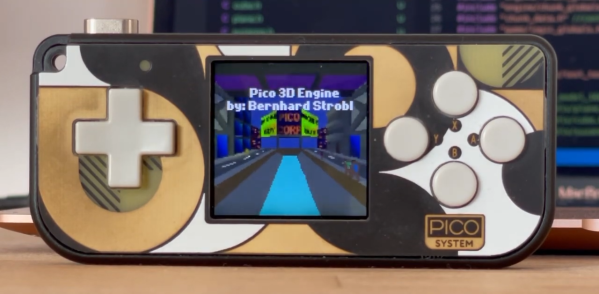
The Raspberry Pi RP2040 is versatile and cheap, but it’s by no means known as the most powerful microcontroller on the world. Regardless, it is capable of great things, as demonstrated by [Bernhard Strobl], who built a 3D open world game engine that runs on that very platform.

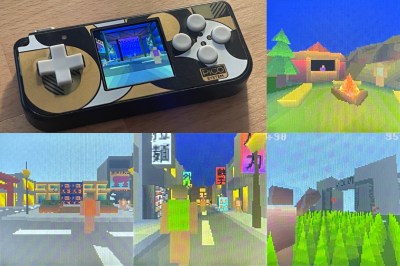
The graphics are simple, but with a compelling low-poly style.

The game engine itself is built to run on the Pimoroni PicoSystem, which is essentially a handheld gaming platform built around the RP2040 chip. The engine takes advantage of the multi-core nature of the RP2040, using the second core as a dedicated rasterizer to keep frames pumping out.

The basic game [Bernhard] built in the engine features 50 NPC characters and 50 further zombies, all running at the same time. Specs are impressive, with the engine’s included game simulating a “world” of 120 x 120 meters in size. As a maximum limit, the engine can handle a 2.56 x 2.56 km world, thanks to the use of 8-bit integers for directional data. However, limited storage space would make it difficult to achieve such a large world in practice.

We don’t get to see much of the gameplay in the YouTube video, but the quality of the graphics is impressive for such a cheap microcontroller. It seems within the bounds of possibility that an actual open-world game could be practical on the PicoSystem if only enough storage were available. Video after the break.

Continue reading “Open World 3D Game Runs On The RP2040 Microcontroller”

Make It Compatible

I’m probably as guilty as anyone of reinventing the wheel for a subpart of a project. Heck, sometimes I just feel like working on a wheel design. But if that’s the path you choose, you have to think about whether or not it’s important that others can replicate your project. The nice thing about a bog-standard wheel is that everyone has got one.

The case study I have in mind is a wall-plotter project that appeared on Hackaday this week. It’s a really sweet design, and in many ways would be an ideal starter project. I actually need a wall plotter (for reasons) and like a number of the choices made. For instance, having nearly everything, including the lightweight geared steppers on the gondola makes it easy to install and uninstall — you just pin up the timing belt from which it hangs and you’re done. Extra weight on the gondola helps with stability anyway. It’s open source and based on the Arduino libraries, so it should be easy enough to port to whatever microcontroller I have on hand.

But the image-generation toolchain is awkward, involving cutting and pasting into a spreadsheet, which generates a text file in a custom plotting micro-language. Presumably the designer doesn’t know about Gcode, which is essentially the lingua franca of moving machines, or just didn’t feel like implementing it. Where in Gcode, movement commands are like “G1 X100 Y50”, this device expects “draw_line(0,0,100,50)”. They’re essentially equivalent, but incompatible.

I totally understand that the author must have had a good time thinking up the movement commands and writing the spreadsheet that translates SVG files into them. I’ve been there and done that! But if the wall plotter spoke Gcode instead of its own dialect, it would slot instantly into any number of graphics processing workflows, which would make me, the potential user, happier.

When you are looking at reinventing the wheel, think about your audience. If you’re the only person likely to see the project, go ahead and scratch whatever itch you’ve got. You’ll learn more that way. But if you want to share the project with as many people as possible, adhering to the most widely used standards is a good choice for your users, even if it is less fun than dreaming up your own movement language.

Digital Rain Animation Crammed Into Pi Pico

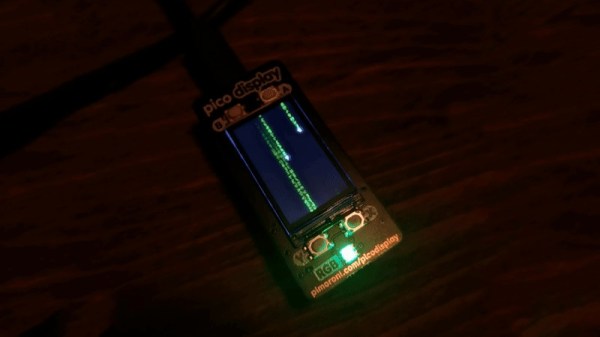
With a new Matrix movie now in cinemas, we’ve all been reminded of those screensavers that were just the coolest thing ever when the original film dropped in 1999. [en0b] decided to recreate the classic “digital rain” effect on the Raspberry Pi Pico, using up all the little microcontroller’s storage in the process.

Rather than rely on existing graphics libraries, [en0b] set about using a high-quality GIF for the animation. The original file was 8 MB, which was far too big to fit on the Pico. After some finagling in an image editor and with the help of a custom Python script, however, [en0b] managed to fit the 127-frame animation at 240 x 135 resolution into the 2 MB Flash onboard the chip. With the microcontroller hooked up to the 1.14″ IPS “Pico Display” from Pimoroni, the final looks great and faithfully recreates the aesthetic seen in the film.

[en0b]’s technique could reliably be used for displaying any GIF that you can cut down to 14 to 16 colors without losing too much quality. It’s not the world’s highest-end graphics format, but it does the job for little animations like these.

We’ve seen similar builds before too, using more heavy-duty hardware to build a magic 8-ball in much the same way. Meanwhile, if you’ve got your own neat little GIF hacks or Pico projects, don’t hesitate to send them in!