Shadow Clock Shows The Time On The Wall

What if you build a clock that displayed the time not just on its own, but in its shadows as well? [Lewis] from [DIY Machines] has done just that, with a nifty 3D-printed shadow clock build.

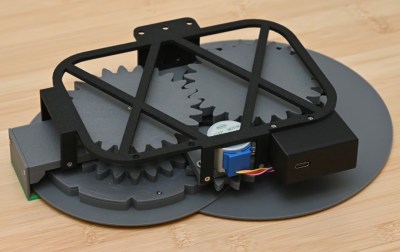
The clock itself has a hollow rim inside which are the two hands which actually display the time. The hands appear to almost float inside the clock, a tricky visual effect of the design which instantly catches the eye. The trick is simple—the minute hand is physically attached to the outer rotor, which sets its position. Meanwhile, the floating hour hand pivots freely around the center of the clock, with a secret magnet within. This magnet is attracted to a complementary magnet in the hour rotor—as that rotor turns, the hour hand points at the magnets inside.

So far, it’s already a cool clock. The bonus feature is that [Lewis] realized this design could show an even larger clockface on the wall behind, merely by using its shadows. Thus, the clock features an LED light source which can project the clock’s shadows into a much larger display than the desktop timepiece itself.

As for the electronics, it’s straightforward stuff. An ESP8266 devboard runs the show, turning stepper motors and controlling addressable LEDs to make the clock do its thing. It also queries a network time server in order to ensure the displayed time is always accurate to the second.

We’ve featured some other excellent clocks over the years, like this incredible thermochromic build. Video after the break.

Continue reading “Shadow Clock Shows The Time On The Wall”

2025 One Hertz Challenge: Electromechanical CMOS Clock Keeps In Step With Mains Frequency

Some people can’t be bothered to read the analog face of a traditional clock. Some people cannot stand the low frequency “hum” of mains current. If you are in either of those categories, you probably don’t want to make [Christian]’s handsome and well-documented electromechanical CMOS clock.

As you might guess from the name, the clock uses CMOS logic, based around a 12 bit counter, to provide the divider circuits 24 (daily) and 60 (minutes and seconds). Specifically, the circuits are based around a CD4040 twelve-bit adder. Those signals go through DAC circuits based around DAC0808 chips to drive some very nice coil meters for hours and minutes in lieu of the traditional clock face. Taking the time to make a CMOS clock circuit from adder chips is respectable enough in this era of instant-gratification through micro-controllers, and we dig the blinkenlights built into the circuits, but it’s what is being added that is where things get really interesting.

[Christian] had the bright idea that a stepper motor could be driven via the mains, simply by using a capacitor to offset the waveforms on the coils by 90 degrees. With a 200-step stepper motor, [Christian] gets one revolution per second out of the 50 Hz grid; this generates the seconds signal for his CMOS chips by the simple expedient of a 3D printed arm and a light barrier. Once per second, the light is interrupted by the spinning arm, creating a pulse for the clock circuits to add up. Check it out in action in the demo video below.

This project also seems to have the distinction of being the first project submitted to our One Hertz Challenge. It’s not just for clocks, but keep an eye on your clock because entries are only open until 9:00 AM Pacific time on August 19th.

Continue reading “2025 One Hertz Challenge: Electromechanical CMOS Clock Keeps In Step With Mains Frequency”

Printed Perpetual Calendar Clock Contains Clever Cams

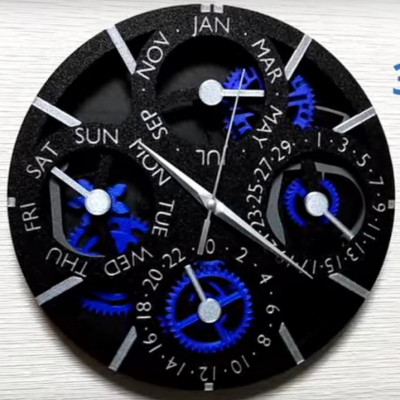
At Hackaday, it is always clock time, and clock time is a great time to check in with [shiura], whose 3D Printed Perpetual Calendar Clock is now at Version 2. A 3D printed calendar clock, well, no big deal, right? Grab a few steppers, slap in an ESP32 to connect to a time server, and you’re good. That’s where most of us would probably go, but most of us aren’t [shiura], who has some real mechanical chops.

The front face of the perpetual calendar clock.
There’s also a 24-hour dial, because why not?

This clock isn’t all mechanical. It probably could be, but at its core it uses a commercial quartz movement — you know, the cheap ones that take a single double-A battery. The only restriction is that the length of the hour axis must be twelve millimeters or more. Aside from that, a few self-tapping screws and an M8 nut, everything else is fully 3D printed.

From that simple quartz movement, [shiura]’s clock tracks not only the day of the week, the month and date — even in Febuary, and even compensating for leap years. Except for the inevitable drift (and battery changes) you should not have to adjust this clock until March 2100, assuming both you and the 3D printed mechanism live that long. Version one actually did all this, too, but somehow we missed it; version two has some improvements to aesthetics and usability. Take a tour of the mechanism in the video after the break.

We’ve featured several of [shiura]’s innovative clocks before, from a hybrid mechanical-analog display, to a splitless flip-clock, and a fully analog hollow face clock. Of course [shiura] is hardly our only clock-making contributor, because it it always clock time at Hackaday. Continue reading “Printed Perpetual Calendar Clock Contains Clever Cams”

Malfunctional Timekeeping With The Vetinari Clock

Lord Vetinari from the Discworld series is known for many things, but perhaps most of all a clock that doesn’t quite keep continuous time. Instead, it ticks away at random increments to infuriate those that perceive it, whilst keeping regular time over the long term. [iracigt] decided to whip up a real world version of this hilarious fictional timepiece.

The clock itself is an off-the-shelf timepiece purchased from Target for the princely sum of $5. However, it’s been deviously modified with an RP2040 microcontroller hidden away inside. The RP2040 is programmed to tick the clock at an average of once per second. But each tick itself is not so exact. Instead, there’s an erraticness to its beat – some ticks are longer, some shorter, in the classic Vetinari style. [iracigt] explains the nitty gritty of how it all works, from creating chaos with Markov chains to interfacing the RP2040 electronically with the cheap quartz clock movement.

If you’ve ever wanted to build one of these amusements yourself, [iracigt’s] writeup is a great place to start. Even better, it was inspired by an earlier post on these very pages! We love to see the community riff on a theme, and we’d love to see yours, too – so keep the tips coming, yeah? Video after the break.

Continue reading “Malfunctional Timekeeping With The Vetinari Clock”

Hybrid Mechanical Clock Shows It Both Ways

After seeing some of the interesting clock builds we’ve featured recently, [shiura] decided to throw their hat in the ring and sent us word about their incredible 3D printed hybrid clock that combines analog and digital styles.

While the multiple rotating rings might look complex from the front, the ingenious design behind the mechanism is powered by a single stepper motor. Its operation is well explained in the video below, but the short version is that each ring has a hook that pushes its neighboring ring over to the next digit once it has completed a full rotation. So the rightmost ring rotates freely through 0 to 9, then flips the 10-minute ring to the next number before starting its journey again. This does mean that the minute hand on the analog display makes a leap forward every 10 minutes rather than move smoothly, but we think its a reasonable compromise.

Beyond the 28BYJ-48 geared stepper motor and its driver board, the only other electronics in the build is a Seeed Studio XIAO ESP32C6 microcontroller. The WiFi-enabled MCU is able to pull the current time down from the Internet, but keep it mind it takes quite awhile for the mechanism to move all the wheels; you can see the process happen at 60x speed in the video.

If you’re looking to recreate this beauty, the trickiest part of this whole build might be the 3D print itself, as the design appears to make considerable use of multi-material printing. While it’s not impossible to build the clock with a traditional printer, you’ll have to accept losing some surface detail on the face and performing some well-timed filament swaps.

[shirua] tells us they were inspired to send their timepiece in after seeing the post about the sliding clock that just went out earlier in the week.

Continue reading “Hybrid Mechanical Clock Shows It Both Ways”

ClockworkPi Unveils New PicoCalc Handheld

Do you like scientific calculators? Don’t bother answering that question, you’re reading Hackaday so we already know the answer. We also know you’re a fan of building things yourself and open source, which makes us fairly sure you’ll be just as interested in the recently announced ClockworkPi PicoCalc as we are.

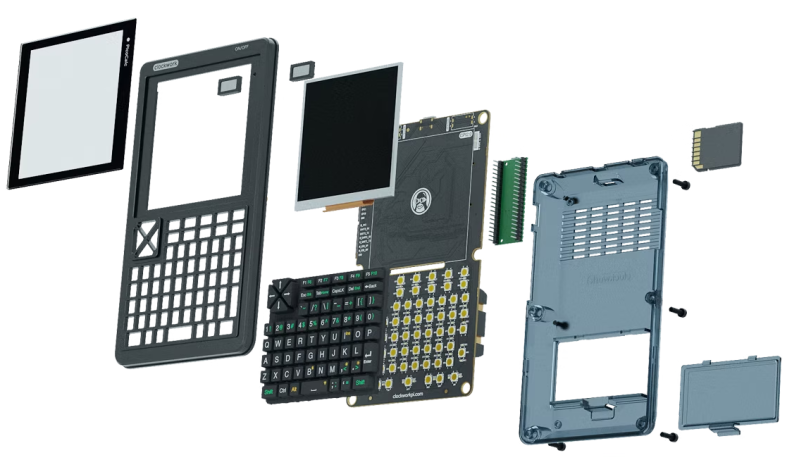
On the surface, it looks like a chunky scientific calculator, though on further inspection you’ll note it comes equipped with a QWERTY keyboard. But open up the case and what you’ve really got is an elaborate carrier board for the Raspberry Pi Pico. The PicoCalc supports all variants of the microcontroller, but realistically we can’t think of any reason that you wouldn’t just use the latest version.

With the MCU connected, you’ll have access to the PicoCalc’s 320×320 4-inch IPS screen, backlit I2C-connected keyboard, SD card slot, 8 MB PSRAM, and dual PWM speakers. Power is provided by a pair of 18650 cells (which you’ll need to supply on your own), and the board has the necessary circuitry to charge them up over USB-C.

Everything is housed in an injection molded case, but the project page says all the necessary CAD files will be eventually be released under the GPL v3 so you can 3D print or CNC your own enclosure. For now though, the only thing of note that seems to be in the PicoCalc GitHub repository is a PCB schematic.

The software side of things is a little less clear. The page mentions a BASIC interpreter, MP3 playback, and support for various programming languages, but we get the impression that’s just a list of stuff you can run on the Pi Pico. There are a few images that clearly show the PicoCalc actually being used as a calculator however, so there may be an official firmware yet to be revealed.

The PicoCalc kit is on sale now, and will set you back $75 USD — which actually includes a first-generation Pi Pico, on the off chance that you don’t already have a few laying around. We’ve been impressed with the previous offerings from ClockworkPi, so assuming this new kit maintains that same build quality, it seems like a fair enough price.

It’s Always Pizza O’Clock With This AI-Powered Timepiece

Right up front, we’ll say that [likeablob]’s pizza-faced clock gives us mixed feelings about our AI-powered future. On the one hand, if that’s Stable Diffusion’s idea of what a pizza looks like, then it should be pretty easy to slip the virtual chains these algorithms no doubt have in store for us. Then again, if they do manage to snare us and this ends up on the menu, we’ll pray for a mercifully quick end to the suffering.

The idea is pretty simple; the clock’s face is an empty pizza pan that fills with pretend pizza as the day builds to noon, whereupon pizza is removed until midnight when the whole thing starts again. The pizza images are generated by a two-stage algorithm using Stable Diffusion 1.5, and tend to favor suspiciously uncooked whole basil sprigs along with weird pepperoni slices and Dali-esque globs of cheese. Everything runs on a Raspberry Pi Zero W, with the results displayed on a 4″ diameter LCD with an HDMI adapter. Alternatively, you can just hit the web app and have a pizza clock on your desktop. If pizza isn’t your thing, fear not — other food and non-food images are possible, limited only by Stable Diffusion’s apparently quite limited imagination.

As clocks go, this one is pretty unique. But we’re used to seeing unusual clocks around here, from another food-centric timepiece to a clock that knits.