This acquisition is the latest in a years-long process of consolidation in the silicon industry. Previously, Broadcom attempted a hostile takeover of Qualcomm for One… Hundred… Billion dollars. Lattice would have been bought if the deal wasn’t shut down for national security concerns. Of course, Microchip bought Atmel in a deal likened to the fall of Constantinople, NXP and Freescale merged, Intel bought Altera, Linear and Analog are one, and On Semiconductor acquired Fairchild.
With the acquisition of Microsemi, Microchip will be looking to add a few interesting components and capabilities to their portfolio. In contrast to Microchip’s portfolio, you won’t find many Microsemi parts on a hacker’s workbench; they’re dealing with stuff like optical networking and avionics. Closer to home, they have a large line of FPGAs and some nice frequency synthesizers.
Since Microchip acquired Atmel, the fields of battle have fallen silent. The Crusaders have returned home, or have been driven into the sea. The great microcontroller holy war is over.
As with any acquisition, there is bound to be some crossover between two product lines. Both Atmel’s AVR platform and Microchip’s PICs have their adherents, and now we’re beginning to see some crossover in the weird and wonderful circuitry and design that goes into your favorite microcontroller, whatever that might be. The newest part from Microchip is an ATMega with a feature usually found in PICs. This is a Core Independent Peripheral. What is it? Well, it’s kinda like a CPLD stuck in a chip, and it’s going to be in the new Arduino board.
The ATMega4809 is the latest in a long line of ATMegas, and has the features you would usually expect as the latest 8-bit AVR. It runs at 20MHz, has 48 K of Flash, 6 K of SRAM, and comes in a 48-pin QFN and TQFP packages. So far, everything is what you would expect. What’s the new hotness? It’s a Core Independent Peripheral in the form of Configurable Custom Logic (CCL) that offloads simple tasks to hardware instead of mucking around in software.
So, what can you do with Configurable Custom Logic? There’s an application note for that. The CCL is effectively a look-up table with three inputs. These inputs can be connected to I/O pins, driven from the analog comparator, timer, UART, SPI bus, or driven from internal events. The look-up table can be configured as a three-input logic gate, and the output of the gate heads out to the rest of the microcontroller die. Basically, it’s a tiny bit of programmable glue logic. In the application note, Microchip provided an example of debouncing a switch using the CCL. It’s a simple enough example, and it’ll work, but there are a whole host of opportunities and possibilities here.
Additionally, the ATMega4809, “has been selected to be the on-board microcontroller of a next-generation Arduino board” according to the press release I received. We’re looking forward to that new hardware, and of course a few libraries that make use of this tiny bit of custom programmable logic.
There is a primordial prototype from [Eben Upton]’s bench that involves an Atmel processor, but the first board dangled in front of the public was a Broadcom one, the BCM2763 ‘micro DB’. This was a form factor like one of those Android TV sticks, and while it was not a Raspberry Pi internal design or indeed sporting the SoC to be used by the Pi itself, it was sufficient to capture the imagination of what would become the Raspberry Pi community.
If you got out of bed early (British time) on the 29th of February 2012 and tried to order one of the first commercially available boards, you were most likely to be out of luck. The relatively small first batch from China was oversubscribed massively, both the RS and Farnell websites went down completely for most of the day. We received our model at some point in May. It’s an over-used phrase, “And the rest is history”, but it seems entirely appropriate here. The Pi has passed through several iterations and increased in both computing power and memory, it has spawned a whole industry of peripherals, a huge community, and a host of competitors. We have quite a few of the boards in the blog post, but some of the more exotic ones have evaded us.
It’s not the best or most powerful board out there, many of its competitors can beat it on performance, but it remains the one to beat in small and cheap Linux-capable single board computers. Why is this the case? It has probably the best-supported Linux distro of all of them, and that community has already answered many of the queries you might find with your board.
So there’s the story, a successful product line, community, and foundation. The Pi blog piece is very much their PR, but it doesn’t need to gild the lily. However, that will not stop competitors from taking aim at its crown, and the field remains open for one of them to topple it. Which of course makes for fascinating stories for us here at Hackaday, so we’d encourage anybody with an electronics factory in China, a bright team, and some good ideas to give it a try. Meanwhile, we’ll be looking towards Cambridge for whatever new products will sport the fruity logo.
Before Lunar New Year, I had ordered two 3000 F, 2.7 V supercapacitors from China for about $4 each. I don’t actually remember why, but they arrived (unexpectedly) just before the holiday.
Supercapacitors (often called ultracapacitors) fill a niche somewhere between rechargeable lithium cells and ordinary capacitors. Ordinary capacitors have a low energy density, but a high power density: they can store and release energy very quickly. Lithium cells store a lot of energy, but charge and discharge at a comparatively low rate. By weight, supercapacitors store on the order of ten times less energy than lithium cells, and can deliver something like ten times lower power than capacitors.
What do you do, when you need a random number in your programming? The chances are that you reach for your environment’s function to do the job, usually something like rand() or similar. This returns the required number, and you go happily on your way.
A shift register configured as a pseudo-random number generator. [by KCAuXy4p CC0 1.0]Except of course the reality isn’t quite that simple, and as many of you will know it all comes down to the level of randomness that you require. The simplest way to generate a random number in software is through a pseudo-random number generator, or PRNG. If you prefer to think in hardware terms, the most elementary PRNG is a shift register with a feedback loop from two of its cells through an XOR gate. While it provides a steady stream of bits it suffers from the fatal flaw that the stream is an endlessly repeating sequence rather than truly random. A PRNG is random enough to provide a level of chance in a computer game, but that predictability would make it entirely unsuitable to be used in cryptographic security for a financial transaction.
There is a handy way to deal with the PRNG predictability problem, and it lies in ensuring that its random number generation starts at a random point. Imagine the shift register in the previous paragraph being initialised with a random number rather than a string of zeros. This random point is referred to as the seed, and if a PRNG algorithm can be started with a seed derived from a truly unpredictable source, then its output becomes no longer predictable.
Selecting Unpredictable Seeds
Computer systems that use a PRNG will therefore often have some form of seed() function alongside their rand() function. Sometimes this will take a number as an argument allowing the user to provide their own random number, at other times they will take a random number from some source of their own. The Sinclair 8-bit home computers for example took their seed from a count of the number of TV frames since switch-on.
The not-very-random result of a thousand analogRead() calls.
The Arduino Uno has a random() function that returns a random number from a PRNG, and as you might expect it also has a randomSeed() function to ensure that the PRNG is seeded with something that will underpin its randomness. All well and good, you might think, but sadly the Atmel processor on which it depends has no hardware entropy source from which to derive that seed. The user is left to search for a random number of their own, and sadly as we were alerted by a Twitter conversation between @scanlime and @cybergibbons, this is the point at which matters start to go awry. The documentation for randomSeed() suggests reading the random noise on an unused pin via analogRead(), and using that figure does not return anything like the required level of entropy. A very quick test using the Arduino Graph example yields a stream of readings from a pin, and aggregating several thousand of them into a spreadsheet shows an extremely narrow distribution. Clearly a better source is called for.
Noisy Hardware or a Jittery Clock
As a slightly old-school electronic engineer, my thoughts turn straight to a piece of hardware. Source a nice and noisy germanium diode, give it a couple of op-amps to amplify and filter the noise before feeding it to that Arduino pin. Maybe you were thinking about radioactive decay and Geiger counters at that point, or even bouncing balls. Unfortunately though, even if they scratch the urge to make an interesting piece of engineering, these pieces of hardware run the risk of becoming overcomplex and perhaps a bit messy.
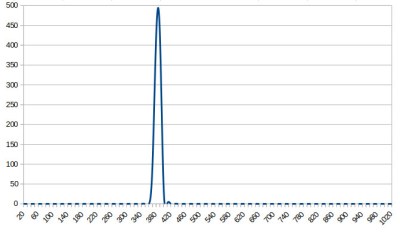
The significantly more random result of a thousand Arduino Entropy Library calls.
The best of the suggestions in the Twitter thread brings us to the Arduino Entropy Library, which uses jitter in the microcontroller clock to generate truly random numbers that can be used as seeds. Lifting code from the library’s random number example gave us a continuous stream of numbers, and taking a thousand of them for the same spreadsheet treatment shows a much more even distribution. The library performs as it should, though it should be noted that it’s not a particularly fast way to generate a random number.
So should you ever need a truly random number in your Arduino sketch rather than one that appears random enough for some purposes, you now know that you can safely disregard the documentation for a random seed and use the entropy library instead. Of course this comes at the expense of adding an extra library to the overhead of your sketch, but if space is at a premium you still have the option of some form of hardware noise generator. Meanwhile perhaps it is time for the Arduino folks to re-appraise their documentation.
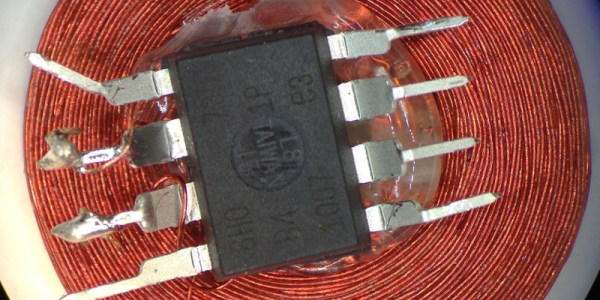
One of Atmel’s smallest microcontrollers, the ATtiny, is among the most inexpensive and reliable chips around for small applications. It’s also one of the most popular. If you don’t need more than a few inputs or outputs, there’s nothing better. As a show of its ability to thrive under adverse conditions, [Trammell Hudson] was able to shoehorn an ATtiny into an RFID circuit in a way that tests the limits of the chip design.
The RFID circuit only uses two of the ATtiny’s pins and neither of which is the ground or power pin. The ATtiny is equipped with protective diodes on its input pins, and if you apply an AC waveform to the input pins, the chip is able to use the leakage current to power itself. Once that little hurdle is crossed, the ATtiny can do the rest of its job handling the RFID circuitry.
This project takes a deep dive into the internals of the ATtiny. If you’ve ever wondered what was going on inside of everyone’s favorite tiny microcontroller, or if you’re looking for an RFID circuit that keeps parts counts to an absolute minimum, this is the project for you. The ATtiny is more than just a rugged, well-designed chip, though. It’s capable of a lot more than such a small chip should be able to.
Most projects are built on abstractions. After all, few of us can create our own wire, our own transistors, or our own integrated circuits. A few months ago, [Julian Ilett] found a problem using the Arduino library for PWM. Recently, he revisited the issue and used his own PWM code to fix the problem. You can watch the video below.
Of course, neither the Arduino library nor [Julian’s] code is actually producing PWM. The Atmel CPU’s hardware is doing the work. The Arduino library gives you a wrapper called analogWrite — especially handy if you are not using an Atmel CPU where the same abstraction will do the same work. The issue arose when [Julian] broke the abstraction to invert the PWM output.