The VAIO WIth A Pi Inside

Raspberry Pi laptops are not an uncommon sight, as many hardware enthusiasts have shoehorned the tiny board behind LCD panels into home-made cases.

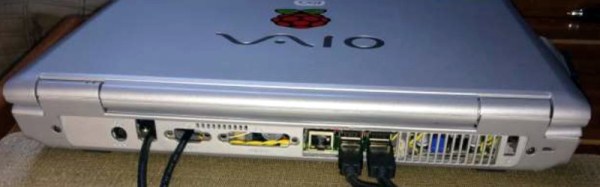
[Frank Adams] has created one of the best Pi laptops we’ve ever seen, (for which we suggest you skip straight to the PDF). He’s removed the guts from an aged Sony VAIO laptop and replaced it with the fruity computer, alongside a Teensy to handle VAIO keyboard, buttons, and LED I/O via the Pi USB port. An M.NT68676 video board interfaces the VAIO display to the Pi HDMI, and a USB to SATA cable is connected to a 240Gb solid state hard drive. The laptop’s Wi-Fi antenna is routed to the Pi via a soldered on co-axial connector, and there is also a real-time clock board. There are a few rough edges such as a USB cable that could be brought inboard, but it’s otherwise well-integrated into the case. His write-up is a very comprehensive PDF, that should serve as a good primer to anyone else considering such a laptop conversion.

The result is a laptop that looks for all the world like a commercially produced machine, yet that is also a Raspberry Pi. In a strange way, a Sony laptop is an apt homecoming for the board from Cambridge, because other than red soldermask or very early Chinese-made models, all Raspberry Pi boards are made in a Sony factory in Wales. Whatever the donor laptop though, this is definitely a step above the run-of-the-mill Pi laptops. To see its competition, take a look at this very ugly machine with a bare LCD panel, or this laser-cut sandwich laptop.

Alexa, Hack My TV

If you have an Alexa, one of the best things you can buy to go with it is a Harmony Hub remote. Sure, you get a universal remote to control all your home theater equipment, but you’ll hardly use it because the Alexa can virtually push the Harmony buttons for you. The negative word in this paragraph, though, is “buy.” The Harmony Hub isn’t inexpensive. Fortunately [Michael Higginis] has you covered. He has an ESP8266 universal remote that you can control with Alexa. You can see a video of setting the system up below.

On the one hand, the idea is fairly simple. An ESP8266 has plenty of horsepower to read and recreate IR codes. However, we were very impressed with the web portal used to configure the device and integrating it with Alexa is a neat trick.

Continue reading “Alexa, Hack My TV”

Hackaday Links Column Banner

Hackaday Links: Supercon Sunday

This is not your normal Sunday links post. This is Superconference Sunday, and right now there are dozens of awesome projects floating around our conference in Pasadena. This links post will be mostly the projects from Supercon, but before that there’s some stuff we need to clear out of the queue:

Concerning other conferences, the Sparklecon site is up. Why go to Sparklecon? It’s a blast.

Tindie is worldwide! There were a bunch of Tindie sellers at the Maker Faire Adelaide this weekend. YouTuber MickMake is a friend of Tindie and we’re teaming up to give away a few prizes from Australian Tindie sellers. You can check out the full details here.

There’s an Internet of Things thing from 4D Systems. It’s an ESP8266 and a nice small display.

Well, crap. It might have finally happened. [Maxim Goryachy] and [Mark Ermolov] have obtained fully functional JTAG for Intel CSME via USB DCI. What the hell does that mean? It means you can plug something into the USB port of a computer, and run code on the Intel Management Engine (for certain Intel processors, caveats apply, but still…). This is doom. The Intel ME runs below the operating system and has access to everything in your computer. If this is real — right now we only have a screenshot — computer security is screwed, but as far as anyone can tell, me_cleaner fixes the problemAlso, Intel annoyed [Andy Tanenbaum].

With that out of the way, here’s some stuff from this weekend’s Supercon:

Continue reading “Hackaday Links: Supercon Sunday”

Inside An Amateur Bugging Device

[Mitch] got interested in the S8 “data line locator” so he did the work to tear into its hardware and software. If you haven’t seen these, they appear to be a USB cable. However, inside the USB plug is a small GSM radio that allows you to query the device for its location, listen on a tiny microphone, or even have it call you back when it hears something. The idea is that you plug the cable into your car charger and a thief would never know it was a tracking device. Of course, you can probably think of less savory uses despite the warning on Banggood:

Please strictly abide by the relevant laws of the state, shall not be used for any illegal use of this product, the consequences of the use of self conceit.

We aren’t sure what the last part means, but we are pretty sure people can and will use these for no good, so it is interesting to see what they contain.

Continue reading “Inside An Amateur Bugging Device”

Modern Technology For An Ancient Contest

Certamen is a special class of  high school quiz bowl tournament that’s focused solely on the classics. No, not Austen and Dickens, the actual classics. All the questions are about stuff like ancient Greek and Roman civilization and culture, classical mythology, and the finer points of Latin grammar. Like any other quiz bowl, the contestants use buttons to buzz in and answer the questions.

To win at Certamen, a team needs more than just a vast working knowledge of classical antiquity. They also have to be fast on the buzzer. The best way to do that is to practice with official equipment. But this is Hackaday, so you know what comes next: all the ones you can buy cost five times more than they should, so [arpruss] made an awesome open-source version for a fraction of the cost.

The practice machine consists of 12 arcade-style buttons connected to a control box. An Arduino Mega in the control box records the order of button presses as they arrive and displays a corresponding code on an LCD. A toggle switch selects between Certamen mode, where one button press locks out the rest of the team, and a Quiz mode with no lockout.

Our favorite thing about this build is the way [arpruss] took care of managing long cables, which was one of his main must-haves. The buttons are wired to the control box with Cat6 in three groups of four—one cable per table, one pair per chair. Our other favorite thing is the Easter eggs. Hold down the clear button on the control box when the system is booting and one of two things happens: either the buttons band together and turn into piano keys, or some Latin poetry appears on the screen.

[arpruss]’s 3D-printed buzzer bases look pretty slick. If Certamen practice ever starts to get out of hand, he might consider more robust packaging, like these Devo hat buttons.

Smart DC Tester Better Than A Dummy Load

Testing DC supplies can be done in many ways, from connecting an actual load like a motor, to using a dummy load in the manner of a big resistor. [Jasper Sikken] is opening up his smart tester for everyone. He is even putting it on Tindie! Normally a supply like a battery or a generator would be given multiple tests with different loads and periodic readings. Believe us, this can be tedious. [Jasper Sikken]’s simulated load takes away the tedium and guesswork by allowing the test parameters to be adjusted and recorded over a serial interface. Of course, this can be automated.

In the video after the break, you can see an adjustment in the constant-current mode from 0mA to 1000mA. His supply, meter, and serial data all track to within one significant digit. If you are testing any kind of power generator, super-capacitor, or potato battery and want a data log, this might be your ticket.

We love testers, from a feature-rich LED tester to a lead (Pb) tester for potable water.

Continue reading “Smart DC Tester Better Than A Dummy Load”

Roll Your Own Arduino PWM

Most projects are built on abstractions. After all, few of us can create our own wire, our own transistors, or our own integrated circuits. A few months ago, [Julian Ilett] found a problem using the Arduino library for PWM. Recently, he revisited the issue and used his own PWM code to fix the problem. You can watch the video below.

Of course, neither the Arduino library nor [Julian’s] code is actually producing PWM. The Atmel CPU’s hardware is doing the work. The Arduino library gives you a wrapper called analogWrite — especially handy if you are not using an Atmel CPU where the same abstraction will do the same work. The issue arose when [Julian] broke the abstraction to invert the PWM output.

Continue reading “Roll Your Own Arduino PWM”