Hackaday Links Column Banner

Hackaday Links: October 16, 2022

Be careful where your take your iPhone 14 or Apple Watch, because under the right circumstances, you might end up swatting yourself. At least that’s what seems to have happened to some owners when their device’s crash detection feature interpreted a roller coaster ride as a car crash, and dialed emergency services. Crash detection is apparently set up to make the call automatically when accelerometers detect the high g-forces that normally occur in a crash, but can also occur on a coaster ride — at least the good one. In at least one case, an ersatz call to 911 was accompanied by the screams of fellow coaster riders, as the service apparently opens the device’s microphone when a crash is detected.

Hilarity ensued, of course, as long as you weren’t someone with a legit emergency who experienced a delayed response because of this. We’d have sworn that having a system auto-dial 911 was strictly illegal for just this reason, but apparently not. We guess there are two lessons here: one, that Apple engineers really should have thought this through, and maybe need to get out into the real world once in a while; and two, that people will gladly fork over their hard-earned dollars for the privilege of going on a fun ride that’s indistinguishable from a car crash. Our own Lewin Day took a close look at the situation earlier this week if you’d like to read more on the subject.

Continue reading “Hackaday Links: October 16, 2022”

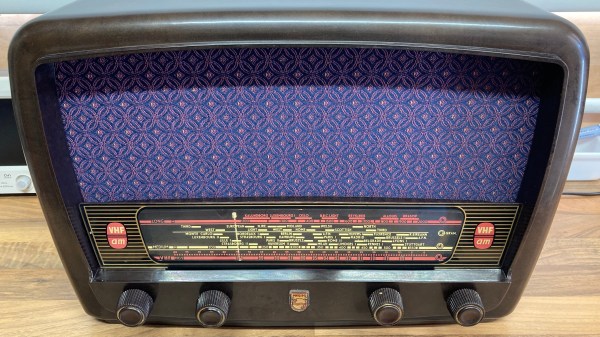
Everything You Wanted To See About Restoring A 1956 Radio

Ever wanted a good, good look at the insides of a 1950s radio, along with fantastic commentary on the internals and the purpose of various components? Then don’t miss [Adam Wilson]’s repair and restoration of a 1956 Philips 353A, a task made easier by a digitized copy of the service manual. [Adam] provides loads of great pictures, as well as tips on what it takes to bring vintage electronics back to life. What’s not to like?

Vintage electronics like this are often chock-full of components that deteriorate with age, so one doesn’t simply apply power to see if it still works as a first step. These devices need to be inspected and serviced before power is ever applied. Even then, powerup should be done with a current-controlled source that can be shut down if anything seems amiss.

Thank goodness for high quality, digitized service manuals.

Devices like these largely predate printed circuit boards, so one can expect to see plenty of point-to-point soldering. Vacuum tubes did much of the hard work, so they are present instead of integrated circuits and transistors. Capacitors in the microfarads were much larger compared to their modern equivalents, and paper/wax capacitors (literally made from rolled-up paper covered in wax) handled capacitances in the nanofarad range instead of the little ceramic disk caps of today.

One thing that helped immensely is the previously-mentioned Philips 353A service manual, which includes not only a chassis and component layout, but even has servicing procedures such as cord replacement for the tuning dial. Back then, a tuning dial was an electromechanical assembly that used a winding of cord to rotate the tuning capacitor, and replacing it was a fiddly process. If only all hardware was documented so well!

The end result looks wonderful and still has great sound. As a final tweak, [Adam] added an external audio input cable as a nod to the modern age. Now, we have in the past seen a small LED screen integrated convincingly into an antique, but in this case [Adam] kept the original look completely intact. You can see it in action, playing some Frank Sinatra in the short video embedded below.
Continue reading “Everything You Wanted To See About Restoring A 1956 Radio”

2022 Cyberdeck Contest: A Wrist-Worn Deck With A Hybrid Interface

You’d think that now that the 2022 Cyberdeck Contest is wrapped up, we’d stop writing about it. Sorry, but no — there were so many great entries that we just can’t help but keep focusing on them. And this wearable hybrid interface cyberdeck has a look we love so much that we can’t resist spotlighting it.

We wouldn’t go so far as to call the “hgDeck” a PipBoy, but [Igor Brkić]’s wrist-worn deck certainly bears some similarity with to the Fallout-famous terminal. In fact, the design for this one is based on his earlier hgTerm Raspberry Pi mini-laptop, which honestly would have made a great entry all by itself. But while the two version shares some similarities, the hgDeck puts a serious twist on the form factor. In the stowed configuration, the Pi Zero W puts the main display, a 3.5″ Waveshare TFT, to work using the resistive touchscreen interface. But with the flick of a finger, a motor flips the monitor up on a set of pantograph linkages, which exposes a compact Bluetooth keyboard. Another touch stows the screen and returns you to touchscreen-only operation.

There were a fair number of wrist-worn decks in the contest’s final results, and while this one didn’t win, [Igor]’s build has got to be one of the cooler designs we’ve seen, one that almost seems practical in the real world.

Continue reading “2022 Cyberdeck Contest: A Wrist-Worn Deck With A Hybrid Interface”

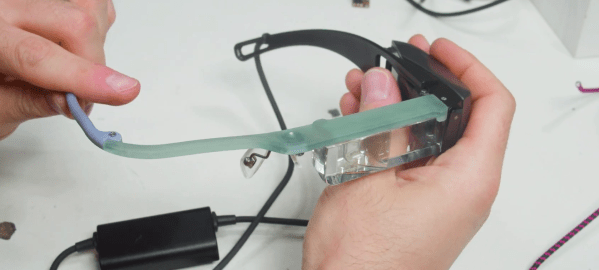
Cutting A Wearable Display In Half Is Harder And Simpler Than It Seems

In the world of hardware hacking, you sometimes spend a ridiculous amount of time debugging a problem, only to find a simple solution that was right in front of you the whole time. [Zack Freedman] got a good dose of this while building the Optigon V2, a modified Epson Moverio wearable display he uses as a teleprompter in all his videos. He prefers having the teleprompter over his left eye only, but the newer version of the Moverio would shut off both sides if one is disconnected, so [Zack] needed a workaround.

Looking for some help from above, [Zack] requested developer documentation for the display module from Epson, but got declined because he wasn’t a manufacturer or product developer. Luckily, a spec sheet available for downloaded from the Epson website did contain a lot of the information he needed. An STM32 monitored the temperature of each display module over a pair of independent I2C interfaces, and would shut down everything if it couldn’t connect to either. This led [Zack] to attempt to spoof the I2C signals with an ATmega328, but it couldn’t keep up with the 400 kHz I2C bus.

However, looking at the logs from his logic analyzer, [Zack] found that the STM32 never talked to both display modules simultaneously, even though it is capable of doing so. Both displays use the same I2C address, so [Zack] could simply connect the two I2C buses to each other with a simple interface board, effectively making the left display “spoof” the signals from the right display.

Wearable displays need some fancy optics to be practical, you can’t just stick an OLED to your face. Two other interesting projects from [Zack] are his modular mechanical keyboard and the Gridfinity 3D printed storage system.

Continue reading “Cutting A Wearable Display In Half Is Harder And Simpler Than It Seems”

Automatic Flag Waver Lets You Show Your Loyalty Without Getting Tired

A flag is a great tool to show your loyalty to a country, a sports team or even a philosophical movement. But there’s not so much you can actually do with a flag: you can either hang it somewhere, or wave it around to attact others to your cause. [Mellow] found that waving quickly becomes tiresome, and decided to design a machine that automates this task for him.

A man holding a device that waves two small rainbow flagsNow there’s a bit more involved in designing a proper flag-waver than simply moving the flag back and forth. Ideally, the fabric should flow smoothly from side to side and show both sides equally, in the same way a human would do when waving a big flag around. After a bit of research [Mellow] decided on a design that generates a rather complex motion using just a single servo: the mast is tilted from left to right, while gravity ensures the flag rotates around its axis. It’s probably best demonstrated visually, as [Mellow] does in the video embedded below.

The flag-waving mechanism is designed in Fusion 360 and 3D printed using white filament. Inside a little square box is a Wemos D1 Mini, powered by a lithium battery scavenged from a vape pen, as well as a battery management system and a power switch. The servo sits on top of the box and holds the flag in a little socket that allows the mast to rotate freely. [Mellow] also went one step further and built a two-flag waver, which still uses only one servo but creates two opposite motions through a set of spur gears. Both waver types bring a lively atmosphere to their surroundings, and we can actually imagine them being useful in places like sports bars.

Automatic flag-wavers are still rare devices, and as far as we can tell this is only the second one we’ve seen, after this hat-mounted example. That is, if you don’t count the automatic “flag” on this mailbox.

Continue reading “Automatic Flag Waver Lets You Show Your Loyalty Without Getting Tired”

Ebike Charges In The Sun

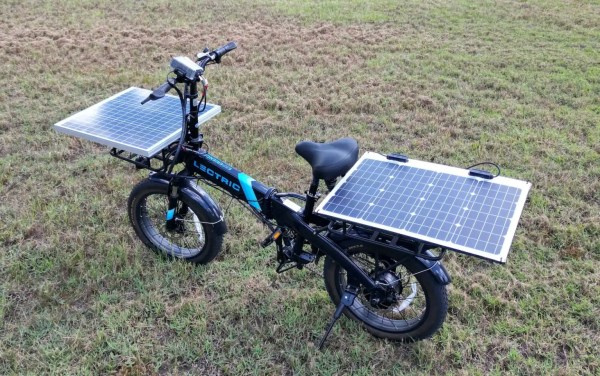
Ebikes are slowly taking the place of many cars, especially for short trips. Most ebikes can take riders at least 16 kilometers (10 miles) without too much effort, at a cost that’s often a single-digit percentage of what the same trip would have been with an internal combustion engine. If you’re interested in dropping the costs of your ebike trips even further, or eliminating it entirely, take a look at this small ebike with integrated solar panels.

While any battery can be charged with a sufficiently large array of solar panels and the correct electronics to match the two systems together, this bike has a key that sets it apart from most others: it can charge while it is being used to power the bike. Most ebikes don’t have charging enabled during rides, so if you want to use the sun while riding to extend the range of the bike you’ll need to find one like this. This bike uses two 50 W panels on the two cargo areas of the bike, attached to a 400 W MPPT charge controller. The Lectric XP 2.0 ebike has a motor with a peak rating of 850 W, but in a low pedal-assist mode the solar panels likely output a significant fraction of the energy used by the electric drivetrain.

Even if the panels don’t provide the full amount of energy needed for riding around, the project’s creator [Micah] lives in Florida, so just setting the bike outside in the sun for six to eight hours is enough to replenish most of the battery’s charge. It’s probably not going to win any solar-powered bike races anytime soon, but for an efficient, quick bike to ride around town it’s not too shabby.

Laser Engraving, Up Close

You know you aren’t supposed to watch your laser while it is cutting or engraving. But [Alex] hosted Wired in his studio and showed them how lasers engrave metal with a fiber laser. You can see the video below.

If you haven’t used a fiber laser, you might be surprised that while a 60 W model can burn metal, it does absolutely nothing to [Alex’s] hand. We wouldn’t try that, by the way, with the common diode lasers you see in most hacker’s labs these days. The video isn’t terribly technical, but it is interesting to see different metals succumb to the powerful laser. There are a few tips about marking different metals in different ways and how to deal with thermal expansion and other effects.

Fiber lasers aren’t as common as diode engravers in private shops, but we assume it is just a matter of time before they get cheaper. Not to mention their widespread use commercially means surplus units might become available, too.

If you are interested in lasers, [Alex’s] YouTube channel has quite a few interesting videos to check out. If you need more power, how’s 200 kW? Then again, even 20 W will get you something useful.

Continue reading “Laser Engraving, Up Close”