LED Skirt Is Stealth By Day, Party By Night

Versatility is always a boon in any outfit. [Mikaela Holmes] wanted to create a skirt that could be unassuming by day, but be the life of the party when the lights go down. Her Day-To-Night Light Skirt achieves just that!

The build is one that should be achievable by anyone with basic dressmaking skills. White and lavender tutus are combined to form the base of the skirt, with a lace outer layer sewn on to create an attractive silhouette for the lights. A USB battery pack is hidden in a pocket in the back to power the show. A WS2812B LED strip is then attached to the skirt, and hidden behind an additional layer of white faux-fur to help diffuse the light.

A pre-programmed LED controller from Cool Neon is used to run the strip, meaning no microcontroller code is required. It also allows the skirt’s lighting effects to be controlled by remote. Such controllers can make getting a glowable project up and running more quickly, particularly for those with less experience in the microcontroller space. Plus, the project can always be upgraded with a fancier controller later. For the most part, the vast majority of glowable projects use similar flashing and fading animations anyway; there’s really no need to reinvent the wheel every time.

[Mikaela] does a great job of showing the necessary steps to produce a skirt that is both attractive and functional. We’ve seen other great projects in this space before, too – like this awesome fibre optic piece. If you’re sewing up your own impressive glowable fashions, be sure to let us know! Video after the break.

Continue reading “LED Skirt Is Stealth By Day, Party By Night”

Super Nice LED Lamp Is Super Simple

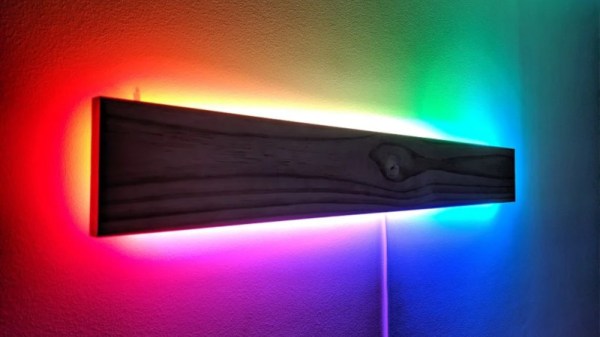
If you’re looking for a fancy LED lamp, the Internet can provide in spades. There are all manner of flashy-this and glowing-that, often with wild and impressive designs made with high-end tools. However, when it came time to decorate the apartment, [thebigpotatoe] wanted to build something simple that anyone could attempt. From this, the Super Simple RGB WiFi Lamp was created.

The body of the lamp consists of a plank of wood. It may not sound like much, but thanks to a nifty design, it actually comes out looking remarkably stylish. The plank is fitted with aluminium angle on the back, and a strip of WS2812B LEDs are wrapped around the perimeter of the board. An ESP8266 NodeMCU is fitted to run the show, and powered from a mains supply to allow it to run all day.

The trick here is that the LEDs are mounted on the back of the board, where they are out of direct sight. The light from the LEDs is projected onto the wall the lamp is mounted on, giving a nice smooth effect without requiring any dedicated diffusers. There’s a series of animations coded in, which look great, particularly when the animations wrap around the end of the lamp.

It’s a great addition to the apartment’s feature wall, and goes to show that you don’t need world-beating crafting skills to make a great piece for your home. You can even go all out, and light your whole room this way. Video after the break.

Continue reading “Super Nice LED Lamp Is Super Simple”

Interactive LED Dome Glows With The Best Of Them

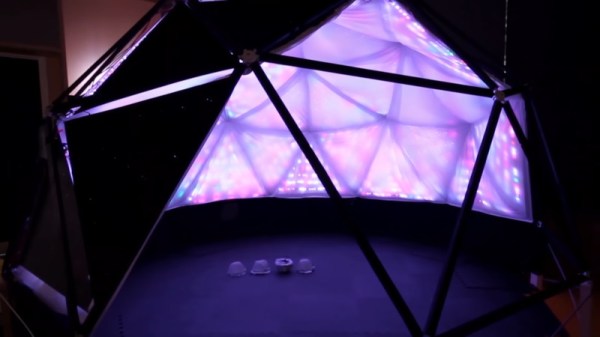
With the price and availability of components these days, it’s easier than ever to throw a whole pile of LEDs at a build and get them flashing away. The hard part is doing it well. [Amy Goodchild] is an artist, and has a knack for producing rather beautiful LED projects. The When in Dome installation is no exception.

The build is based around a large geodesic dome, fitted with LED panels that glow and react to the occupants inside. Using the Microsoft Kinect as a sensor enables the dome to map out what’s happening in 3D space, and use this data to guide its animations. WS2812B LED strips were used, in combination with a Fadecandy controller along with Processing. This is a powerful combination which makes designing attractive LED effects easier, without forcing users to go to the effort of writing their own libraries or optimizing their microcontroller code.

For those more interested in the dome itself, you’ll be happy to know that [Amy] doesn’t skimp on the details there either. The build actually started as a commercially available kit, though there’s still plenty of manual cutting, screwing, and painting required. She does an excellent job documenting the dome build through a series of videos, and walks the reader through some of the design decisions she made (and would remake, if given the chance).

People love geodesic domes at the best of times; adding an interactive LED installation just takes things to the next level. We’ve seen them used as greenhouses too, and they make a great hackerspace project as well. Video after the break.

Continue reading “Interactive LED Dome Glows With The Best Of Them”

Glitching LED Display Proves Crowd Favorite

There’s something enchanting about the soft glow of a properly diffused LED, and this is only improved by greater numbers of LEDs. [Manoj Nathwani] was well aware of this, setting out to build a large display using ping-pong balls for their desirable optical qualities.Unfortunately, not everything went to plan, but sometimes that’s not all bad.

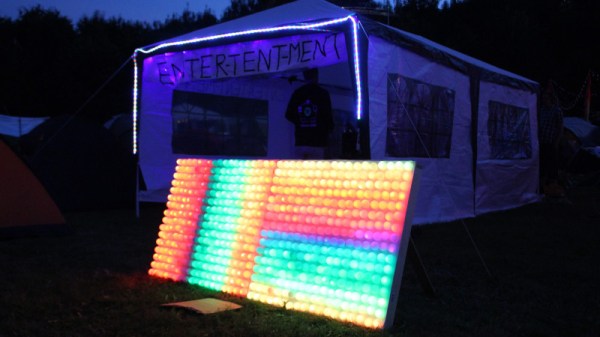
The matrix, built back in 2016 for EMF Camp, was sized at 32×18 elements, for a total of 576 pixels. This was achieved with the use of 12 WS2811 LED strips, with the lights set out on a 50mm grid. Cheap knock-off pingpong balls were used for their low cost, and they proved to be excellent diffusers for the LEDs.

With everything wired up to a NodeMCU, basic testing showed the system to be functioning well. However, once the full matrix was assembled in the field, things started to fall over. Basic commands would work for the first 200 LEDs or so, and then the entire matrix would begin to glitch out and display random colors. Unable to fix the problem in the field, [Manoj] elected to simply run the display as-is. Despite the problems, passers-by found the random animations to be rather beautiful anyway, particularly at night.

After the event, [Manoj] determined the issue was due to the excessive length of the data line, which in the final build was 48 meters long. While the problem may be rectified when [Manoj] revisits the project, the audience seemed to appreciate the first revision anyway.

LED displays will be a hacker staple until the heat death of the universe. Ping pong balls will also likely retain their position as a favorite diffuser. If you’ve got a great LED build of your very own, be sure to hit up the tips line!

New Part Day: Two Millimeter Addressable LEDs

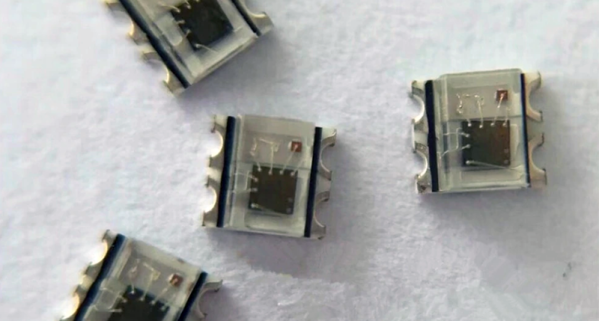
The WS2812, or “Neopixels”, or whatever you want to call them, are the standard when it comes to adding blinky to anything. These chips are individually addressable RGB LEDs, which you’ve seen in many LED strips and a thousand other products. These LEDs are rather big compared to normal, dumb LEDs, measuring 5 mm on each side. Here are WS2812s packed into a 2 mm x 2 mm square package. It’s the smallest and brightest blinky that works the same as the WS2812s you know and love.

This is the latest product from Worldsemi. We’ve heard of these before, but damned if we could find a supplier or even a price. Now they’re on AliExpress, at a price of $8 USD per 100, shipping not included.

Electrically, these appear to have the same properties of the normal, 5050-size WS2812 LEDs. Apply power and ground to two pins, send data in on one pin, and connect the next LED in the strand to the remaining pin. Yes, it requires a bit of work to turn this into a display, but microcontrollers are very fast now and have plenty of RAM. Attach a BeagleBone and you’ll be able to drive as many as your glowing heart desires.

If you’re wondering what the coolest project imaginable for these LEDs is, here’s the math: the largest (common) PCB panel for your random board house is 16 by 22 inches. Assuming a 3 mm pixel pitch, that means the largest PCB display you can make with these LEDs is 135 by 186 pixels, call it 120 by 180 just to make things easy. That’s 21,600 LEDs, at a cost of about $2,000. I would not recommend reflowing these, and assuming soldering a LED every thirty seconds, it will take about a month to solder them all by hand. There’s your project, now get to it.

Epoxy LED Cube Looks Sleek, And Flashes To The Beat

If there’s one thing that’s universally popular in these polarizing times, it’s colorful glowing objects. LEDs reign supreme in this area, and we’re accustomed to seeing all manner of fun flashy devices hit the tips line. Today is no different, and we’ve been looking at [Modustrial Maker]’s stylish epoxy LED cube.

The build starts with the casting of a black epoxy cube, with a cutout near the top in which the LEDs will be installed. A melamine form is used, with aluminium foil tape, caulk and paste wax to help seal it up. After releasing the cast from the form, there were some unsightly voids which were swiftly dispatched, by trimming the block down with a table saw. With the block cut to size, LED strips were installed, and the light cavity sealed with hot glue before white epoxy was poured in as a diffuser. All that’s left was a simple matter of polishing the cube and installing electronics.

The cube runs from a single-cell LiPo battery, and there’s a wireless power receiver and charging module to keep the power flowing. The cube can be used on most wireless phone chargers, as well as its own dedicated charging base. The LEDs are controlled by an off-the-shelf module, which offers a variety of flashing displays as well as a music-reactive mode.

While the electronics side is done with off-the-shelf parts, the real art in this piece is in the build of the cube. Its glossy, attractive form would look stunning on any coffee table or bedside shelf.

LED cubes are a great rabbit hole to go down on your lunch break. This OpenGL-enabled build is particularly impressive. Video after the break.

Continue reading “Epoxy LED Cube Looks Sleek, And Flashes To The Beat”

LED Music Visualizer Bespeckles Your Bedroom

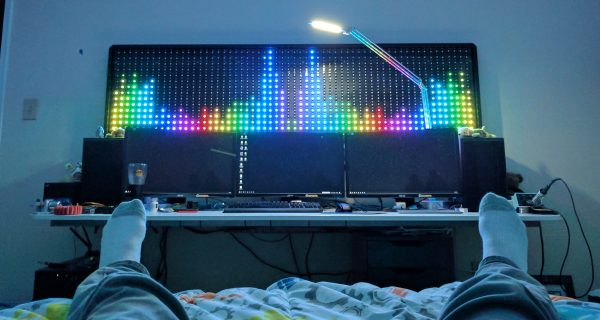
When it comes to wall-mounted ornamentation, get ready to throw out your throw-rugs and swap them for something that will pop so vividly, you’ll want to get your eyes checked. To get our eyes warmed up and popping, [James Best] has concocted a gargantuan 900-RGB-LED music visualizer to ensure that our bedrooms are bright and blinky on demand.

Like any other graduate from that small liberal-arts school in southern California, [James] started prototyping with some good old-fashioned blue tape. Once he had had his grid-spacing established, he set to work on 2-meter-by-0.5-meter wall mounted display from some plywood and lumber. Following some minor adhesive mishaps, James had his grid tacked down with Gaffers tape, and ready for visuals.

Under the hood, a Teensy is leveraging its DMA capabilities to conduct out a bitstream to 900 LEDs. By using the DMA feature and opting for a Teensy over the go-to Arduino, [James] is  using the spare CPU cycles to cook out some Fourier-Transformed music samples and display their frequency content.

We’ve covered folks proving the concept of driving oodles of WS2812B LEDs over DMA; it’s great seeing these ideas mature into a fully-featured project that lands on the walll. For more on chatting with WS2812B LEDs over DMA, have a look back into our archive.

Continue reading “LED Music Visualizer Bespeckles Your Bedroom”