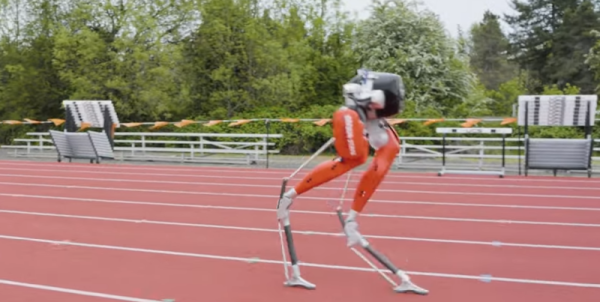
Wind-Up Tape Measure Transformed Into Portable Ham Antenna

If there’s one thing that amateur radio operators are good at, it’s turning just about anything into an antenna. And hams have a long history of portable operations, too, where they drag a (sometimes) minimalist setup of gear into the woods and set up shop to bag some contacts. Getting the two together, as with this field-portable antenna made from a tape measure, is a double win in any ham’s book.

For [Paul (OM0ET)], this build seems motivated mainly by the portability aspect, and less by the “will it antenna?” challenge. In keeping with that, he chose a 50-meter steel tape measure as the basis of the build. This isn’t one of those retractable tape measures, mind you — just a long strip of flexible metal on a wind-up spool in a plastic case. His idea was to use the tape as the radiator for an end-fed halfwave, or EFHW, antenna, a multiband design that’s a popular option for hams operating from the 80-m band down to the 10-m band. EFHW antennas require an impedance-matching transformer, a miniature version of which [Paul] built and tucked within the tape measure case, along with a BNC connector to connect to the radio and a flying lead to connect to the tape.

Since a half-wave antenna is half the length of the target wavelength, [Paul] cut off the last ten meters of the tape to save a little weight. He also scratched off the coating on the tape at about the 40-meter mark, to make good contact with the alligator clip on the flying lead. The first video below details the build, while the second video shows the antenna under test in the field, where it met all of the initial criteria of portability and ease of deployment.

Continue reading “Wind-Up Tape Measure Transformed Into Portable Ham Antenna”

Building 7-Segment Displays With LEGO

Utter the words “7-segment display” amongst hackers and you’ll typically get people envisaging the usual LED and LCD versions that we all come across in our daily lives. However, mechanical versions do exist, and [ord] has assembled a couple of designs of their very own.

The first uses what appears to be two LEGO motors to drive individual segments of the display. Each segment consists of a pair of yellow axles thrust up through a black grid to represent parts of the number, as well as a minus sign as needed. [ord] demonstrates it by using it to display angle data from a tilt sensor inside a LEGO Powered Up controller brick. Further photos on Flickr show the drive system from underneath.

The second design relies upon a drum-like mechanism that seems to only be capable of displaying numbers sequentially. It works in a manner not dissimilar to that of a player piano. The required movements to display each number are programmed into sequences with Technic pins sticking out of beams in a drum assembly driven by either a hand crank or motor. It’s again demonstrated by [ord] using it to display angular data.

While it’s unlikely we’ll see LEGO displays used as angle of attack meters in light aircraft, you could do so if you wanted a cheap and unreliable device that is likely to fall to pieces if unduly jostled. In any case, it’s not the first time we’ve seen LEGO 7-segment displays, but it’s always great to see a new creative take on an existing concept. We’d love to see such a design implemented into a fancy clock, or perhaps even a news ticker running on a 16-segment version. Video after the break.

Continue reading “Building 7-Segment Displays With LEGO”

Building A DIY Flight Yoke For Flight Simulator

Flight yokes are key to getting an authentic experience when playing a flight simulator, but [Michel Rechtin] didn’t want to pay big money for a commercially-available solution. He ended up building a design using a lot of parts he had laying around, which saved money and worked out great.

The build is based around an Arduino Micro, which reads a series of potentiometers from the yoke and pedals to control pitch, roll, and yaw, A series of buttons are then added to control ancillary functions for the plane and simulator software.

Much of the build uses old 3D printer components, including linear bearings and rods for the pitch axis for smooth operation. There’s even a throttle setup and some more buttons and switches for a more complete flying experience.

Files are available on Thingiverse from anyone looking to replicate [Michael]’s build. We love to see a yoke built from scratch, though we’ve also seen creative builds repurpose PlayStation controllers for the same purpose. Video after the break.

Continue reading “Building A DIY Flight Yoke For Flight Simulator”

Fifty Motored Paraglider Partly Flies, Partly Glides

If there’s one thing you can count on [Peter Sripol] for, it’s for defining the the aviation category of “Don’t Try This At Home.” In the video below the break, [Peter] displays his latest terror of the skies: A powered paraglider backpack that has fifty electric motors. Does it fly? Yes. Was it a success? Eh… mostly.

As [Peter] even says in the video: Don’t try this at home. [Peter] has taken a paraglider, which is essentially a non-rigid fabric wing that to the untrained eye resembles a parachute, and powered it with fifty drone motors taken from other projects. Two motors each are mounted in a push/pull configuration inside a 5×5 array of 3d printed ducts.

While the experiment was essentially a success, it was also a failure due to not having enough power, too little battery life, and overall just not being that great. Does every experiment need to end in absolute success in order to have fun and learn lessons that can be applied to the next iteration? Definitely not! We applaud [Peter] for being willing to fail- although, we have to admit, failing is a lot easier when you’ve already got a parachute of sorts deployed!

Looking for some more don’t-try-this-at-home projects to gawk at? Look no further than [Colin Furze] who like [Peter],  has managed to gain his own Hackaday tag.

Continue reading “Fifty Motored Paraglider Partly Flies, Partly Glides”

Cute Oscilloscope Uses LEDs For Display

Oscilloscopes were once commonly called CROs, for the fact that they relied on cathode ray tubes for display. Since then, technology has moved quickly, and oscilloscopes these days almost entirely rely on modern screens like LCDs. However, [lonesoulsurfer] went a different route with this fun DIY build, creating an oscilloscope with a low-resolution LED display.

Yes, the signals are shown on a 10×10 matrix made up of red LEDs. The individual pixels look nicely diffused and chunky thanks to the fact that [lonesoulsurfer] was able to source square 5mm LEDs for the build. The whole project only uses four ICs – a decade counter and a LM3914 LED driver to run the display, a 555 timer for clock input, and an LM386 op-amp for amplifying incoming signals.

With a mic fitted onboard, the oscilloscope can act as a simple music visualizer, or be used with a probe to investigate actual circuits. It may not be of great enough resolution or precision for fine work, but it’ll at least tell you if your microcontroller’s clock is running properly if you’re scratching your head about the function of a simple project.

We’ve seen some great DIY oscilloscopes over the years, like this neat Arduino-based build. Video after the break.

Continue reading “Cute Oscilloscope Uses LEDs For Display”

You Can Turn Soft Drink Bottles Into Handy Solar Lamps

Solar lights are a popular garden decoration. Of course, they’re available cheaply from most hardware and garden stores, but if you’re more of the DIY type, you might like to build your own. [opengreenenergy] has done just that, using recycled materials for a cheap and simple design.

The design was inspired by the Moser bottle, which is a water-filled bottle used to diffuse sunlight into a room during the day. Instead of sunlight, however, this design uses an LED to provide the light, for decorating a garden or for use when out camping or traveling.

In this design, a solar panel is used to charge a lithium-polymer battery during the day using a LP4060B5F charge controller IC. It’s paired with a AP6685 battery protection IC to ensure the battery is not overly discharged or otherwise damaged in use. When the solar panel stops putting out power when it gets dark, the LED is automatically switched on. It can be set to a low or high brightness to provide more runtime or more light as needed.

All the circuitry is wrapped up in a neat 3D-printed case that allows the hardware to be screwed directly on top of a regular soft drink bottle. Paired with some water in the bottle, and perhaps a little bleach to stave off algal growth, the result is a handy, portable light that also has enough mass to avoid it being blown over easily.

It’s interesting to compare the design to commercial versions that aim to pare costs down to a minimum. Video after the break.

Continue reading “You Can Turn Soft Drink Bottles Into Handy Solar Lamps”

Non-Contact Probe Works Better With A Little More Complexity

Non-contact voltage probes have been around a while and some test equipment now has them built-in. This is one of those things that you probably don’t think about much, but surely it isn’t that hard to detect AC voltage. Turns out there are a lot of circuits floating around that can do it and [nsievers51] tried a bunch. Many didn’t work very well, but the best used a 4069 CMOS hex inverter. A dollar store flashlight provided power, a case, and an LED and the result was a good-looking and effective probe.

The circuit came from the Electronics Library website and is fairly complex for this sort of device. The CMOS inverters have a high input impedance so they pick up the weak signal. Instead of directly driving an LED, two inverters form a ring oscillator that generate pulses around 1 kHz. At that frequency, the LED appears to be on, but battery consumption is less severe. A single 2N2222-style transistor drives the LED.

We’ve seen a number of variations on this tool in the past. Many of them only use transistors.

Continue reading “Non-Contact Probe Works Better With A Little More Complexity”