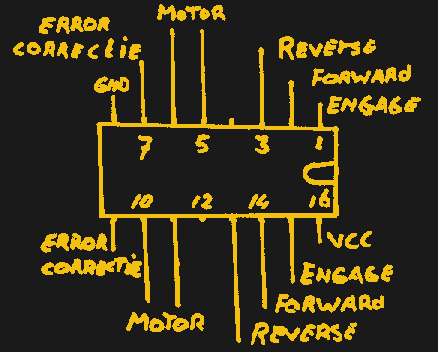
When we think of a motor controller it’s usual to imagine power electronics, and a consequent dent in the wallet when it’s time to order the parts. But that doesn’t always have to be the case, as it turns out that there are many ways to control a motor. [Bram] did it with a surprising part, a 74ACT139 dual 4-line demultiplexer.
A motor controller is little more than a set of switches between the supply rails and the motor terminals, and thus how it performs depends on a few factors such as how fast it can be switched, how much current it can pass, and how susceptible it is to any back EMF or other electrical junk produced by the motor.
In this particular application the motor was a tiny component in a BEAM robot, so the unexpected TTL motor controller could handle it. The original hack was done a few decades ago and it appears to have become a popular hack in the BEAM community.
This project is part of the Hackaday Component Abuse Challenge, in which competitors take humble parts and push them into applications they were never intended for. You still have time to submit your own work, so give it a go!
I modified a printer a few years ago to handle multiple filaments, but I will admit it was more or less a stunt. It worked, but it felt like you had to draw mystic symbols on the floor of the lab and dance around the printer, chanting incantations for it to go right. But I recently broke down and bought a color printer. No, probably not the one you think, but one that is pretty similar to the other color machines out there.
Of course, it is easy to grab ready-made models in various colors. It is also easy enough to go into a slicer and “paint” colors, but that’s not always desirable. In particular, I like to design in OpenSCAD, and adding a manual intervention step into an otherwise automatic compile process is inconvenient.
The other approach is to create a separate STL file for each filament color you will print with. Obviously, if your printer can only print four colors, then you will have four or fewer STLs. You import them, assign each one a color, and then, if you like, you can save the whole project as a 3MF or other file that knows how to handle the colors. That process is quick and painless, so the question now becomes how to get OpenSCAD to put out multiple STLs, one for each color.
But… color()
OpenSCAD has a color function, but that just shows you colors on the screen, and doesn’t actually do anything to your printed models. You can fill your screen with color, but the STL file you export will be the same. OpenSCAD is also parametric, so it isn’t that hard to just generate several OpenSCAD files for each part of the assembly. But you do have to make sure everything is referenced to the same origin, which can be tricky.
OpenSCAD Development Version Test
It turns out, the development version of OpenSCAD has experimental support for exporting 3MF files, which would allow me to sidestep the four STLs entirely. However, to make it work, you not only have to run the development version, but you also have to enable lazy unions in the preferences. You might try it, but you might also want to wait until the feature is more stable.
Besides, even with the development version, at least as I tried it, every object in the design will still need its color set in the slicer. The OpenSCAD export makes them separate objects, but doesn’t seem to communicate their color in a way that the slicer expects it. If you have a large number of multi-color parts, that will be a problem. It appears that if you do go this way, you might consider only setting the color on the very top-most objects unless things change as the feature gets more robust.
A Better Way
What I really wanted to do is create one OpenSCAD file that shows the colors I am using on the screen. Then, when I’m ready to generate STL files, I should be able to just pick one color for each color I am using.
First person view (FPV) quadcopter drones have become increasingly more capable over the years, as well as much smaller. The popular 65 mm format, as measured from hub to hub, is often considered to be about the smallest you can make an FPV drone without making serious compromises. Which is exactly why [Hoarder Sam] decided to make a smaller version that can fit inside a Pringles can, based on the electronics used in the popular Air65 quadcopter from BetaFPV.
The 22 mm FPV drone with camera installed and looking all cute. (Credit: Hoarder Sam)
The basic concept for this design is actually based on an older compact FPV drone design called the ‘bone drone’, so called for having two overlapping propellers on each end of the frame, thus creating a bone-like shape. The total hub-to-hub size of the converted Air65 drone ends up at a cool 22 mm, merely requiring a lot of fiddly assembly before the first test flights can commence. Which raises the question of just how cursed this design is when you actually try to fly with it.
Obviously the standard BetaFPV firmware wasn’t going to fly, so the next step was to modify many parameters using the Betaflight Configurator software, which unsurprisingly took a few tries. After this, the fully loaded drone with camera and battery pack, coming in at a whopping 25 grams, turns out to actually be very capable. Surprisingly, it flies not unlike an Air65 and has a similar flight time, losing only about 30 seconds of the typical three minutes.
With propellers sticking out at the top and bottom – with no propeller guards – it’s obviously a bit of a pain to launch and land. But considering what the donor Air65 went through to get to this stage, it’s honestly quite impressive that this extreme modification mostly seems to have altered its dimensions.
At 5:20 PM on November 9, 1965, the Tuesday rush hour was in full bloom outside the studios of WABC in Manhattan’s Upper West Side. The drive-time DJ was Big Dan Ingram, who had just dropped the needle on Jonathan King’s “Everyone’s Gone to the Moon.” To Dan’s trained ear, something was off about the sound, like the turntable speed was off — sometimes running at the usual speed, sometimes running slow. But being a pro, he carried on with his show, injecting practiced patter between ad reads and Top 40 songs, cracking a few jokes about the sound quality along the way.
Within a few minutes, with the studio cart machines now suffering a similar fate and the lights in the studio flickering, it became obvious that something was wrong. Big Dan and the rest of New York City were about to learn that they were on the tail end of a cascading wave of power outages that started minutes before at Niagara Falls before sweeping south and east. The warbling turntable and cartridge machines were just a leading indicator of what was to come, their synchronous motors keeping time with the ever-widening gyrations in power line frequency as grid operators scattered across six states and one Canadian province fought to keep the lights on.
They would fail, of course, with the result being 30 million people over 80,000 square miles (207,000 km2) plunged into darkness. The Great Northeast Blackout of 1965 was underway, and when it wrapped up a mere thirteen hours later, it left plenty of lessons about how to engineer a safe and reliable grid, lessons that still echo through the power engineering community 60 years later.
Those of us ancient enough to remember the time, or even having grown up during the heyday of the 8-bit home computer, may recall the pain of trying to make your latest creation work on another brand of computer. They all spoke some variant of BASIC, yet were wildly incompatible with each other regardless. BASICODE was a neat solution to this, acting as an early compatibility standard and abstraction layer. It was essentially a standardized BASIC subset with a few extra routines specialized per platform.
But that’s only part of the story. The BASICODE standard program was invented by Dutch radio engineer Hessel de Vries, who worked for the Dutch national radio broadcaster Nederlandse Omroep Stichting (NOS). It was designed to be broadcast over FM radio! The idea of standardization and free national deployment was brilliant and lasted until 1992, when corporate changes and technological advancements ultimately led to its decline.
[CreativeLab] bought a cheap arbitrary waveform generator and noted that it only had a two-pin power cord. That has its ups and downs. We feel certain the intent was to isolate the internal switching power supply to prevent ground loops through the scope probes or the USB connector. However, it is nice to have all your equipment referencing the same ground. [CreativeLab] agrees, so he decided to do something about it.
Opening the box revealed that there was hardly anything inside. The main board was behind the front panel. There was also the power supply and a USB board. Plus lots of empty space. Some argue the case is made too large to be deceptive, but we prefer to think it was to give you a generous front panel to use. Maybe.
It was a simple matter to ground everything to a new three-pin connector, but that left the problem of the USB port. Luckily, since it was already out on its own board, it was easy to wire in an isolator.
Honestly? We’d have hesitated to do this unless we had made absolutely sure it didn’t pose some safety hazard to “jump over” the switching power supply. They are often isolated for some reason. However, the likelihood is that it is just fine. What do you think? Let us know in the comments.
Anyone into retro Macintosh machines has probably heard of BlueSCSI: an RP2040-based adapter that lets solid state flash memory sit on the SCSI bus and pretend to contain hard drives. You might have seen it on an Amiga or an Atari as well, but what about a PC? Once upon a time, higher end PCs did use SCSI, and [TME Retro] happened to have one such. Not a fan of spinning platters of rust, he takes us through using BlueSCSI with a big-blue-based-box.
Naturally if you wish to replicate this, you should check the BlueSCSI docs to see if the SCSI controller in your PC is on their supported hardware list; otherwise, your life is going to be a lot more difficult than what is depicted on [TME Retro]. As is, it’s pretty much the same drop-in experience anyone who has used BlueSCSI on a vintage Macintosh might expect. Since the retro-PC world might not be as familiar with that, [TME Retro] gives a great step-by-step, showing how to set up hard disk image files and an iso to emulate a SCSI CD drive on the SD card that goes into the BlueSCSIv2.
This may not be news to some of you, but as the title of this video suggests, not everyone knows that BlueSCSI works with PCs now, even if it has been in the docs for a while. Of course PCs owners are more likely to be replacing an IDE drive; if you’d rather use a true SSD on that bus, we’ve got you covered.

 A motor controller is little more than a set of switches between the supply rails and the motor terminals, and thus how it performs depends on a few factors such as how fast it can be switched, how much current it can pass, and how susceptible it is to any back EMF or other electrical junk produced by the motor.