384 Neon Bulbs Become Attractive Display

Neon lights have inspired much prose over the years, with their attractive light output receiving glowing adulation. [Pierre Muth] is a big fan, and decided to spend lockdown creating something suitably pretty for his desk.

An 8×8 segment of the total panel. The display draws 40W at 5V with all pixels on at the same time.

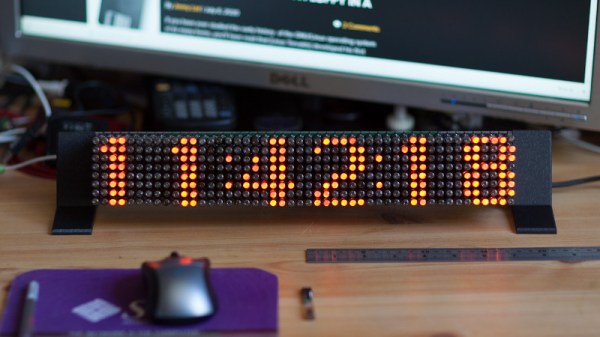
The project consists of an 8×48 matrix display constructed out of INS-1 (ИНC-1) tubes. These tiny neon tubes are 6.5 mm in diameter, showing a bright orange dot of light when powered up. Requiring just 100 V and 0.5 mA to light, they’re a touch easier to drive than the famous Nixie.

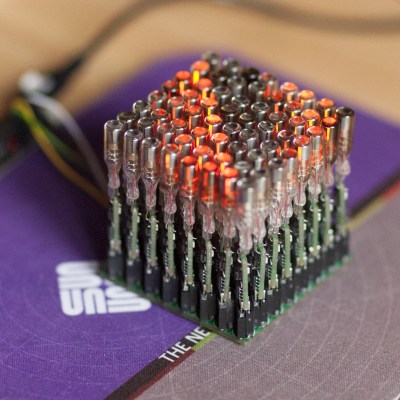
[Pierre] decided to go all out, wishing to replicate the capabilities of smart LEDs like the WS2812. These contain a microcontroller built in to each LED, so [Pierre] would have to do the same. Each of the 384 neon tubes got its own bespoke PCB, containing a PIC16F15313 microcontroller, step up voltage circuitry, and a 6-pin connector. (Whoah!) When each bulb was soldered to its PCB, they were then plugged into a backplane. An ESP32 was then employed to drive the display as a whole.

Creating a display in this fashion takes a huge amount of work, with most of it being soldering the 384 individual bulb PCBs containing 11 components each. We have a lot of respect for [Pierre]’s work ethic to get this done during lockdown, and the final result is a gloriously retro neon matrix display. We’ve featured other neon matrixes recently, too. Video after the break. Continue reading “384 Neon Bulbs Become Attractive Display”

Custom Weather Camera Feed With Software Tricks

With a gorgeous view of the Italian seaside, we’re not surprised [Danilo Larizza] had a couple IP cameras set up to pull in real-time views. But using a Raspberry Pi, an environmental sensor, and some software trickery to overlay the current (and naturally, perfect) weather conditions over the images? Now he’s just teasing us.

Whatever his motives are, we have to admit that the end result is very nice. Especially when you find out that there’s no complex hardware or software at work here. An original Raspberry Pi is doing all the heavy lifting by pulling a frame from the external IP camera using ffmpeg, polling the I2C-connected BME280 temperature and humidity sensor with a Python script, and then producing a final snapshot with the environmental data laid over top using ImageMagick.

[Danilo] gives the exact commands he’s using for each step of the process, making it easy to follow along and see how everything comes together in the end. That also makes it much easier to adapt for your own purposes should you feel so inclined. Once you see how all the pieces fit together, where the data and images come from is up to you.

We’ve previously shown how some simple Python code can be used to turn your raw data into attractive images, and combining that with real-world photographs is an excellent way of turning a text file full of values into a display worth showing off.

Linux Fu: Keep In Sync

Once upon a time, computers were very expensive and you were lucky to have shared access to one computer. While that might seem to be a problem, it did have one big advantage: all of your files were on that computer.

Today, we all probably have at least a desktop and one laptop. Your phone is probably a pretty good computer by most standards. You might have multiple computers and a smattering of tablets. So what do you do to keep your files accessible everywhere? Why not run your own peer-to-peer synchronization service? Your files are always under your control and encrypted in motion. There’s no central point of failure. You can do it with one very slick piece of Open Source software called syncthing. It runs on Windows, Linux, Mac, BSD, and Solaris. There are also Android clients. We haven’t tested it, but one caveat is that the unofficial iOS support sounds a little spotty.

The joke about the cloud — that it’s just other people’s servers — is on point here. Some people don’t like their files sitting on a third-party server. Even if your files are encrypted or you don’t care, you still have the problem of what happens if you can’t reach the server — may be on an airplane with no WiFi — or the server goes down. Sure, Google and Microsoft don’t go dark very often, but they can and do. Even if you build your own cloud, it runs on your servers. Syncthing is serverless: it simply makes sure that all files are up-to-date on all your end devices. Continue reading “Linux Fu: Keep In Sync”

Tiny Ethernet Switch Gets Even Smaller

As a project gets more complicated, some kind of internal communication network is often used to that all of the various modules and sensors can talk with each other. For hardware hackers like us, that usually means SPI, I2C, or maybe even good old fashioned UART. But if you’re pushing a lot of data around, like live video feeds from multiple cameras, you’ll need something a bit faster than that.

Which is why [Josh Elijah] has created the SwitchBlox Nano, a three port 10/100 Ethernet switch that fits on a one inch square PCB. All you need to do is provide it with power, with a generous input range of 5 to 50 volts, connect your devices to the Molex Picoblade connectors on the board, and away you go. There’s even a 5 V 1 A regulated output you can use to run your downstream devices.

If you’ve got a feeling that you’ve seen something very similar on these pages earlier in the year, you’re not imagining things. Back in April we covered the original five port SwitchBlox in a post that garnered quite a bit of attention. In fact, [Josh] tells us that the design of this new switch was driven largely by the feedback he got from Hackaday readers. The Nano is not only smaller and cheaper than the original, but now maintains full electrical isolation between each port.

The average Hackaday reader is as knowledgeable as they are opinionated, and we’re glad [Josh] was able to put the feedback he received to practical use. We’re proud that our community has had a hand in refining successful commercial products like the Arduboy handheld game system and the Mooltipass hardware password keeper. Now it looks like we can add a tiny Ethernet switch to the list of gadgets we’ve helped push up the hill. Maybe we should get a stamp or something…

Let’s Take A Closer Look At This Robotic Airship

It’s not a balloon, however shiny its exterior may seem. This miniature indoor robotic airship created by the University of Auckland mechanical engineering research group [New Dexterity] is an asymmetric system experimenting with the possibilities of an open-source helium-based airship.

Why a helium airship, as opposed to a fixed wing aircraft? The group wanted to experiment with the advantages of lighter-than-air (LTA) travel, namely the higher mobility and looser path planning constraints. Furthermore, LTA airships have a less obstructed field of vision and fewer locomotion issues. While unmanned aerial vehicles (UAV) may be capable of hovering in one place, their lift is generated by rotor thrust, which drains their batteries quickly in the order of minutes. LTA airships can hover for longer periods of time.

The design was created for educational and research purposes, focusing on the financial feasibility of manufacturing the platform, the environmental impact of the materials, and the helium loss through the balloon-like envelope. By measuring these parameters, the researchers are able to study the effects of circumstances such as the cost of indoor commercial balloons and the mechanical properties of balloon materials.

The airship gondola was designed and 3D printed in a modular fashion, then attached to the envelope with Velcro. The placement with respect to the horizontal symmetry of the gondola was done for flight stability, with several configurations tested for the side rotor angle.

The group open-sourced their CAD files and ROS interface for controlling the airship. They primarily use off-the-shelf components such as Raspberry Pi boards, propellers, a DC single brushed motor driver carrier, and LiPo batteries for a total cost of $90 for the platform, with an addition $20 for the balloon and initial helium filling. The price is comparable to the cost of indoor blimps like the Blimpduino 2.0.

You can check out the completed airship below, where the team demonstrates its path following capabilities based on a carrot chasing path finding algorithm. And if you’re interested in learning more about the gotchas of building lighter-than-air vehicles, check out [Sophi Kravitz’s] blimp talk from Hackaday Belgrade.

Continue reading “Let’s Take A Closer Look At This Robotic Airship”

Versatile Energy Meter Has Multiple Functions

If you are dealing with solar or battery power, you might want to have one of these little energy meters built by [Open Green Energy] around. The Arduino-based instrument measures DC voltage, current, power, energy, capacity, and temperature. The range is only up to 26 volts and 3.2 amps, but you could extend that with some external circuitry.

Of course, measuring a voltage with the Arduino is old hat. But the addition of a INA219 current sensor provides voltage, current, and power measurements in a single module that talks I2C back to the host computer.

Continue reading “Versatile Energy Meter Has Multiple Functions”

Bringing The Pi Camera Into Focus With LEGO

Ever since the high-quality camera for the Raspberry Pi was released a few months back it has been the center of attention for many hacks. In this quick build [Martin Mander] shows us how to make a servo-powered focusing mechanism entirely from LEGO.

The inspiration for this project came to him while he was working on his 1979 Merlin Pi Camera and found that setting the focus just right is vital in order to get good quality pictures. So he set himself the goal to build a mechanism that allows him to focus the camera precisely and remotely.

It is the plethora of LEGO-compatible parts that are available off-the-shelf that make such a project possible without the use of any 3D printed components. He not only found a LEGO-compatible continuous rotating servo but also a LEGO-compatible case for the Pi, and a LEGO cogwheel which almost fits exactly onto the camera lens. He also added a tripod mount to the case that allows him to set up the camera anywhere. The camera and focussing mechanism are controlled with a custom GUI based on guizero Python 3 library and the camera can be accessed remotely via VNCViewer.

If you prefer 3D printing over LEGO there are also other stylish Raspi HQ camera builds.

Video after the break.

Continue reading “Bringing The Pi Camera Into Focus With LEGO”