A Complete Raspberry Pi Power Monitoring System

As the world has become more environmentally conscious, we’ve seen an uptick in projects that monitor or control home energy use. At a minimum one of these setups involves a microcontroller and some kind of clamp-on current sensor, but if you’re looking for resources to take things a bit farther, this Raspberry Pi energy monitoring system created by [David00] would be a great place to start.

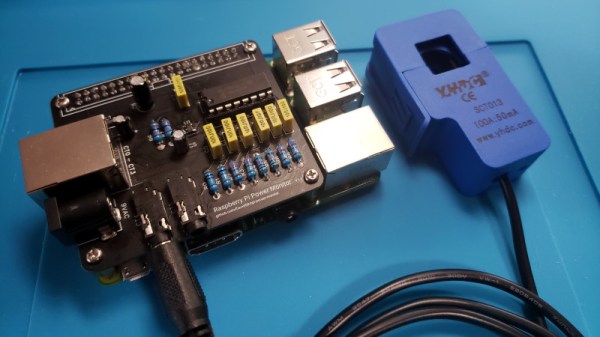
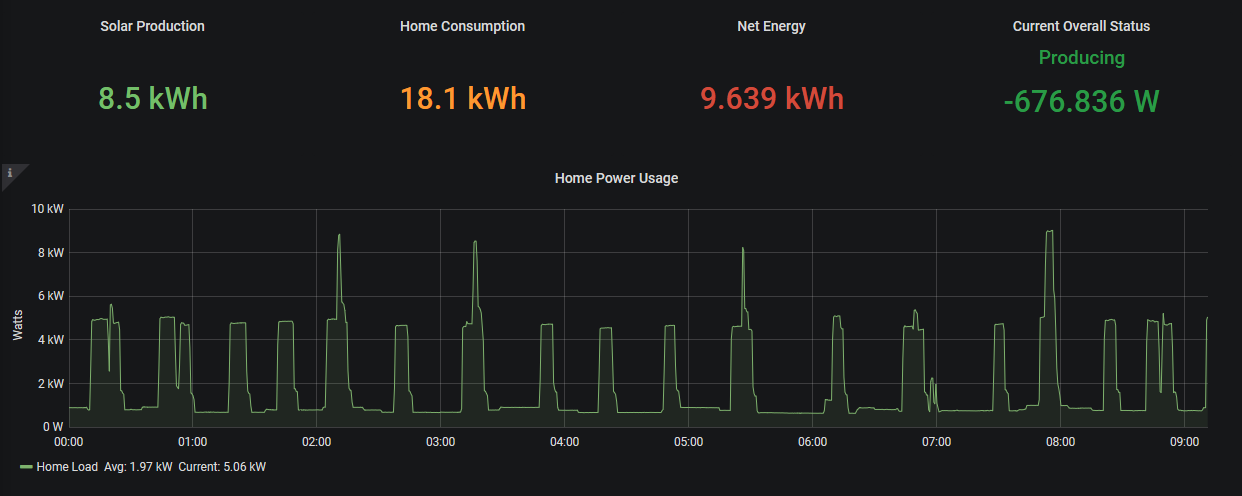
This project includes provides software and hardware to be used in conjunction with the Raspberry Pi to keep tabs on not just home energy consumption, but also production if your home has a solar array or other method of generating its own power. Data is pulled every 0.5 seconds from a MCP3008 ADC connected to up to five six current sensors to provide real-time utilization statistics, and visualized with Grafana so you can see all of the information at a glance.

While [David00] has already done the community a great service by releasing the hardware and software under an open source license, he’s also produced some absolutely phenomenal documentation for the project that’s really a valuable resource for anyone who wants to roll their own monitoring system. He’s even offering hardware kits for anyone who’s more interested in experimenting with the software side of things than building the PCB.

Home energy monitoring projects are certainly nothing new, but the incredible advances we’ve seen in the type of hardware and software available for DIY projects over the last decade has really pushed the state-of-the-art forward. With so many fantastic resources available now, the only thing standing between you and your own home energy monitoring dashboard is desire and a long weekend.

TinyPilot Provides KVM-over-IP, With Low Cost And Even Lower Latency

Remote access is great, but if the machine stops booting, ceases to connect to the network, or needs low-level interaction like BIOS settings or boot management, remote access is worthless because it’s only available once the host computer is up and running. The usual solution is to drag a keyboard and monitor to the machine in question for physical access.

Ubuntu laptop (right) being accessed over IP, via web browser on the left.

For most people, swapping cables in this way is an infrequent task at best. But for those who work more closely with managing hardware or developing software, the need to plug and unplug a keyboard and monitor into machines that otherwise run headless can get tiresome. The modern solution is KVM (keyboard, video, mouse) over IP, but commercial options are expensive. [Michael Lynch]’s TinyPilot on the other hand clocks in at roughly $100 of parts, including a Raspberry Pi and USB HDMI capture device. It does have to drop the ‘M’ from KVM (meaning it does not support a mouse yet) but the rest of it hits all the bases, and does it all from a web browser.

What exactly does TinyPilot do? It provides remote access via web browser, but the device is an independent piece of hardware that — from the host computer’s point of view — is no different from a physical keyboard and monitor. That means keyboard and video access works before the host machine even boots, so even changing something like BIOS settings is no problem.

[Michael] demonstrates his design in the video embedded below, but we encourage you to check out the project page for a fascinating exploration of all the challenges that were part of TinyPilot’s development.

Continue reading “TinyPilot Provides KVM-over-IP, With Low Cost And Even Lower Latency”

Portable CP/M Runs The Classics Anywhere

If you want to run an old CP/M program — maybe you want to run WordStar or play StarTrek — you have several options. One is to acquire some classic hardware. You can also build a new computer using a Z80 or some other processor that will emulate a Z80. Finally, you can emulate old hardware on your current computer. The iz-cpm project from [ivanizag] takes this last approach. Unlike some emulators, iz-cpm doesn’t try to emulate everything in one simulated environment. Instead, it directly accesses your file system so it allows CP/M executables to run more as though they were a native program.

You can think of it as Wine for CP/M. The code is portable to Linux, Windows, or MacOS. The author mentions, though, that it won’t run on CP/M itself! The program can run an executable standalone which means you could set .COM files up to execute automatically if you wanted to.

Continue reading “Portable CP/M Runs The Classics Anywhere”

Wobble Disk Coffee Roaster Gets The Beans Just Right

Coffee roasting is an art or a science, depending on who you talk to. Both camps will however agree that attention to detail is key. Many diehard beanheads, as they’re known, will go so far as to create their own roasting hardware to get the job done just right. [Larry Cotton] is one such builder, who has created an elegant roaster to get his brew just right.

The build is based around a wobble disk design. This consists of a round plate fixed at a 45-degree angle to a rotating shaft. As the shaft spins, the disk gently sweeps and agitates the roast, allowing the batch to heat up evenly without burning the beans. It’s a two-part design, with heat gun parts in the base to generate the hot air for the roasting process. The bean basket sits on top, held in place by magnets that also act as a conduit for the wobble disk motor’s power supply.

It’s a tidy build, which allows for accurate roasting and easy dumping of the beans once finished. If you’re a serious beanhead yourself with a few hacks up your sleeve, be sure to let us know! Video after the break.

Continue reading “Wobble Disk Coffee Roaster Gets The Beans Just Right”

Ergo Keyboard Build Issue Becomes Crystal Clear

Somewhere between the onset of annoying hand pain and the feeling of worn-out, mushy switches, [sinbeard]’s keyboard dissatisfaction came to a head. He decided it was time to slip into something bit more ergonomic and settled on building an Iris — a small split keeb with an ortholinear (non-staggered) key arrangement.

The Iris is open source and uses an on-board controller, so you can have the boards fabbed and do a lot of SMD soldering, or get a pair of PCBs with all of that already done. [sinbeard] went the latter route with this build, but there’s still plenty of soldering and assembly to do before it’s time to start clackin’, such as the TRRS jacks, the rotary encoders, and of course, all the switches. It’s a great way for people to get their feet wet when it comes to building keyboards.

Everything went according to plan until it was time to flash the firmware and it didn’t respond. It’s worth noting that both of the Iris PCBs are the same, and both are fully populated. This is both good and bad.

It’s bad you have two on-board microcontrollers and their crystals to worry about instead of one. It’s good because there’s a USB port on both sides so you can plug in whichever side you prefer, and this comes in mighty handy if you have to troubleshoot.

When one side’s underglow lit up but not the other, [sinbeard] busted out the ISP programmer. But in the end, he found the problem — a dent in the crystal — by staring at the board. A cheap replacement part and a little hot air rework action was all it took to get this Iris to bloom.

Want to build a keyboard but need a few more keys? Check out the dactyl and the ErgoDox.

3D Printed ESP8266 TV Is A Blast From The Past

We’ve often said that one of the best applications for desktop 3D printing is the production of custom enclosures, but you certainly aren’t limited to an extruded version of the classic Radio Shack project box. As [Marcello Milone] shows with this very clever retro TV enclosure for the Wemos D1 Mini, 3D printing means your imagination is the only limit when it comes to how you want to package up your latest creation.

As nice as the printed parts are, it’s the little details that really sell the look. [Marcello] has bent a piece of copper wire into a circle to make a faux antenna with vintage flair, and while the ESP is connecting to the WiFi network, it even shows an old school TV test pattern on its 1.8″ TFT display.

In the video after the break you can see the device go through its startup routine, and while displaying the Hackaday Wrencher at boot might not be strictly on theme…we’ll allow it.

While you could certainly use this little enclosure for whatever ESP project you had in mind, [Marcello] says he’s building a distributed environmental monitoring network using HTU21D temperature and humidity sensors. It sounds like he’s still working on the software side of things though, so hopefully he posts an update when the functionality is fully realized.

Continue reading “3D Printed ESP8266 TV Is A Blast From The Past”

384 Neon Bulbs Become Attractive Display

Neon lights have inspired much prose over the years, with their attractive light output receiving glowing adulation. [Pierre Muth] is a big fan, and decided to spend lockdown creating something suitably pretty for his desk.

An 8×8 segment of the total panel. The display draws 40W at 5V with all pixels on at the same time.

The project consists of an 8×48 matrix display constructed out of INS-1 (ИНC-1) tubes. These tiny neon tubes are 6.5 mm in diameter, showing a bright orange dot of light when powered up. Requiring just 100 V and 0.5 mA to light, they’re a touch easier to drive than the famous Nixie.

[Pierre] decided to go all out, wishing to replicate the capabilities of smart LEDs like the WS2812. These contain a microcontroller built in to each LED, so [Pierre] would have to do the same. Each of the 384 neon tubes got its own bespoke PCB, containing a PIC16F15313 microcontroller, step up voltage circuitry, and a 6-pin connector. (Whoah!) When each bulb was soldered to its PCB, they were then plugged into a backplane. An ESP32 was then employed to drive the display as a whole.

Creating a display in this fashion takes a huge amount of work, with most of it being soldering the 384 individual bulb PCBs containing 11 components each. We have a lot of respect for [Pierre]’s work ethic to get this done during lockdown, and the final result is a gloriously retro neon matrix display. We’ve featured other neon matrixes recently, too. Video after the break. Continue reading “384 Neon Bulbs Become Attractive Display”