Hackaday Podcast 075: 3D Printing Japanese Joinery, Android PHONK, One-Armed Time Bandit, And Whistling Bridges

Hackaday editors Mike Szczys and Elliot Williams scoop up a basket of great hacks from the past week. Be amazed by the use of traditional Japanese joinery in a 3D-printed design — you’re going to want to print one of these Shoji lamps. We behold the beautiful sound of a noise generator, and the freaky sound from the Golden Gate. There’s a hack for Android app development using Javascript on an IDE hosted from the phone as a webpage on your LAN. And you’ll like the KiCAD trick that makes enclosure design for existing boards a lot easier.

Take a look at the links below if you want to follow along, and as always, tell us what you think about this episode in the comments!

Take a look at the links below if you want to follow along, and as always, tell us what you think about this episode in the comments!

Direct download (60 MB or so.)

Continue reading “Hackaday Podcast 075: 3D Printing Japanese Joinery, Android PHONK, One-Armed Time Bandit, And Whistling Bridges”

Boston Dynamics’ Spot Robot Gets A Price Tag: $75 Grand

One of Spot’s features is the ability to navigate real-world environments. This has not historically been a strong point for robots.

Not long ago, Boston Dynamics’ Spot finally went on sale, meaning the dog-like robot can now be purchased online. Previously it was available only to be leased by early adopters willing to pay to see what the robot had to offer. Pricing was tucked behind an NDA, and Spot could be only leased and not actually purchased — until now.

From a hobbyist’s perspective, Spot’s price is of course eye-watering; the cost of the accessories even more so. It would be perfectly understandable to ask what good is a robotic dog and what makes it worth such a cost?

From an industrial equipment point of view, the cost is perhaps less shocking. Maybe it’s a reminder that from an industrial and commercial perspective, the price of a thing matters mainly in relation to what kind of benefits it can bring, and what kind of price or savings can be hung on that.

Hackers being hackers and free from having to worry about such things, some choose to make their own four-legged robot pals with no winning lotto tickets, juicy grants, or enormous R&D budgets needed.

’75 Nixie Multimeter As Digital Dice

For the casual Monopoly or Risk player, using plain six-sided dice is probably fine. For other games you may need dice with much more than six sides, and if you really want to go overboard you can do what [John] did and build electronic dice with a random number generator if you really need to remove the pesky practice of rolling physical dice during your games of chance.

The “digital dice” he built are based on a multimeter from 1975 which has some hardware in it that was worth preserving, including a high quality set of nixie tubes. Nixies can be a little hard to come by these days, but are interesting pieces of hardware in their own right. [John] added some modern hardware to it as well, including an AVR microcontroller that handles the (pseudo) random number generation. A hardware switch tells the microcontroller how many sides the “die” to be emulated will need, and then a button generates the result of the roll.

This is a pretty great use for an old piece of hardware which would otherwise be obsolete by now. [John] considers this a “Resto-Mod” and the finish and quality of the build almost makes it look all original. It’s certainly a conversation piece at the D&D sessions he frequents.

IPv6 Christmas Display Uses 75 Internet’s Worth Of Addresses

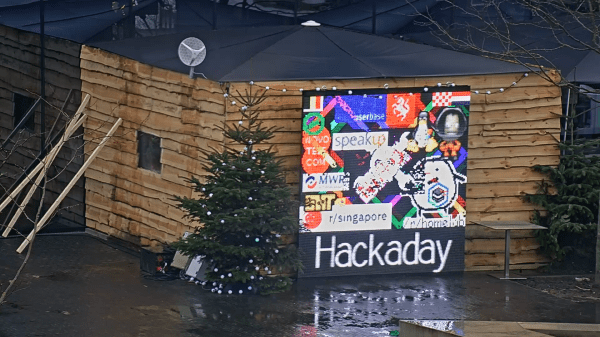
We’ve seen internet-enabled holiday displays before, and we know IPv6 offers much more space than the older IPv4 addressing scheme that most of us still use today, but the two have never been more spectacularly demonstrated than at jinglepings.com. The live video stream shows an Internet-connected Christmas tree and an LED display wall that you can control by sending IPv6 ICMP echo request messages, more commonly known as pings.

Reading the page, you quickly parse the fact that there are three ways to control the tree. First, you can type a message in the box and press send – this message gets displayed on the crawl at the bottom of the LED screen.  Second, you can light up the tree by sending a ping to the IPv6 address 2001:4c08:2028:2019::RR:GG:BB, where RR, GG, and BB are 8-bit hex values for red, green, and blue. This is a neat abuse of the IPv6 address space, in that the tree has 224 (around 16.8 million) IPv6 addresses, one for each color you can set. We were impressed by this brute-force use of address space, at least until we read on a little further.

You can also make your own drawings on the LED wall, again by sending pings. In this case, the address to set a pixel to a particular color is: 2001:4c08:2028:X:Y:RR:GG:BB, where X and Y are the pixel coordinates. This seems easy enough: to set pixel (10, 11) to magenta, the RGB value (0xFF, 0x00, 0xFF), you’d simply ping the IPv6 address 2001:4c08:2028:10:11:FF:00:FF. Having  an array of addressable LEDs is commonplace in hacker circles today, although each of them having their own live IPv6 address on the Internet seems a little excessive at first. Then it hits you – each LED has an IPv6 address for every possible color, just like the tree: 16.8 million addresses for each LED. The LED display is 160×120 pixels in size, so the total number of IPv6 addresses used is 160x120x224, which is 75 times larger than all possible IPv4 addresses!  This is a hack of monstrous proportions, and we love it.

In case you’re not running IPv6 yet, we’ve got you covered. To send individual pings using your browser, you can use a site like Ipv6now. If you want to send pixels to the display wall, you’re better off using a 6in4 tunnel that lets you access IPv6 sites using your current IPv4 connectivity.  Hurricane Electric offers a free 6in4 tunnel service that we’ve found useful. Then it’s just a matter of writing some code to send pixel values as pings.  The python scapy module is perfect for this sort of thing. But, first you’ll have to fill out the form on jinglepings.com and wait to get your IPv6 address whitelisted before you can draw on the display; evidently the usual bad actors have found the site and started drawing inappropriate things.

If you think this use of addresses seems wasteful, you needn’t worry. There are around 3.4×1038 IPv6 addresses, enough for 1027 such displays. We’re going to go out on a limb here and say it: nobody will ever need more than 2128 IP addresses.

If you’re looking to build an LED holiday display on a smaller budget, check out this one that re-purposes normal LED strings.

Thanks to [Ward] for the tip!

Firing Up 750 Raspberry Pis

Creating Raspberry Pi clusters is a popular hacker activity. Bitscope has been commercializing these clusters for a bit now and last year they created a cluster of 750 Pis for Los Alamos National Labs. You might wonder what an institution know for supercomputers wants with a cluster of Raspberry Pis. Turns out it is tough to justify taking a real high-speed cluster down just to test software. Now developers can run small test programs with a large number of CPU cores without requiring time on the big iron.

On the face of it, this doesn’t sound too hard, but hooking up 750 of anything is going to have its challenges. You have to provide power and carry away heat. They all have to communicate, and you aren’t going to want to house the thing in a few hundred square feet which makes heat and power even more difficult.

Continue reading “Firing Up 750 Raspberry Pis”

Radio Amateuring Like It’s 1975

It was a tweet from an online friend in the world of amateur radio, featuring a transmitter design published in Sprat, the journal of the G-QRP club for British enthusiasts of low-power radio. The transmitter was very simple, but seriously flawed: keying the power supply line would cause it to exhibit key clicks and frequency instability. It would probably have been far better leaving the oscillator connected full-time and keying the supply to the amplifier, with of course a suitable key click filter.

[M0CVO]'s Tweet that started it all
[M0CVO]’s Tweet that started it all
We’ve all probably made projects that get the job done at the expense of a bit of performance and economy, and from one angle this circuit is a fantastic example of that art. But it’s not the shortcomings of direct PSU keying a small transmitter that has brought it here, but observation instead of what it represents. Perhaps my social group of radio amateurs differs from the masses, but among them the universal lament is that there is nothing new in a simple transistor transmitter that could just as well have been published in 1977 as 2017.

To explain why this represents a problem, it’s worth giving some background. Any radio amateur will tell you that amateur radio is a wonderful and diverse pastime, in fact a multitude of pastimes rolled into one. Working DX? Got you covered. Contesting? UR 599 OM QRZ? Digital modes pushing the envelope of atmospheric propagation? Satellites? SDRs? GHz radio engineering? All these and many more can be yours for a modest fee and an examination pass. There was a time when radio was electronics, to all intents and purposes, and radio amateurs were at the vanguard of technology. And though electronics has moved on from those days of purely analogue communications and now stretches far beyond anything you’d need a licence and a callsign to investigate for yourself, there are still plenty of places in which an amateur can place themselves at the cutting edge. Software defined radio, for instance, or digital data transmission modes. With an inexpensive single board computer and a few components it is now possible to create a software-defined digital radio station with an extremely low power output, that can be copied on the other side of the world. That’s progress, it’s not so long ago that you would have required a lot of dollars and a lot of watts to do that. Continue reading “Radio Amateuring Like It’s 1975”

Teardown With A Twist: 1975 Sinclair Scientific Calculator

When writing a recent piece about Reverse Polish Notation, or RPN, as a hook for my writing I retrieved my Sinclair Scientific calculator from storage. This was an important model in the genesis of the scientific calculator, not for being either a trailblazer or even for being especially good, but for the interesting manner of its operation and that it was one of the first scientific calculators at an affordable price.

I bought the calculator in a 1980s rummage sale, bodged its broken battery clip to bring it to life, and had it on my bench for a few years. Even in the early 1990s (and even if you didn’t use it), having a retro calculator on your bench gave you a bit of street cred. But then as life moved around me it went into that storage box, and until the RPN article that’s where it stayed. Finding it was a significant task, to locate something about the size of a candy bar in the storage box it had inhabited for two decades, among a slightly chaotic brace of shelves full of similar boxes.

The Sinclair's clean design still looks good four decades later.
The Sinclair’s clean design still looks good four decades later.

Looking at it though as an adult, it becomes obvious that this is an interesting machine in its own right, and one that deserves a closer examination. What follows will not be the only teardown of a Sinclair Scientific on the web, after all nobody could match [Ken Shirriff]’s examination of the internals of its chip, but it should provide an insight into the calculator’s construction, and plenty of satisfying pictures for lovers of 1970s consumer electronics.

The Sinclair is protected by a rigid black plastic case, meaning that it has survived the decades well. On the inside of the case is a crib sheet for its RPN syntax and scientific functions, an invaluable aid when it comes to performing any calculations.

It shares the same external design as the earlier Sinclair Cambridge, a more humble arithmetic calculator, but where the Cambridge’s plastic is black, on the Scientific it is white. The LED display sits behind a purple-tinted window, and the blue-and-black keyboard occupies the lower two-thirds of the front panel. At 50 x 111 x 16 mm it is a true pocket calculator, with an elegance many of its contemporaries failed to achieve and which is certainly not matched by most recent calculators. Good industrial design does not age, and while the Sinclair’s design makes it visibly a product of the early 1970s space-age aesthetic it is nevertheless an attractive item in its own right.

Continue reading “Teardown With A Twist: 1975 Sinclair Scientific Calculator”