Have Yourself A Recursive Little Christmas: Ornament That Prints Ornaments

Sure there are the occasional functional Christmas tree ornaments; we had one that plugged into the lights and was supposed to sound like a bird gently trilling its song, but was in fact so eardrum-piercing that we were forbidden from using it. But in general, ornaments are just supposed to be for looks, right? Not so fast — this 3D-printed ornament has a 3D-printer inside that prints other ornaments. One day it might just be the must-have in functional Christmas decor.

Given that [Sean Hodgins] had only a few days to work on this tree-dwelling 3D-printer, the questionable print quality and tiny print volume can be overlooked. But the fact that he got this working at all is quite a feat. We were initially surprised that he chose to build a stereolithography (SLA) printer rather than the more common fused deposition modeling (FDM) printer, but it makes sense. SLA only requires movement in the Z-axis, provided in this case by the guts of an old DVD drive. The build platform moves in and out of a tiny resin tank, the base of which has a small LCD screen whose backlight has been replaced by a bunch of UV LEDs. A Feather M0 controls the build stage height and displays pre-sliced bitmaps on the LCD, curing the resin in the tank a slice at a time.

Results were mixed, with the tiny snowflake being the best of the bunch. For a rush job, though, and one that competed with collaborating on a package-theft deterring glitter-bomb, it’s pretty impressive. Here’s hoping that this turns into a full-sized SLA build like [Sean] promises.

Continue reading “Have Yourself A Recursive Little Christmas: Ornament That Prints Ornaments”

Arduino And Pi Share Boardspace

A Raspberry Pi Zero (W) and Arduino are very different animals, the prior has processing power and connectivity while the latter has some analog to digital converters (ADCs) and nearly real-time reactions. You can connect them to one another with a USB cable and for many projects that will happily wed the two. Beyond that, we can interface this odd couple entirely through serial, SPI, I2C, and logic-level signaling. How? Through a device by [cburgess] that is being called an Arduino shield that supports a Pi0 (W). Maybe it is a cape which interfaces with Arduino. The distinction may be moot since each board has a familiar footprint and both of them are found here.

Depending on how they are set up and programmed, one can take control over the other, or they could happily do their own thing and just exchange a little information. This board is like a marriage counselor between a Raspberry Pi and an Arduino. It provides the level-shifting so they don’t blow each other up and libraries so they can speak nicely to one another. If you want to dig a bit deeper into this one, design files and code examples are on available.

Perhaps we’ll report on this board at the heart of a pinball machine retrofit, a vintage vending machine restoration, or maybe a working prop replica from the retro bar in Back to the Future II.

A Safe, Ducted Drone With No Visible Blades

We love a good drone build here at Hackaday, but no matter how much care is taken, exposed propellers are always a risk: you don’t have to look far on the web to see videos to prove it. Conventional prop-guards like those seen on consumer drones often only protect the side of the propeller, not the top, and the same problem goes for EDFs. [Stefano Rivellini]’s solution was to take some EDFs and place them in the middle of large carbon fibre thrust tubes, making it impossible to get anywhere near the moving parts. The creation is described as a bladeless drone, but it’s not: they’re just well hidden inside the carbon fibre.

We’re impressed by the fact that custom moulds were made for every part of the body, allowing [Stefano] to manually create the required shapes out of carbon fibre cloth and epoxy. He even went to the trouble of running CFD on the design before manufacture, to ensure that there would be adequate thrust. Some DJI electronics provide the brains, and there’s also a parachute deployment tube on the back.

Whilst there’s no doubt that the finished drone succeeds at being safe, the design does come at the cost of efficiency. The power electronics needed are far more serious than we’d usually see on a drone of this size, to compensate for the extra mass of the thrust ducts and the impediment to the air-flow caused by the two 90° bends.

One of our favorite EDF drone innovations that we saw recently was this thrust-vectored single rotor device, a really unique idea that took some interesting control methods to implement.

[Thanks, Itay]

Continue reading “A Safe, Ducted Drone With No Visible Blades”

An IoT Christmas Tree You’re Invited To Control

We love IoT gadgets, but are occasionally concerned that they might allow access to the wrong kind of hacker. In this case, [Kevin] has created an IoT tree that allows anyone to control the pattern of lights, and he’s invited you to do so!

We played with the tree a bit, and the web interface is fairly powerful. For each LED, you can select either a random color or a keyframe-defined pattern. For the keyframe LEDs, you can create a number of “keyframes”, each of which is defined by a color and a transition, which can be either linear, quarter sine wave, or instantaneous (“wall”). Additional keyframes can be added for each LED, and if don’t specify a pattern for all the LEDs, the system repeats those you have defined to fill the entire string. There are also a few preset patterns you can choose if you prefer. If you, too, want to play with the tree, don’t delay: it’s only available through the first week of 2019!

Behind the scenes, an aging Raspberry Pi provides the local brains driving the LED controller and streaming the video, while a cloud server running a Redis instance allows communication with the web. The interface to the string of WS2811 LEDs uses [Kevin]’s Kinetis LK26 breakout board, which he managed to get working despite the state of tools and documentation for the Kinetis ARM family. You can read a good discussion of the system on his blog; there are a surprisingly large number of pieces that need to work together. As usual, he provides all the source code for this project on GitHub.

We’ve seen [Kevin]’s work before, including his 73-LED wristwatch, and adventures developing on an STM32 from scratch.

But, if it’s IoT Christmas trees that have got you thinking, you can check out this one from last year.

Oh The Lessons You’ll Learn By Building A Robot Familiar

A familiar spirit, or just a familiar, is a creature rumored to help people in the practice of magic. The moniker is perfect for Archimedes, the robot owl built by Alex Glow, which wields the Amazon Google AIY kit to react when it detects faces. A series of very interesting design choices a what really gives the creature life. Not all of those choices were on purpose, which is the core of her talk at the 2018 Hackaday Superconference.

You can watch the video of her talk, along with an interview with Alex after the break.

Continue reading “Oh The Lessons You’ll Learn By Building A Robot Familiar”

Ambitious Homebrew X-Ray Machine Reveals What Lies Within

We’re not quite sure what to say about this DIY X-ray machine. On the one hand, it’s a really impressive build, with incredible planning and a lot of attention to detail. On the other hand, it’s a device capable of emitting dangerous doses of ionizing radiation.

In the end, we’ll leave judgment on the pros and cons of [Fran Piernas]’ creation to others. But let’s just say it’s probably a good thing that a detailed build log for this project was not provided. Still, the build video below gives us the gist of what must have taken an awfully long time and a fair amount of cash to pull off. The business end is a dental X-ray tube of the fixed anode variety. We’ve covered the anatomy and physiology of these tubes previously if you need a primer, but basically, they use a high voltage to accelerate electrons into a tungsten target to produce X-rays. The driver for the high voltage supply, which is the subject of another project, is connected to a custom-wound transformer to get up to 150V, and then to a voltage multiplier for the final boost to 65 kV. The tube and the voltage multiplier are sealed in a separate, oil-filled enclosure for cooling, wisely lined with lead.

The entire machine is controlled over a USB port. An intensifying screen converts the X-rays to light, and the images of various objects are quite clear. We’re especially impressed by the fluoroscopic images of a laptop while its hard drive is seeking, but less so with the image of a hand, presumably [Fran]’s; similar images were something that [Wilhelm Röntgen] himself would come to regret.

Safety considerations aside, this is an incredibly ambitious build that nobody else should try. Not that it hasn’t been done before, but it still requires a lot of care to do this safely.

Continue reading “Ambitious Homebrew X-Ray Machine Reveals What Lies Within”

Vintage Toys Live On Through 3D Printing

We all have fond memories of a toy from our younger days. Most of which are still easy enough to get your hands on thanks to eBay or modern reproductions, but what if your childhood fancies weren’t quite as mainstream? What if some of your fondest memories involved playing with 1960’s educational games which are now so rare that they command hundreds of dollars on the second-hand market?

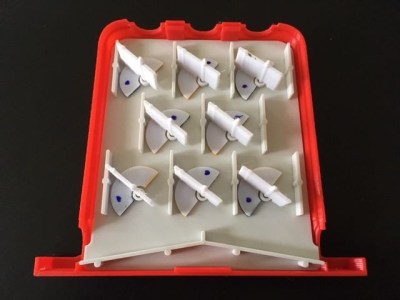
Inside the Think-a-Dot replica

That’s the situation [Mike Gardi] found himself in recently. Seeing that the educational games which helped put him on a long and rewarding career in software development are now nearly unobtainable, he decided to try his hand at recreating them on his 3D printer. With his keen eye for detail and personal love of these incredible toys, he’s preserved them in digital form for future generations to enjoy.

His replica of The Amazing Dr. Nim” needed to get scaled-down a bit in order to fit on your average desktop 3D printer bed, but otherwise is a faithful reproduction of the original injection molded plastic computer. The biggest difference is that his smaller version uses 10 mm (3/8 inch) steel ball bearings instead of marbles to actuate the three flip-flops and play the ancient game of Nim.

[Mike] has also created a replica of “Think-a-Dot”, another game which makes use of mechanical flip-flops to change the color of eight dots on the front panel. By dropping marbles in the three holes along the top of the game, the player is able to change the color of the dots to create various patterns. The aim of the game is to find the fewest number of marbles required to recreate specific patterns as detailed in the manual.

Speaking of which, [Mike] has included scans of the manuals for both games, and says he personally took them to a local shop to have them professionally printed and bound as they would have been when the games were originally sold. As such, the experience of owning one of these classic “computer” games has now been fully digitized and is ready to be called into corporeal form on demand.

This is really a fascinating way of preserving physical objects, and we’re interested to see if it catches on with other toys and games which otherwise might be lost to time. As storage capacities get higher and our ability to digitize the world around us improve, we suspect more and more of our physical world will get “backed up” onto the Internet.