Lasers Make PCBs The Old Fashioned Way

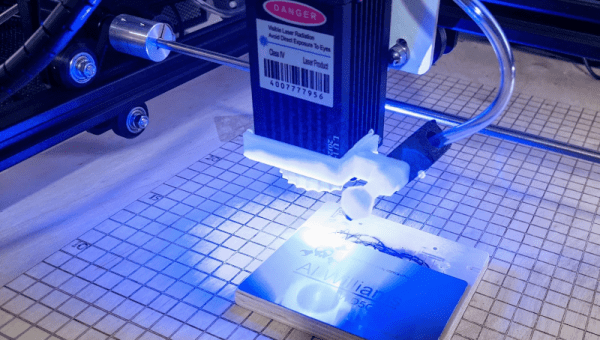
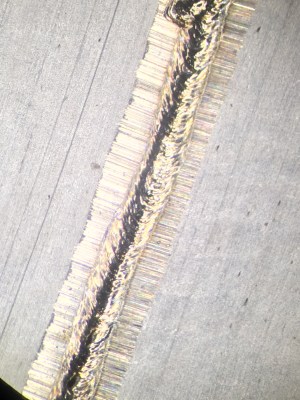
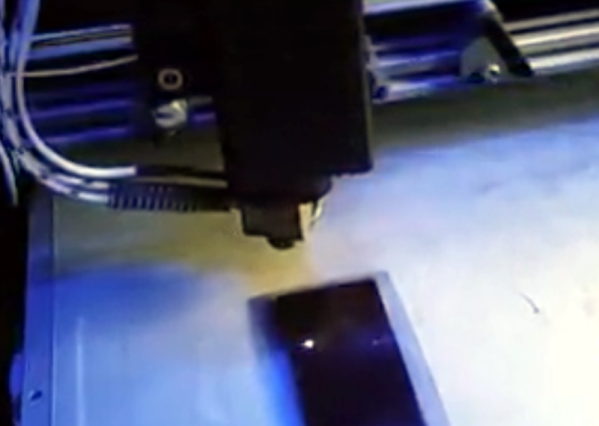
There are many ways to create printed circuit boards, but one of the more traditional ways involves using boards coated with photoresist and exposing the desired artwork on the board, usually with UV light. Then you develop the board like a photograph and etch it in acid. Where the photoresist stays, you’ll wind up with copper traces. Hackers have used lots of methods to get that artwork ranging from pen plotters to laser printers, but commercially a machine called a photoplotter created the artwork using a light and a piece of film. [JGJMatt] sort of rediscovered this idea by realizing that a cheap laser engraver could directly draw on the photoresist.

The laser dot is about 0.2 mm in diameter, so fine resolution boards are possible. If you have a laser cutter or engraver already, you have just about everything you need. If not, the lower-power laser modules are very affordable and you can mount one on a 3D printer. Most people are interested in using these to cut where higher power is a must, but for exposing photosensitive film, you don’t need much power. The 500 mW module used in the project costs about fifty bucks.

Continue reading “Lasers Make PCBs The Old Fashioned Way”

Polymer Discovery Gives 3D-printed Sand Super Strength

Research activity into 3D printing never seems to end, with an almost constant stream of new techniques and improvements upon old ones hitting the news practically daily. This time, the focus is on a technique we’ve not covered so much, namely binder jetting additive manufacturing (BJAM for short, catchy huh?) Specifically the team from Oak Ridge National Laboratory, who have been exploring the use of so-called hyperbranched Polyethyleneimine (PEI) as a binder for jetting onto plain old foundry silica sand (nature, free access.)

Roll, spray, bake. Simples.

The PEI binder was mixed with a 75:25 mix of water and 1-propanol (not to be mixed up with 2-propanol aka isopropanol) to get the correct viscosity for jetting with a piezoelectric print head and the correct surface tension to allow adequate powder bed penetration, giving optimal binding efficiency. The team reported a two-fold increase in strength over previous jetting techniques, however, the real news is what they did next; by infusing the printed part (known as the green part) with common old ethyl cyanoacrylate (ECA, or super glue to us) the structural strength of the print increased a further eight times due to the reaction between the binder and the ECA infiltrate.

To further bestow the virtues of the PEI binder/ECA mix, it turns out to be water-soluble, at least for a couple of days, so can be used to make complex form washout tooling — internal supports that can be washed away. After a few days, the curing process is complete, resulting in a structure that is reportedly stronger than concrete.  Reinforce this with carbon fiber, and boy do you have a tough building material!

Not bad for some pretty common materials and a simple printing process.

We covered a similar binder jetting process for using sawdust a little while ago, and a neat way of printing with metal powder by carrying it in a stream of argon and cooking it with a laser, but there is an opening for a DIY effort to get in on the binder jetting game.

Thanks [Victor] for the tip!

Thor does battle with a man shooting lasers from his hands

Of Lasers And Lightning: Thwarting Thor With Technology

Most of us don’t spend that much time thinking about lightning. Every now and then we hear some miraculous news story about the man who just survived his fourth lightning strike, but aside from that lightning probably doesn’t play that large a role in your day-to-day life. Unless, that is, you work in aerospace, radio, or a surprisingly long list of other industries that have to deal with its devastating effects.

Humans have been trying to protect things from lightning since the mid-1700s, when Ben Franklin conducted his fabled kite experiment. He created the first lightning rod, an iron pole with a brass tip. He had speculated that the conductor would draw the charge out of thunderclouds, and he was correct. Since then, there haven’t exactly been leaps and bounds in the field of lightning rod design. They are still, essentially, a metal rods that attract lightning strikes and shunt the energy safely into the earth. Just as Ben Franklin first did in the 1700s, they are still installed on buildings today to protect from lightning and do a fine job of it. While this works great for most structures, like your house for example, there are certain situations where a tall metal pole just won’t cut it.

Continue reading “Of Lasers And Lightning: Thwarting Thor With Technology”

Hacking The Ortur Laser With Spoil Board, Z-Height, And Air Assist

Last month in my hands-on review of the Ortur Laser I hinted that I had done a few things to make it work a little better. I made three significant changes in particular: I anchored the machine to a spoil board with markings, I added a moving Z axis to adjust focus by moving the entire laser head, and I added an air assist.

Turns out, you can find designs for all of these things all over the Internet and I did, in fact, use other people’s designs. The problem is the designs often conflict with one another or don’t exactly work for your setup. So what I’ll tell you about is the combination that worked for me and what I had to do to get it all working together. The air assist is going to take a post all by itself, but some of the attempts at air assist led to some of the other changes I made, so we’ll talk about it some in this post, as well.

One of the modifications — the spoil board mount — I simply downloaded and the link for that is below. However, I modified the moving Z axis and air assist parts and you can find my very simple modifications on Thingiverse. You’ll also find links to the original designs and you’ll need them for extra parts and instructions, too.

Continue reading “Hacking The Ortur Laser With Spoil Board, Z-Height, And Air Assist”

3D Finger Joints For Your Laser Cutter

A laser cutter is an incredibly useful tool and they are often found in maker spaces all over. They’re quite good at creating large two-dimensional objects and by cutting multiple flat shapes that connect together you can assemble a three-dimensional object. This is easier when creating something like a box with regular 90-degree angles but quickly becomes quite tricky when you are trying to construct any sort of irregular surface. [Tuomas Lukka] set out to create a dollhouse for his daughter using the laser cutter at his local hackerspace and the idea of creating all the joints manually was discouraging.

The solution that he landed on was writing a python script called Plycutter that can take in an STL file and output a series of DXF files needed by the cutter. It does the hard work of deciding how to cut out all those oddball joints.

At its core, the system is just a 3D slicer like you’d find for a 3D printer, but not all the slices are horizontal. Things get tricky if more than two pieces meet. [Tuomas] ran into a few issues along the way with floating-point round-off and after a few rewrites, he had a fantastic system that reliably produced great results. The dollhouse was constructed much to his daughter’s delight.

All the code for Plycutter is on GitHub. We’ve seen a similar technique that adds slots, finger-joints, and t-slots to boxes, but Plycutter really offers some unique capabilities.

Cheap And Effective Mosquito Trap Looks Like A Disco

Words cannot quite articulate the collective loathing humankind has for mosquitoes, and rightfully so! These parasite peddling, blood sucking little critters are responsible for a great deal of human suffering. Mosquito-borne diseases such as malaria still account for a significant proportion of human mortality, especially in under-developed parts of the world . So it’s no wonder that people try to reduce their numbers; see this latest $40 mosquito trap by [jacobsk]. (Video, embedded below.)

The idea is critically simple, opening up the potential for widespread deployment. The base and body of the trap are made out of three five-gallon buckets with a mini desk fan sandwiched in between, providing suction into the main trap bin. An opening is cut in the top bucket as a point of entry, and an old school incandescent blacklight is mounted in the centre, with just enough IR and UV output to entice these little vermin, who will definitely regret mistaking it for a black-light rave.

[jacobsk] also does a very good job of showing every step of its construction in his videos. Whilst this solution is purposefully low tech, check out this admittedly overcooked way of killing mosquitoes, with a laser turret.

Continue reading “Cheap And Effective Mosquito Trap Looks Like A Disco”

Laser Welding With A Tattoo Removal Gun

Dating as far back as the early 1960’s, researchers were zapping tattoo inks with laser light was an effective way to remove the markings from human skin. At the time it was prohibitively expensive. But the desire to have an undo-button for badge choices is strong, and thus the tattoo removal gun was born.

These days you can pick up one of these zappy, burn-y wonders for far less than a flagship cellphone put their high-power-output to alternative use. [Andrew] recently discovered that these devices can be readily repurposed into a laser welding tool with just a bit of work under the hood.

He first came across the technology via videos from [styropyro], whose work we’ve featured before. The tattoo removal gun features a YAG laser, which is pulsed to create a high power density. In initial testing, the pulses were too short and of too high intensity to effectively weld with; instead, the pulses simply cratered the metal.

After delving in further, [Andrew] discovered that by removing the Q-switch optical component, the pulses from the laser could be lengthened. This reduces the power density, and allows the tool to weld various materials even on its lower power settings. Success was found welding steel, titanium, and other materials, though attempts to weld copper and silver faced little success. Test pieces included razor blades and small screws, which could easily be welded with the tool. Results of the razor blade welding is spectacular, with a high-quality welding bead achieved by taping the laser to a CNC mill for precise movement.

It could prove to be a useful tool for those experimenting with complex projects involving bonding metals at very fine scales. If you’re pursuing something exotic yourself, we want to hear about it!