Hacking A Disco Laser

hacked laser disco

[Mark] was looking for a cheap disco laser projector for parties, and he found one. Unfortunately for him, the advertised features were a bit lacking. The “sound activation mode” was merely an on off circuit, as opposed to it actually being controlled by the music — he set out to fix this.

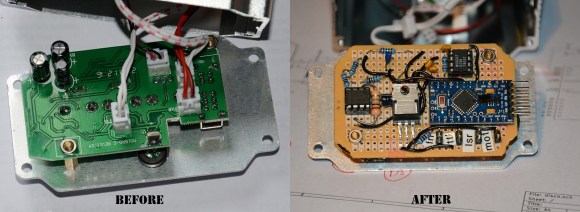
Taking the unit apart revealed a very convenient design for hacking. All of the components were connected to the main PCB by connectors, meaning the laser driver board was completely separate! He replaced the PCB completely using a prototyping board, an Arduino pro mini, a microphone with a simple preamp, a rotary encoder, and a MSGEQ7 chip to analyse the levels. Oh, and a MOSFET to control the motor via PWM output. It even ended up being close to the same size as the original!

If you happen to have one of these projectors and want to fix it too, he’s posted the source code and circuit diagram on github.

After the break, check out the before and after video. It’s still a cheap disco laser projector, but at least it works as advertised now!

Continue reading “Hacking A Disco Laser”

Hackaday Podcast 132: Laser Disco Ball, Moore’s Law In Your Garage, Cheap Cyborg Glasses, And A Mouse That Detects Elephants

Hackaday editors Elliot Williams and Mike Szczys debate the great mysteries of the hacking universe. On tap this week is news that Sam Zeloof has refined his home lab chip fabrication process and it’s incredible! We see a clever seismometer built from plastic pipe, a laser, and a computer mouse. There’s a 3D printed fabric that turns into a hard shell using the same principles as jamming grippers. And we love the idea of high-powered lasers being able to safely direct lighting to where you want it.

Take a look at the links below if you want to follow along, and as always, tell us what you think about this episode in the comments!

Direct download (60 MB or so.)

Continue reading “Hackaday Podcast 132: Laser Disco Ball, Moore’s Law In Your Garage, Cheap Cyborg Glasses, And A Mouse That Detects Elephants”

3D Print Smoothing, With Lasers

As anyone who has used an FDM printer can tell you, it’s certainly not the magical replicator it’s often made out to be. The limitations of the platform are numerous — ranging from anisotropic material characteristics to visual imperfections in the parts. In an attempt to reduce the visual artifacts in 3D prints, [TenTech] affixed a small diode laser on a 3D printer.

Getting the 1.5 watt diode laser onto the printer was a simple matter of a bracket and attaching it to the control board as a fan. Tuning the actual application of the laser proved a little more challenging. While the layer lines did get smoothed, it also discolored the pink filament making the results somewhat unusable. Darker colored filaments seem to not have this issue and a dark blue is used for the rest of the video.

A half smoothed half unprocessed test print
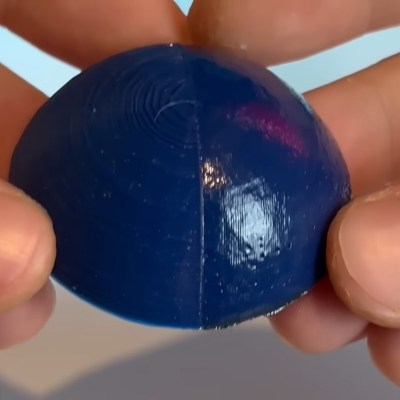
The smoothing process begins at the end of a 3D print and uses non-planar printer movements to keep the laser at an ideal focusing distance. The results proved rather effective, giving a noticeably smoother and shiner quality than an unprocessed print. The smoothing works incredibly well on fine geometry which would be difficult or impossible to smooth out via traditional mechanical means. Some detail was lost with sharp corners getting rounded, but not nearly as much as [TenTech] feared.

For a final test, [TenTech] made two candle molds, one smoothed and one processed. The quality difference between the two resulting candles was minimal, with the smoothed one being perhaps even a little worse. However, a large amount of wax leaked into the 3D print infill in the unprocessed mold, with the processed mold showing no signs of leaking.

If you are looking for a bit safer of a 3D print post-processing technique, make sure to check out [Donal Papp]’s UV resin smoothing experiments!

Continue reading “3D Print Smoothing, With Lasers”

The Sixteen-Year Odyssey To Finally Emulate The Pioneer LaserActive Console

The 1993 Pioneer LaserActive certainly ranks high on the list of obscure video games. It was an odd duck; it used both a LaserDisc for data storage and provided compatibility with a range of existing video game consoles. Due to the rarity and complexity of this system, emulating it has proven to be a challenge. The Ares emulator version 146 is the first to officially add support for the LaserActive. You’d expect getting to that point to be a wild journey. It was, and [Read Only Memo] documented the author’s ([Nemesis]) quest to emulate the odd little machine.

The LaserActive had a brief lifespan, being discontinued in 1996 after about 10,000 units sold. Its gimmick was that in addition to playing regular LaserDiscs and CDs, it could also use expansion modules (called PACs) to support games for other consoles, including the Sega Genesis and the NEC TurboGrafx-16. You could also get PACs for karaoke or to connect to a computer.

By itself, that doesn’t seem too complex, but its LaserDisc-ROM (LD-ROM) format was tough. The Mega LD variation also presented a challenge. The LD-ROMs stored entire games (up to 540 MB) that were unique to the LaserActive. Finding a way to reliably dump the data stored on these LD-ROMs was a major issue. Not to mention figuring out how the PAC communicates with the rest of the LaserActive system. Then there’s the unique port of Myst to the LaserActive, which isn’t a digital game so much as an interactive analog video experience, which made capturing it a complete nightmare.

With that complete, another part of gaming history has finally been preserved and kept playable. Sure, we have plenty of Game Boy emulators. Even tiny computers now are powerful enough to do a good job emulating the systems of yesterday.

Laser Painting Explained

If you get an inexpensive diode laser cutter, you might have been disappointed to find it won’t work well with transparent acrylic. The material just passes most of the light at that wavelength, so there’s not much you can do with it. So how did [Rich] make a good-looking sign using a cheap laser? He used a simple paint and mask technique that will work with nearly any clear material, and it produces great-looking results, as you can see in the video below.

[Rich] starts with a piece of Acrylic covered with paper and removes the paper to form a mask. Of course, even a relatively anemic laser can slice through the paper covering with no trouble at all. He also cuts an outline, which requires a laser to cut the acrylic. However, you could easily apply this to a rectangular hand-cut blank. Also, most diode lasers can cut thin acrylic, but it doesn’t always come out as cleanly as you’d like.

Continue reading “Laser Painting Explained”

Hackaday Podcast Episode 284: Laser Fault Injection, Console Hacks, And Too Much Audio

The summer doldrums are here, but that doesn’t mean that Elliot and Dan couldn’t sift through the week’s hack and find the real gems. It was an audio-rich week, with a nifty microsynth, music bounced off the moon, and everything you always wanted to know about Raspberry Pi audio but were afraid to ask. We looked into the mysteries of waveguides and found a math-free way to understand how they work, and looked at the way Mecanum wheels work in the most soothing way possible. We also each locked in on more classic hacks, Elliot with a look at a buffer overflow in Tony Hawks Pro Skater and Dan with fault injection user a low-(ish) cost laser setup. From Proxxon upgrades to an RC submarine to Arya’s portable router build, we’ve got plenty of material for your late summer listening pleasure.

Worried about attracting the Black Helicopters? Download the DRM-free MP3 and listen offline, just in case.

Continue reading “Hackaday Podcast Episode 284: Laser Fault Injection, Console Hacks, And Too Much Audio”

Lasers Could Help Us Recycle Plastics Into Carbon Dots

As it turns out, a great deal of plastics are thrown away every year, a waste which feels ever growing. Still, as reported by Sci-Tech Daily, there may be help on the way from our good friend, the laser!

The research paper  from the University of Texas outlines the use of lasers for breaking down tough plastics into their baser components. The method isn’t quite as simple as fire a laser off at the plastic, though. First, the material must be laid on a special two-dimensional transition metal dichalcogenide material — a type of atomically-thin semiconductor at the very forefront of current research. When the plastics are placed under the right laser light in this scenario, carbon-hydrogen bonds in the plastic are broken and transformed, creating new chemical bonds. Done right, and you can synthesize luminescent carbon dots from the plastic itself!

“By harnessing these unique reactions, we can explore new pathways for transforming environmental pollutants into valuable, reusable chemicals, contributing to the development of a more sustainable and circular economy,” says Yuebing Zheng, a leader on the project. “This discovery has significant implications for addressing environmental challenges and advancing the field of green chemistry.”

Sure it’s a bit trickier than turning old drink bottles into filament, but it could be very useful to researchers and those investigating high-tech materials solutions. Don’t forget to read up on the sheer immensity of the world’s plastic recycling problems, either. If you’ve got the solution, let us know!