Atlas robot jumps over a gap

Boston Dynamics Atlas Dynamic Duo Tackles Obstacle Course

Historically, the capabilities of real world humanoid robots have trailed far behind their TV and movie counterparts. But roboticists kept pushing state of the art forward, and Boston Dynamics just shared a progress report: their research platform Atlas can now complete a two-robot parkour routine.

Watching the minute-long routine on YouTube (embedded after the break) shows movements more demanding than their dance to the song “Do You Love Me?  And according to Boston Dynamics, this new capability is actually even more impressive than it looks. Unlike earlier demonstrations, this routine used fewer preprogrammed motions that made up earlier dance performances. Atlas now makes more use of its onboard sensors to perceive its environment, and more of its onboard computing power to decide how to best move through the world on a case-by-case basis. It also needed to string individual actions together in a continuous sequence, something it had trouble doing earlier.

Such advances are hard to tell from a robot demonstration video, which are frequently edited and curated to show highlighted success and skip all the (many, many) fails along the way. Certainly Boston Dynamics did so themselves before, but this time it is accompanied by almost six minutes worth of behind-the-scenes footage. (Also after the break.) We see the robot stumbling as it learned, and the humans working to put them back on their feet.

Humanoid robot evolution has not always gone smoothly (sometimes entertainingly so) but Atlas is leaps and bounds over its predecessors like Honda Asimo. Such research finds its way to less humanoid looking robots like the Stretch. And who knows, maybe one day real robots will be like their TV and movie counterparts that have, for so long, been played by humans inside costumes.

Continue reading “Boston Dynamics Atlas Dynamic Duo Tackles Obstacle Course”

Spiffy Summer Project Sources Solar Sounds From Scraps

[Gijs Gieskes] has a long history of producing electronic art and sound contraptions, and his Zonneliedjes (sunsongs) project is certainly an entertaining perpetuation of his sonic creations. With the stated goal of making music from sunlight, the sunsongs most prominent feature is solar panels.

Although It’s not clear how the photons transform into the rhythmic crashes and random beep-boop sounds, the results are quite satisfying. We have a strong suspicion that the same principals that turn random junk into BEAM robots are at work, maybe with some circuit bending sprinkled on for good measure. One detail we were able to glean from a picture of the device he calls “mobile” was a 40106 oscillator, which [Gijs] has used in previous projects.

The construction style that [Gijs] uses reminds us of the “Manhattan” construction style the amateur radio homebrewing community favors. Squares of copper PCB are glued directly to the back of the solar cells and the circuits are built atop them. Looking carefully at the pictures we can also see what look like cutoff leads, suggesting a healthy amount of experimentation to get the desired results, which we can all relate to.

Be sure to check out the video after the break, and also [Gijs] website. He’s been hacking away at projects such as these for a very long time, and we’ve even featured his projects going back more than 15 years. Thanks for the continued hacks, [Gijs]. We look forward to seeing what you come up with next!

If the terms “BEAM robotics” and “circuit bending” are unfamiliar to your ears (or if a refresh is due), be sure to check out our recent re-introduction to BEAM robotics and our classic “Intro to Circuit Bending” to get acquainted. Continue reading “Spiffy Summer Project Sources Solar Sounds From Scraps”

Casting Silicone Parts With 3D-Printed Inserts For Stiffness

Prolific maker [Jan Mrázek] shared his process for casting soft silicone parts that nevertheless have some added stiffness, which he accomplished by embedding porous, 3D-printed “ribs” into the pieces during the casting process. The 3D-printed inserts act as a sort of skeleton, and as a result, the parts have a soft silicone surface but gain structure and rigidity that simply wouldn’t be obtained if the part were cast entirely in silicone. The nice thing is that no new materials or tools were needed; [Jan] 3D printed both the molds for the parts as well as the structural inserts. It’s always nice when one can use the same tool and materials to accomplish different functions.

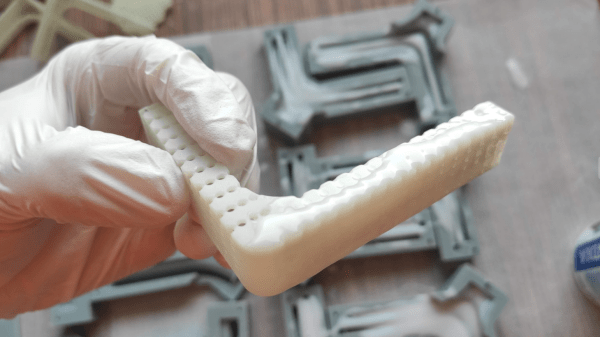
The parts [Jan] is making are interesting, as well. He observed that the process of swapping resin in his printer’s build tank was an unpleasant experience for a number of reasons, chief among them being that resin is sticky and messy, and the shape of the build tank doesn’t make pouring resin from it a clean job.
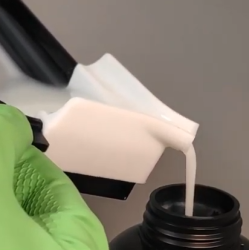
His solution was to design a pour spout that could be pressed onto the build tank, and some specially-designed squeegees to allow scraping the tank clean with ease. Silicone is the ideal material for the parts because it turns out that sticky resin beads nicely on silicone’s surface. Anywhere else, resin tends to spread out and form a sticky mess, but on silicone resin it forms tidy drops and is much easier to clean up.

It’s a technique worth keeping in mind, because one never knows when it could come in handy. Fabricating soft robots for example tends to involve silicone casting and clever techniques. See [Jan]’s parts in action in the video, embedded below.

Continue reading “Casting Silicone Parts With 3D-Printed Inserts For Stiffness”

Custom Isolated Variac Is Truly One Of A Kind

It’s no surprise that many hardware hackers avoid working with AC, and frankly, we can’t blame them. The potential consequences of making a mistake when working with mains voltages are far greater than anything that can happen when you’re fiddling with a 3.3 V circuit. But if you do ever find yourself leaning towards the sparky side, you’d be wise to outfit your bench with the appropriate equipment.

Take for example this absolutely gorgeous variable isolation transformer built by [Lajt]. It might look like a  high-end piece of professional test equipment, but as the extensive write-up and build photographs can attest, this is a completely custom job. The downside is that this particular machine will probably never be duplicated, especially given the fact its isolation transformer was built on commission by a local company, but at least we can look at it and dream.

This device combines two functions which are particularly useful when repairing or testing AC hardware. As a variable transformer, often referred to as a variac, it lets [Lajt] select how much voltage is passed through to the output side. There’s a school of thought that says slowly ramping up the voltage when testing an older or potentially damaged device is better than simply plugging it into the wall and hoping for the best. Or if you’re like Eddie Van Halen, you can use it to control the volume of your over-sized Marshall amplifiers when playing in bars.

Image of the device's internal components.Secondly, the unit isolates the output side. That way if you manage to cross the wrong wire, you’re not going to pop a breaker and plunge your workshop into darkness. It also prevents you from accidentally blowing up any AC powered test equipment you might employ while poking around, such as that expensive oscilloscope, since the devices won’t share a common ground.

Additional safety features have been implemented using an Arduino Uno R3 clone, a current sensor, and several relays. The system will automatically cut off power to the device under test should the current hit a predetermined threshold, and will refuse to re-enable the main relay until the issue has been resolved. The code has been written in such a way that whenever the user makes a configuration change, power will be cut and must be reestablished manually; giving the user ample time to decide if its really what they want to do.

[Lajt] makes it clear that the write-up isn’t meant as a tutorial for building your own, but that shouldn’t stop you from reading through it and getting some ideas. Whether you’re in the market for custom variac tips or just want to get inspired by an impeccably well engineered piece of equipment, this project is a high-water mark for sure.

ThunderScope datapath

Why Buy A New Scope When You Can ‘Just’ Build One?

Hackaday Prize 2021 Finalist ThunderScope is doing exactly that. [Aleska] is building a modular open source PC-connected oscilloscope aiming at four channels and a cool 100 MHz bandwidth with a low budget. The detailed project logs, showing how he is learning about ‘scope technology on-the-fly is a fascinating look into the mind of an engineer as he navigates the ups and downs of a reasonably complicated build.

We like how [Aleska] has realised early on, that keeping the project private and only releasing it when “I’m done” actually impedes progress, when you could open source from the beginning, log progress and get great feedback right from the start. All those obvious mistakes and poor design choices get caught and fixed before committing to hardware. Just think of all the time saved. Now this is an attitude to cultivate!

Continue reading “Why Buy A New Scope When You Can ‘Just’ Build One?”

Teardown: 3D Printed Space Shuttle Lamp

Since the very beginning, the prevailing wisdom regarding consumer desktop 3D printers was that they were excellent tools for producing prototypes or one-off creations, but anything more than that was simply asking too much. After all, they were too slow, expensive, and finicky to be useful in a production setting. Once you needed more than a few copies of a plastic part, you were better off biting the bullet and moving over to injection molding.

But of course, things have changed a lot since then. Who could have imagined that one day you’d be able to buy five 3D printers for the cost of the crappiest Harbor Freight mini lathe? Modern 3D printers aren’t just cheaper either, they’re also more reliable and produce higher quality parts. Plus with software like OctoPrint, managing them is a breeze. Today, setting up a small print farm and affordably producing parts in mass quantities is well within the means of the average hobbyist.

Space shuttle lamp
Flickering LEDs provide a sense of motion

So perhaps I shouldn’t have been so surprised when I started seeing listings for these 3D printed rocket lamps popping up on eBay. Available from various sellers at a wide array of price points depending on how long you’re willing to wait for shipping, the lamps come in several shapes and sizes, and usually feature either the Space Shuttle or mighty Saturn V perched atop a “exhaust plume” of white PLA plastic. With a few orange LEDs blinking away on the inside, the lamp promises to produce an impressive flame effect that will delight space enthusiasts both young and old.

As a space enthusiast that fits somewhere in between those extremes, I decided it was worth risking $30 USD to see what one of these things looked like in real life. After waiting a month, a crushed up box arrived at my door which I was positive would contain a tiny mangled version of the majestic lamp I was promised — like the sad excuse for a hamburger that McBurgerLand actually gives you compared to what they advertise on TV.

But in person, it really does look fantastic. Using internally lit 3D printed structures to simulate smoke and flame is something we’ve seen done in the DIY scene, but pulling it off in a comparatively cheap production piece is impressive enough that I thought it deserved a closer look.

Now it’s always been my opinion that the best way to see how something was built is to take it apart, so I’ll admit that the following deviates a bit from the rest of the teardowns in this series. There’s no great mystery around flickering a couple LEDs among Hackaday readers, so we already know the electronics will be simplistic in the extreme. This time around the interesting part isn’t what’s on the inside, but how the object itself was produced in the first place.

Continue reading “Teardown: 3D Printed Space Shuttle Lamp”

Packing Heat With A Homemade Portable Soldering Iron

Small portable soldering irons are all the rage so [electronoobs] decided to build one on his own. While the design isn’t quite as sleek as a commercial unit, considering it holds its own batteries, it looks pretty good.

Of course, the question is: does it work? You can see in the video below that it does, melting solder in about ten seconds. The weight is about 100 g, so it should be very comfortable to use.

Continue reading “Packing Heat With A Homemade Portable Soldering Iron”