DIY Telescope Courtesy Of IKEA

Some of the most expensive hobbies have some of the more ingenious hacks on display, generally to lower the cost of entry to various parts the hobby itself. Amateur astronomy has expensive, necessary equipment such as telescopes and other optics, but also has a large group of people willing to build their own gear out of some surprising materials rather than buy pre-built equipment.

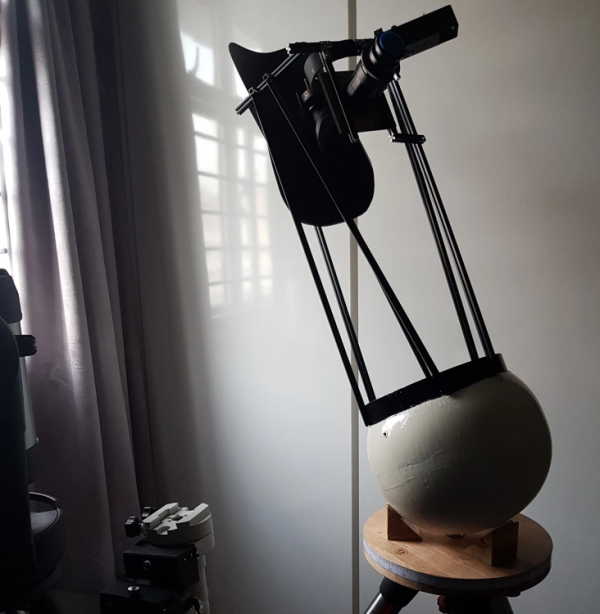
One of the latest telescopes from [The Amateur Engineer] uses several bowls from IKEA to build the mirror mount. It’s a variation of a Portaball telescope, which is similar to a Dobsonian telescope except that it is much easier to adjust and point in any direction. This “Portabowl” telescope uses two bowls epoxied together and weighted at the bottom as the core of the build. The mirror mounts inside the ball, and some supports are attached to it to hold the eyepiece and mount. With some paint and some minor adjustments it’s ready to go stargazing.

There are a few improvements to this build planned for the future, such as the creation of a larger ball that will make operating the scope easier. All in all, though, it’s an excellent example of amateur astronomy even without needing to go as far as grinding one’s own mirrors.

This Week In Security: APT Targeting Researchers, And Someone Watching All The Cameras

Microsoft’s Patch Tuesday just passed, and it’s a humdinger. To add the cherry on top, two seperate BSOD inducing issues led to Microsoft temporarily pulling the update.

Among the security vulnerabilities fixed is CVE-2021-26897, another remote code exploit in the Windows DNS server. It’s considered a low-complexity attack, but does require local network access to pull off. CVE-2021-26867 is another of the patched vulnerabilities that sounds very serious, allowing an attacker on a Hyper-V virtual machine to pierce the barrier and run code on the hypervisor. The catch here is that the vulnerability is only present when using the Plan 9 filesystem, which surely limits the scope of the problem to a small handful of machines.

The most interesting fixed flaw was CVE-2021-26411 a vulnerability that allowed remote code execution when loading a malicious web page in either IE or pre-chromium Edge. That flaw was actively being exploited in a unique APT campaign, which we’ll cover right after the break.

Continue reading “This Week In Security: APT Targeting Researchers, And Someone Watching All The Cameras”

E-Ink Laptop, First Steps

[Alexander Soto] prefers the reduced eye-strain of an e-ink display, but he doesn’t have a portable solution to use at different work stations. The solution? Make your own e-ink laptop. Once you see his plan, it’s not as crazy as it sounds.

[Alexander] got his inspiration from an earlier Dasung Paperlike Pro teardown that we covered back in 2018. His plan is to shoehorn the e-ink panel into a “headless” Thinkpad T480 laptop. This particular model ES133TT3 display is 13.3 inches (about 40 cm) with a much-better-than-normal laptop resolution of 2200 x 1650 pixels. It is driven over HDMI and is perfect fit for the Thinkpad enclosure.

Unfortunately, these displays haven’t gone down in price since 2018. They’re still in the $1000+ price range, more expensive than many laptops. But if you really want the reduced eye-strain of e-ink in a laptop format, you’re going to have to shell out for it.

It’s a pretty ambitious project. We’re looking forward to following his progress and see how the finished laptop goes together. Do check out the extensive list of e-ink references on his project page, too. If you want to experiment with a less expensive e-ink project, have a look at the PaperTTY project for your Raspberry Pi.


Growing The World’s Largest Snowflake

Plenty of areas around the world don’t get any snowfall, so if you live in one of these places you’ll need to travel to experience the true joy of winter. If you’re not willing to travel, though, you could make some similar ice crystals yourself instead. While this build from [Brian] aka [AlphaPhoenix] doesn’t generate a flurry of small ice crystals, it does generate a single enormous one in a very specific way.

The ice that [Brian] is growing is created in a pressure chamber that has been set up specifically for this hexagonal crystal. Unlike common ice that is made up of randomly arranged and varying crystals frozen together, this enormous block of ice is actually one single crystal. When the air is pumped out of the pressure chamber, the only thing left in the vessel is the seed crystal and water vapor. A custom peltier cooler inside with an attached heat sink serves a double purpose, both to keep the ice crystal cold (and growing) and to heat up a small pool of water at the bottom of the vessel to increase the amount of water vapor in the chamber, which will eventually be deposited onto the crystal in the specific hexagonal shape.

The build is interesting to watch, and since the ice crystal growth had to be filmed inside of a freezer there’s perhaps a second hack here which involved getting the camera gear set up in that unusual environment. Either way, the giant snowball of an ice crystal eventually came out of the freezer after many tries, and isn’t the first time we’ve seen interesting applications for custom peltier coolers, either.

Continue reading “Growing The World’s Largest Snowflake”

Raspberry Pi Hitches A Ride In A 1989 BMW Dashboard

It probably won’t surprise you to find out that a 1989 BMW 325i doesn’t have much in the way of electronic gadgetry onboard. In fact, what passes for an in-dash “computer” in this vintage Beemer is just a digital clock with a rudimentary calendar function. Not content to waste his precious dashboard space any longer, [Ryan Henderson] used his time in quarantine to replace the clock module with a Raspberry Pi.

Nestled in a custom laser-cut housing is a touch screen LCD module that connects directly to the GPIO header of a Pi Zero. Combined with some Python code, this provides a very slick multipurpose interface for pretty much anything [Ryan] wants. Right now he’s got it hooked up to a GPS receiver so he can figure out things like speed and acceleration, but the only real limit on what this little drop-in upgrade can do is how much code you want to sit down and write.

Thankfully, it sounds like [Ryan] has done a lot of the hard work for you. He’s put together a Python library that allows the user to easily draw analog gauges on the screen. The faces are parametrically sized, and even have custom minimum/maximum marks. Of course if you’d rather just throw some text and images on the screen, that’s accomplished easily enough with existing libraries such as PyGame.

[Ryan] says he’s also working on some code to better integrate the Pi into the vehicle’s systems by way of a Bluetooth OBD2 adapter. In the most basic application that would allow you to throw various bits of engine data up on the screen, but on more modern cars, you could potentially tap into the CAN bus and bend it to your will.

While the physical size and shape of this particular modification is clearly focused on this model and year of BMW, the general concepts could be applied to any car on the road. [Ryan] has recently started a GitHub repository for the project and hopes to connect with others who are interested in adding a little modern complexity convenience to their classic rides.

The reality is that cars become more dependent on their onboard computers with each passing year. Already we’re seeing Tesla owners struggle with cooked flash chips, and things are likely to get worse before they get any better. While undoubtedly there are some that would rather keep their daily driver as simplistic as possible, we’re encouraged by projects like this that at least let owners computerize their cars on their own terms.

Getting On The Air With A 10-Minute-ish Ham Transmitter

Artificially constrained designs can be among the most challenging projects to build, and the most interesting to consider. The amateur radio world is no stranger to this, with homebrew radio designs that set some sort of line in the sand. Such designs usually end up being delightfully minimalist and deeply instructive of first principles, which is one reason we like them so much.

For a perfect example of this design philosophy, take a look at [VK3YE]’s twist on the classic “10-Minute Transmitter”. (Video, embedded below.)

The design dates back to at least the 1980s, when [G4RAW] laid down the challenge to whip up a working transmitter from junk bin parts and make a contact within 15 minutes — ten for the build and five for working the bands. [VK3YE] used the “oner” — one-transistor — design for his 10-minute transmitter, but invested some additional time into adding a low-pass filter to keep his signal clean, and a power amplifier to boost the output a bit.

Even with the elaborations, the design is very simple and easy to understand. Construction is the standard “ugly style” that hams favor for quick builds like this. There are no parts that would be terribly hard to find, and everything fits into a small metal box. The video below shows the design and build, along with some experiments with WebSDR receivers to check out range both with and without the power amplifier.

Seeing these kinds of builds really puts us in the mood for some low-power action. Could something like this pop up in “The $50 Ham” series? Quite possibly yes.

Continue reading “Getting On The Air With A 10-Minute-ish Ham Transmitter”

Building An LED Etch-A-Sketch

The Etch-A-Sketch was a toy that demanded mastery. Some grew capable of creating masterful artworks, while others struggled to do more than a jumbled mess of angry, angular lines. The inherent limitations of being able to only draw a singular, connected line are all part of the fun, of course, and [gatoninja236] recreated that in a modern, LED form.

The build uses a Raspberry Pi to run the show, with a 64×64 LED matrix hooked up to the GPIO pins serving as a display. Two encoders are used to recreate the famous Etch-A-Sketch interface, hooked up to an Arduino Nano that then communicates encoder data to the Pi over I2C, due to the limited GPIOs available. There’s also an MPU6050 accelerometer board, used to enable the intuitive shake-to-clear functionality.

The final result is a fun LED toy that, unlike a real Etch-A-Sketch, you can play in the dark. We’ve seen other sneaky hacks on the classic toy before, too – like this Samsung TV cleverly hidden in a lookalike shell. Video after the break. Continue reading “Building An LED Etch-A-Sketch”