Optimizing AVR LCD Libraries

A while ago, [Paul Stoffregen], the creator of the Teensy family of microcontrollers dug into the most popular Arduino library for driving TFT LCDs. The Teensy isn’t an Arduino – it’s much faster – but [Paul]’s library does everything more efficiently.

Even when using a standard Arduino, there are still speed and efficiency gains to be made when driving a TFT. [Xark] recently released his re-mix of the Adafruit GFX library and LCD drivers. It’s several times faster than the Adafruit library, so just in case you haven’t moved on the Teensy platform yet, this is the way to use one of these repurposed cell phone displays.

After reading about [Paul]’s experience with improving the TFT library for the Teensy, [Xark] grabbed an Arduino, an LCD, and an Open Workbench Logic Sniffer to see where the inefficiencies in the Adafruit library were. These displays are driven via SPI, where the clock signal goes low for every byte shifted out over the data line. With the Adafruit library, there was a lot of wasted time in between each clock signal, and with the right code the performance could be improved dramatically.

The writeup on how [Xark] improved the code for these displays is fantastic, and the results are impressive; he can fill a screen with pixels at about 13FPS, making games that don’t redraw too much of the screen at any one time a real possibility.

The Dan64: A Minimal Hardware AVR Microcomputer

[Juan] sent us his writeup of a microcomputer he built using an Arduino UNO (AVR ATmega328p) and some off-board SRAM. This one’s truly minimalistic.

Have a look at the schematics (PDF). There’s an Arduino, the SPI SRAM, some transistors for TV video output, and a PS/2 connector for the keyboard. That’s it, really. It’s easily built on a breadboard in a few minutes if you have the parts on hand. Flash the Dan64 operating system and virtual machine into the AVR and you’re good to go.

Now we’ve seen a few 6502-based retro computers around here lately that use a 6502 paired with a microcontroller for the interfacing, but they’ve all been bulky three-chip affairs. [Juan] wins the minimalism prize by using a 6502 virtual machine implemented in the AVR to reduce the parts count down to two chips for the whole shooting match.

Using a 6502 virtual machine was a crucial choice in the design, because there are 6502 cross compilers that will let you compile and debug code for the microcomputer on your macrocomputer and then load it into the micro to run. This makes developing for the micro less painful.

How does it load programs you ask? The old-fashioned way of course, using audio files. Although rather than using the Kansas City Standard as in days of yore, he encodes the data in short and long pulses of square waves. This might be less reliable, but it sure saves on external hardware.

Continue reading “The Dan64: A Minimal Hardware AVR Microcomputer”

Programming An Arduino Over WiFi With The ESP8266

A lot of people have used ESP8266 to add inexpensive WiFi connectivity to their projects, but [Oscar] decided to take it one step further and program an Arduino over WiFi with the ESP8266. [Oscar] wrote a server script in Python that communicates with firmware running on the Arduino. The Arduino connects to the server on startup and listens for a “reboot” command.

When the command is received, the processor resets and enters the bootloader. The python script begins streaming a hex file over WiFi to the ESP8226, which relays it to the Arduino’s bootloader. Once the hex file is streamed, the microcontroller seamlessly starts executing the firmware. This method can be used with any AVR running a stk500-compatible bootloader.

[Oscar]’s writeup is in Spanish, but fortunately the comments in his Python and Arduino code are in English. Check out the video (in English) after the break where [Oscar] demonstrates his bootloading setup.

Continue reading “Programming An Arduino Over WiFi With The ESP8266”

Overwriting A Protected AVR Bootloader

Logo for the FIgnition 8 bit computer project

A bootloader is typically used to update application code on a microcontroller. It receives the new program from a host, writes it to flash, verifies the program is valid, and resets the microcontroller. Perhaps the most ubiquitous example is the Arduino bootloader which allows you to load code without an AVR programmer.

The bootloader resides in a special part of memory, which is protected. On the AVR, it isn’t possible to write to the bootloader memory from the application code. This is to prevent you from accidentally breaking the bootloader and bricking the device.

However, it can be useful to write to the bootloader memory. The best example would be when you need to update the bootloader itself. To accomplish this, [Julz] found a workaround that defeats the AVR bootloader protection.

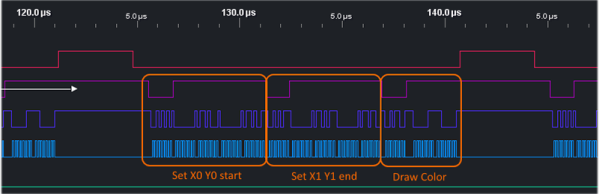
The challenge was to find a way to execute the Store Program Memory (spm) instruction, which can only be executed by the bootloader. [Julz] managed to make use of the spm instruction in the existing bootloader by counting cycles and modifying registers at the right time.

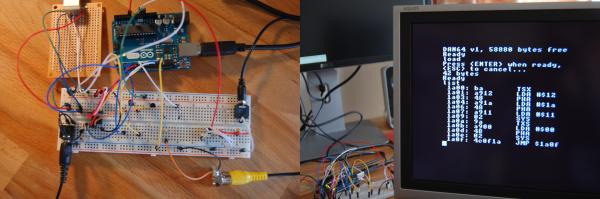
Using this technique, which [Julz] calls BootJacker, the Fignition 8 bit computer could have its bootloader updated. However, this technique would likely allow you to modify most bootloaders on AVR devices.

Tag Connect Programming Headers

A Small Replacement For Large Programming Headers

No matter how small you make your embedded projects, you still need a way to program the MCU. Standard programming headers can be annoyingly large for those very small projects. [Danny] wrote in to tell us how we can save room on our PCB designs using special spring loaded connectors, rather than large headers.

There are so many small embedded development systems, such as the Trinket that still rely on standard headers. Reducing the size of the programming headers and interface headers is an issue that deserves more attention than it currently receives. Based on Tag-Connect, a proprietary connector built around pogo-style pins, your PCB does not actually require any on-board mating connector. The PCB footprint simply has test-pads that connect with the pogo-pins and holes that allow for a rock solid connection. While the Tag-Connect header is a bit expensive (it costs about $34), you only need to buy it once.

It would be great to see even smaller Tag-Connect cables. Do you have a similar solution? What about something even smaller and more compact? Write in to tell us about any ultra-compact connector solutions you have been using!

Serial USB For Any AVR Microcontroller

If you’re using an AVR microcontroller and you’d like to add USB to a project, there are a lot of options out there for you. Both LUFA and V-USB add some USB functionality to just about every AVR micro, but if you’d like a native serial port, your only options are to look towards the USB-compatible Atmel micros.

[Ray] looked at the options for adding a USB serial port and didn’t like what he saw; seemingly, this was an impossible task without a second, more capable microcontroller. Then he had an idea: if the goal is only to transfer data back and forth between a computer and a microcontroller, why not write an HID-class USB serial port?

[Ray] based his project on The V-USB library and created a new HID descriptor to transfer data between a micro and a computer. While it won’t work with a proper terminal such as Putty, [Ray] managed to whip up a serial monitor program in Processing that’s compatible with Windows, Linux and OS X.

In the video below, you can see [Ray] using an ATmega328p with a standard V-USB setup. He’s transferring analog values from a photoresistor as a proof of concept, but just about everything that would work with a normal serial port will work with [Ray]’s library.

Continue reading “Serial USB For Any AVR Microcontroller”

Microcontroller Enumerates As USB Printer — Can Be Programmed By Printing

avr-programming-by-printing

This is a fascinating concept. We’re not sure of its usefulness, but it definitely stands on its own just for the concept. [Dean Camera] just added a new HID class to the LUFA project that lets you flash AVR chips by printing to them. This means once you have a file like the one seen open in Notepad above, you can just click on File, then on Print, and the firmware will be uploaded to the chip.

[Dean] is the creator of the LUFA project and still likes to get his hands dirty hacking around with it. This idea came to him while he was exploring the concept of using the MIDI protocol to program a chip. That didn’t pan out because of the way Microsoft has handled MIDI in newer versions of Windows. But he did get the idea of making LUFA identify itself as a simple USB printer. He dug into the specification and figured out how to do that. Once Windows connects to the device it doesn’t really care what data gets sent to it. So [Dean] wrote a parser for the bootloader which could accept the incoming hex code and write it to the chip’s program memory.