A multitool that weighs less than a penny? Yes, it exists. This video by [ToolTechGeek] shows his titanium flat-cut design tipping the scales at only 1.9 grams—lighter than the 2.5-gram copper penny jingling in your pocket. His reasoning: where most everyday carry (EDC) tools are bulky, overpriced, or simply too much, this hack flips the equation: reduce it to the absolute minimum, yet keep it useful.
You might have seen this before. This second attempt is done by laser-cutting titanium instead of stainless steel. Thinner, tougher, and rust-proof, titanium slashes the weight dramatically, while still keeping edges functional without sharpening. Despite the size, this tool manages to pack in a Phillips and flathead screwdriver, a makeshift saw, a paint-lid opener, a wire bender (yes, tested on a paperclip), and even a 1/4″ wrench doubling as a bit driver. High-torque screwdriving by using the long edges is a clever exploit, and yes—it scrapes wood, snaps zip ties, and even forces a bottle cap open, albeit a bit roughly.
It’s not about replacing your Leatherman; it’s about carrying something instead of nothing. Ultra-minimalist, featherlight, pocket-slip friendly—bet you can’t find a reason not to just have it in your pocket.
In the same way that it makes sense for you to learn to touch type if you’re going to be using a computer a lot, it makes sense for you to put some thought and effort into your KiCad keyboard shortcuts keys, too.
In this video [Pat] introduces the keymap that he has come up with for the KiCad programs (schematic capture and PCB layout) and explains the rules of thumb that he used to generate his recommended shortcut keys, being:
one handed operation; you should try to make sure that you can operate the keyboard with one hand so your other hand can stay on your mouse
proximity follows frequency; if you use it a lot it should be close to hand
same purpose, same place; across programs similar functions should share the same key
birds of a feather flock together; similar and related functionality kept in proximate clusters
typing trounces topography; if you have to use both hands for typing you have to take your hand off the mouse anyway so then it doesn’t really matter where on the keyboard the shortcut key is
When you really love your pawed, feathered, or scaled friends, you build projects for them. (Well, anyway, that’s what’s happened to us.) For the 2025 Pet Hacks Challenge, we asked you to share your favorite pet-related hacks, and you all delivered. So without further ado, here are our favorites, as well as the picks-of-the-litter that qualified for three $150 DigiKey gift certificates. Spoiler alert: it was a clean sweep for team cat.
The Radio Shack TRS-80 was a much-loved machine across America. However, one thing it lacked was MIDI. That’s not so strange given the era it was released in, of course. Nevertheless, [Michael Wessel] has seen fit to correct this by creating the MIDI/80—a soundcard and MIDI interface for this old-school beast.
The core of the build is a BluePill STM32F103C8T6 microcontroller, running at a mighty 75 MHz. Plugged into the TRS-80s expansion port, the microcontroller is responsible for talking to the computer and translating incoming and outgoing MIDI signals as needed. Naturally, you can equip it with full-size classic DIN sockets for MIDI IN and MIDI OUT using an Adafruit breakout module. None of that MIDI Thru nonsense, though, that just makes people uncomfortable. The card is fully capable of reproducing General MIDI sounds, too, either via plugging in a Waveblaster sound module to the relevant header, or by hooking up a Roland Sound Canvas or similar to the MIDI/80s MIDI Out socket. Software-wise, there’s already a whole MIDI ecosystem developing around this new hardware. There’s a TRS-80 drum tracker and a synthesizer program, all with demo songs included. Compatibility wise, The MIDI/80 works with the TRS-80 Model I, III, and 4.
Does this mean the TRS-80 will become a new darling of the tracker and chiptune communities? We can only hope so! Meanwhile, if you want more background on this famous machine, we’ve looked into that, too. Video after the break.
Despite a general lack of real-world experience, many teenagers are overly confident in their opinions, often to the point of brashness and arrogance. In the late 90s and early 00s I was no different, firmly entrenched in a clichéd belief that Apple computers weren’t worth the silicon they were etched onto—even though I’d never actually used one. Eventually, thanks to a very good friend in college, a bit of Linux knowledge, and Apple’s switch to Intel processors, I finally abandoned this one irrational belief. Now, I maintain an array of Apple laptops for my own personal use that are not only surprisingly repairable and hacker-friendly but also serve as excellent, inexpensive Linux machines.
Of course, I will have ruffled a few feathers suggesting Apple laptops are repairable and inexpensive. This is certainly not true of their phones or their newer computers, but there was a time before 2016 when Apple built some impressively high quality, robust laptops that use standard parts, have removable batteries, and, thanks to Apple dropping support for these older machines in their latest operating systems, can also be found for sale for next to nothing. In a way that’s similar to buying a luxury car that’s only a few years old and letting someone else eat the bulk of the depreciation, a high quality laptop from this era is only one Linux install away from being a usable and relatively powerful machine at an excellent bargain. Continue reading “Inexpensive Repairable Laptops, With Apple Style”→
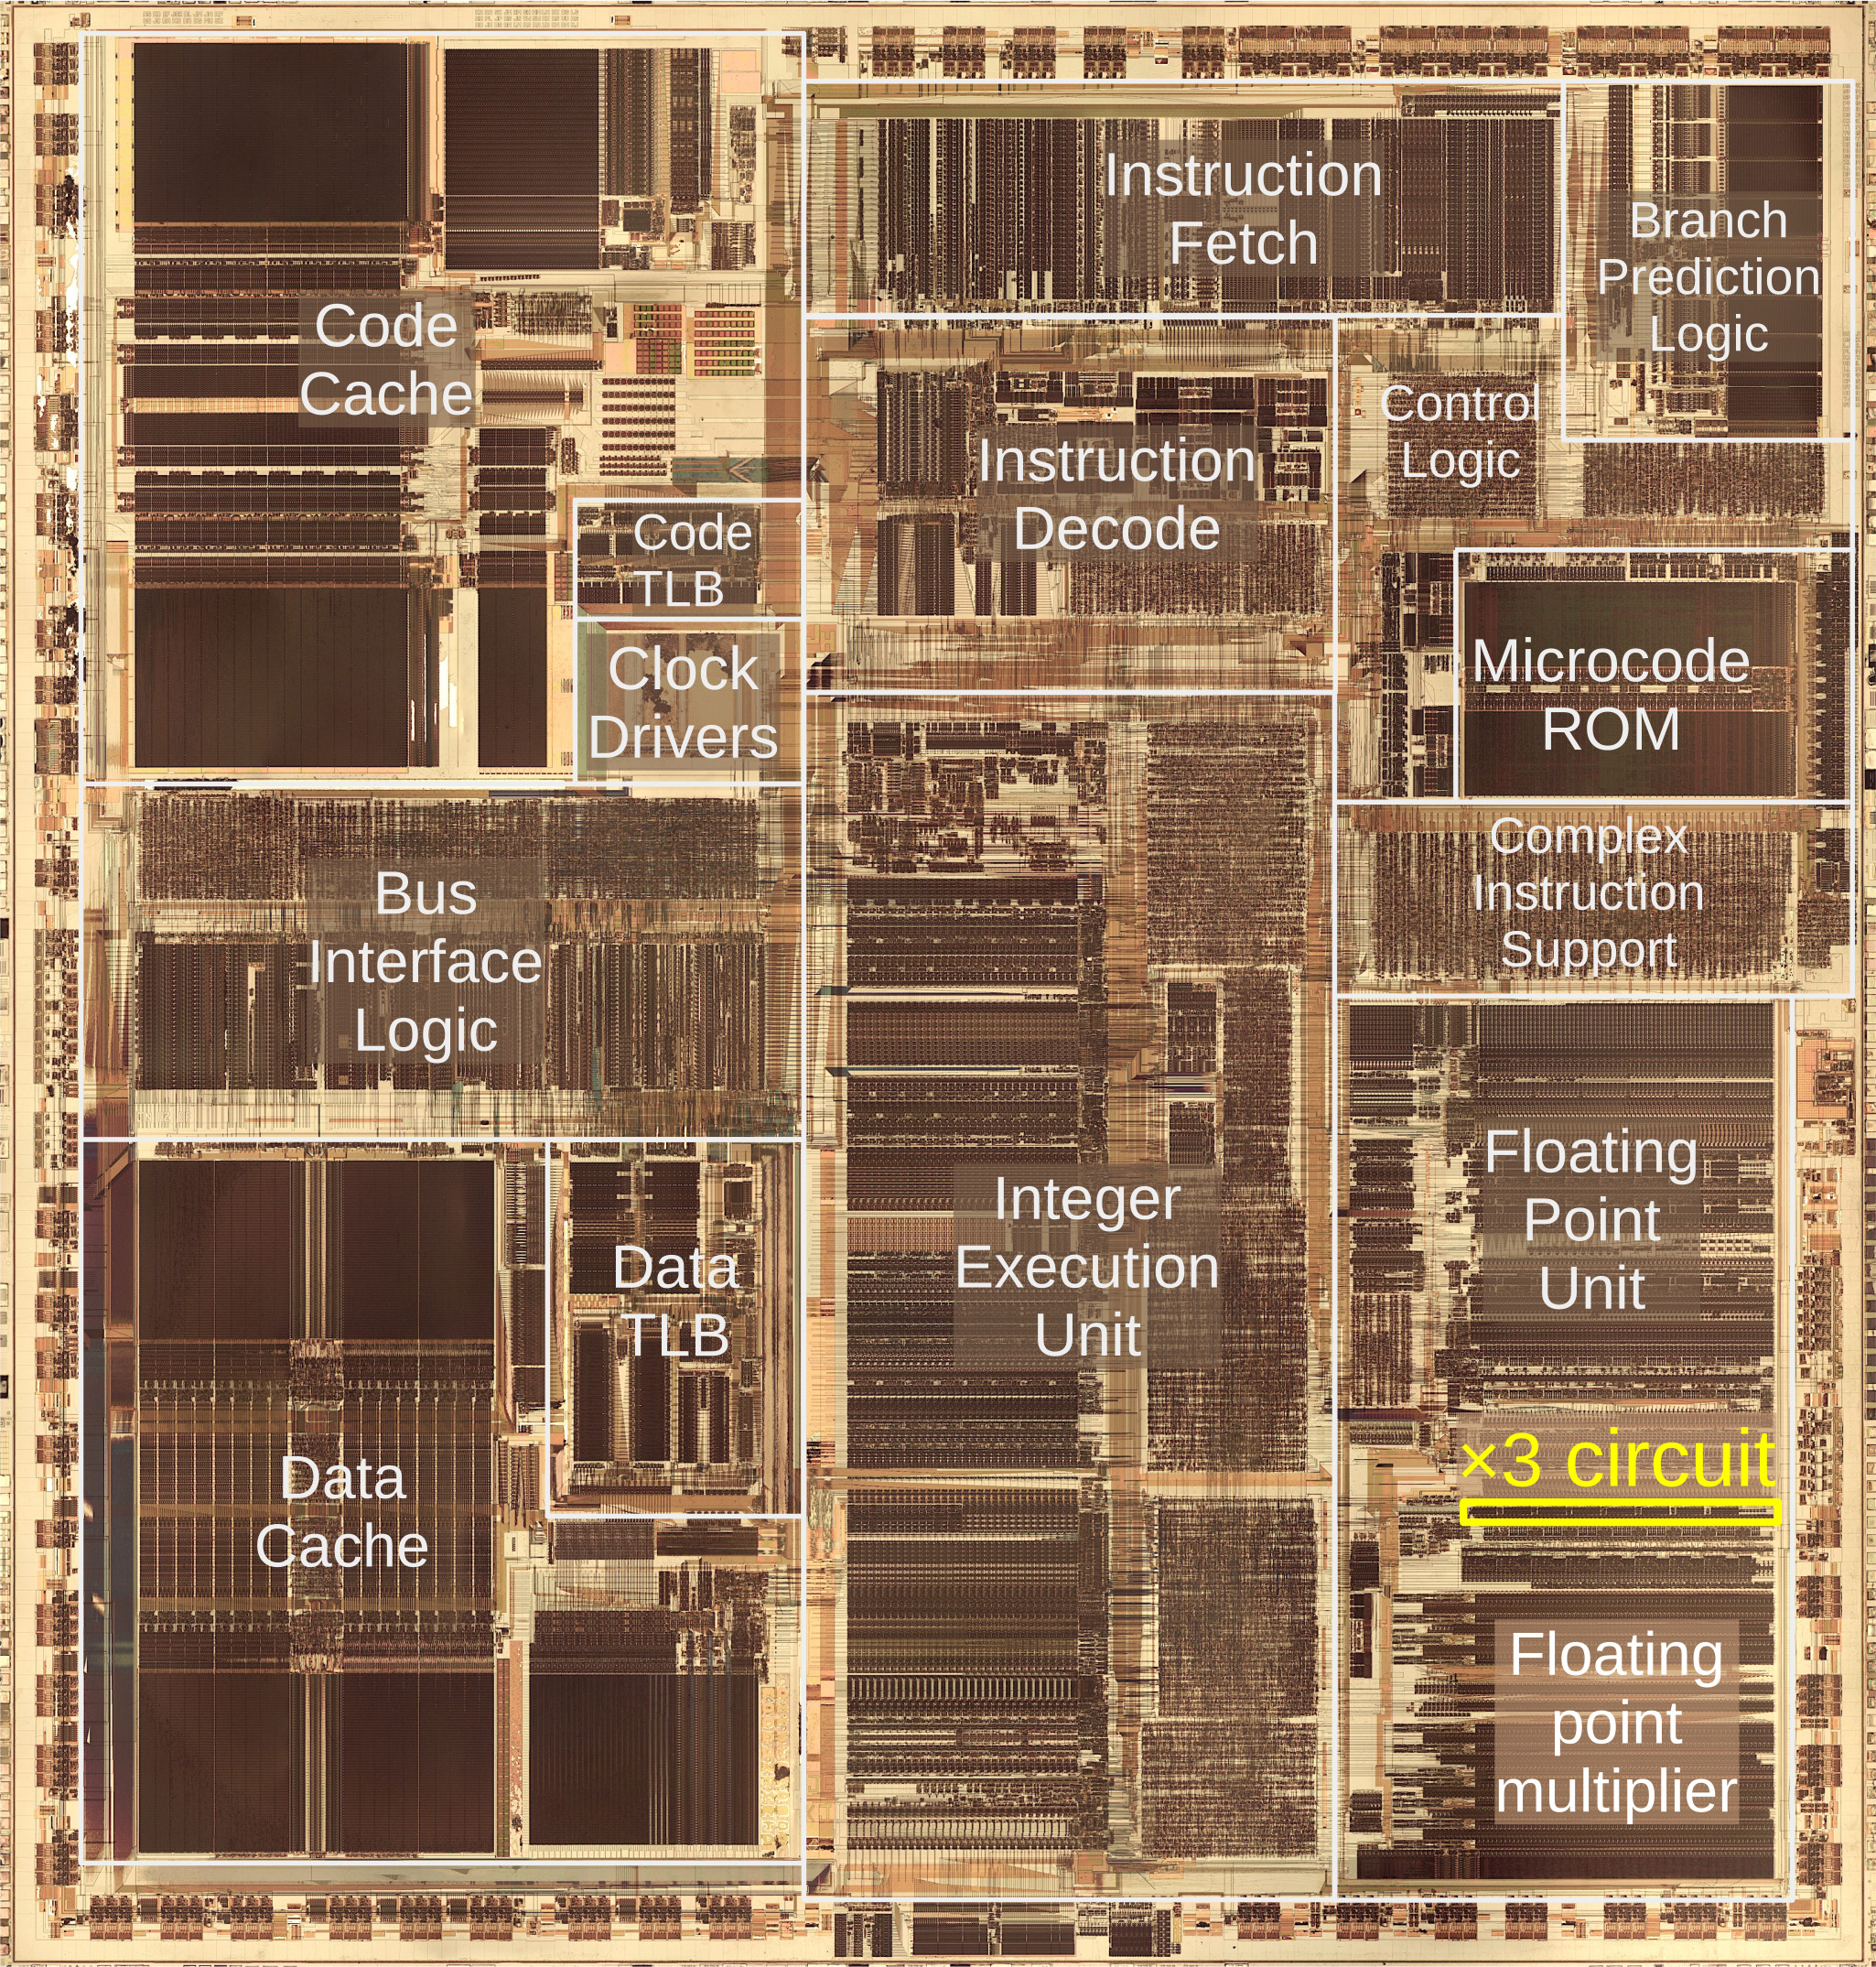
[Ken Shirriff] has been sharing a really low-level look at Intel’s Pentium (1993) processor. The Pentium’s architecture was highly innovative in many ways, and one of [Ken]’s most recent discoveries is that it contains a complex circuit — containing around 9,000 transistors — whose sole purpose is to multiply specifically by three. Why does such an apparently simple operation require such a complex circuit? And why this particular operation, and not something else?
Let’s back up a little to put this all into context. One of the feathers in the Pentium’s cap was its Floating Point Unit (FPU) which was capable of much faster floating point operations than any of its predecessors. [Ken] dove into reverse-engineering the FPU earlier this year and a close-up look at the Pentium’s silicon die shows that the FPU occupies a significant chunk of it. Of the FPU, nearly half is dedicated to performing multiplications and a comparatively small but quite significant section of that is specifically for multiplying a number by three. [Ken] calls it the x3 circuit.
The “x3 circuit”, a nontrivial portion of the Pentium processor, is dedicated to multiplying a number by exactly three and contains more transistors than an entire Z80 microprocessor.
Why does the multiplier section of the FPU in the Pentium processor have such specialized (and complex) functionality for such an apparently simple operation? It comes down to how the Pentium multiplies numbers.
Multiplying two 64-bit numbers is done in base-8 (octal), which ultimately requires fewer operations than doing so in base-2 (binary). Instead of handling each bit separately (as in binary multiplication), three bits of the multiplier get handled at a time, requiring fewer shifts and additions overall. But the downside is that multiplying by three must be handled as a special case.
[Ken] gives an excellent explanation of exactly how all that works (which is also an explanation of the radix-8 Booth’s algorithm) but it boils down to this: there are numerous shortcuts for multiplying numbers (multiplying by two is the same as shifting left by 1 bit, for example) but multiplying by three is the only one that doesn’t have a tidy shortcut. In addition, because the result of multiplying by three is involved in numerous other shortcuts (x5 is really x8 minus x3 for example) it must also be done very quickly to avoid dragging down those other operations. Straightforward binary multiplication is too slow. Hence the reason for giving it so much dedicated attention.
[Ken] goes into considerable detail on how exactly this is done, and it involves carry lookaheads as a key element to saving time. He also points out that this specific piece of functionality used more transistors than an entire Z80 microprocessor. And if that is not a wild enough idea for you, then how about the fact that the Z80 has a new OS available?
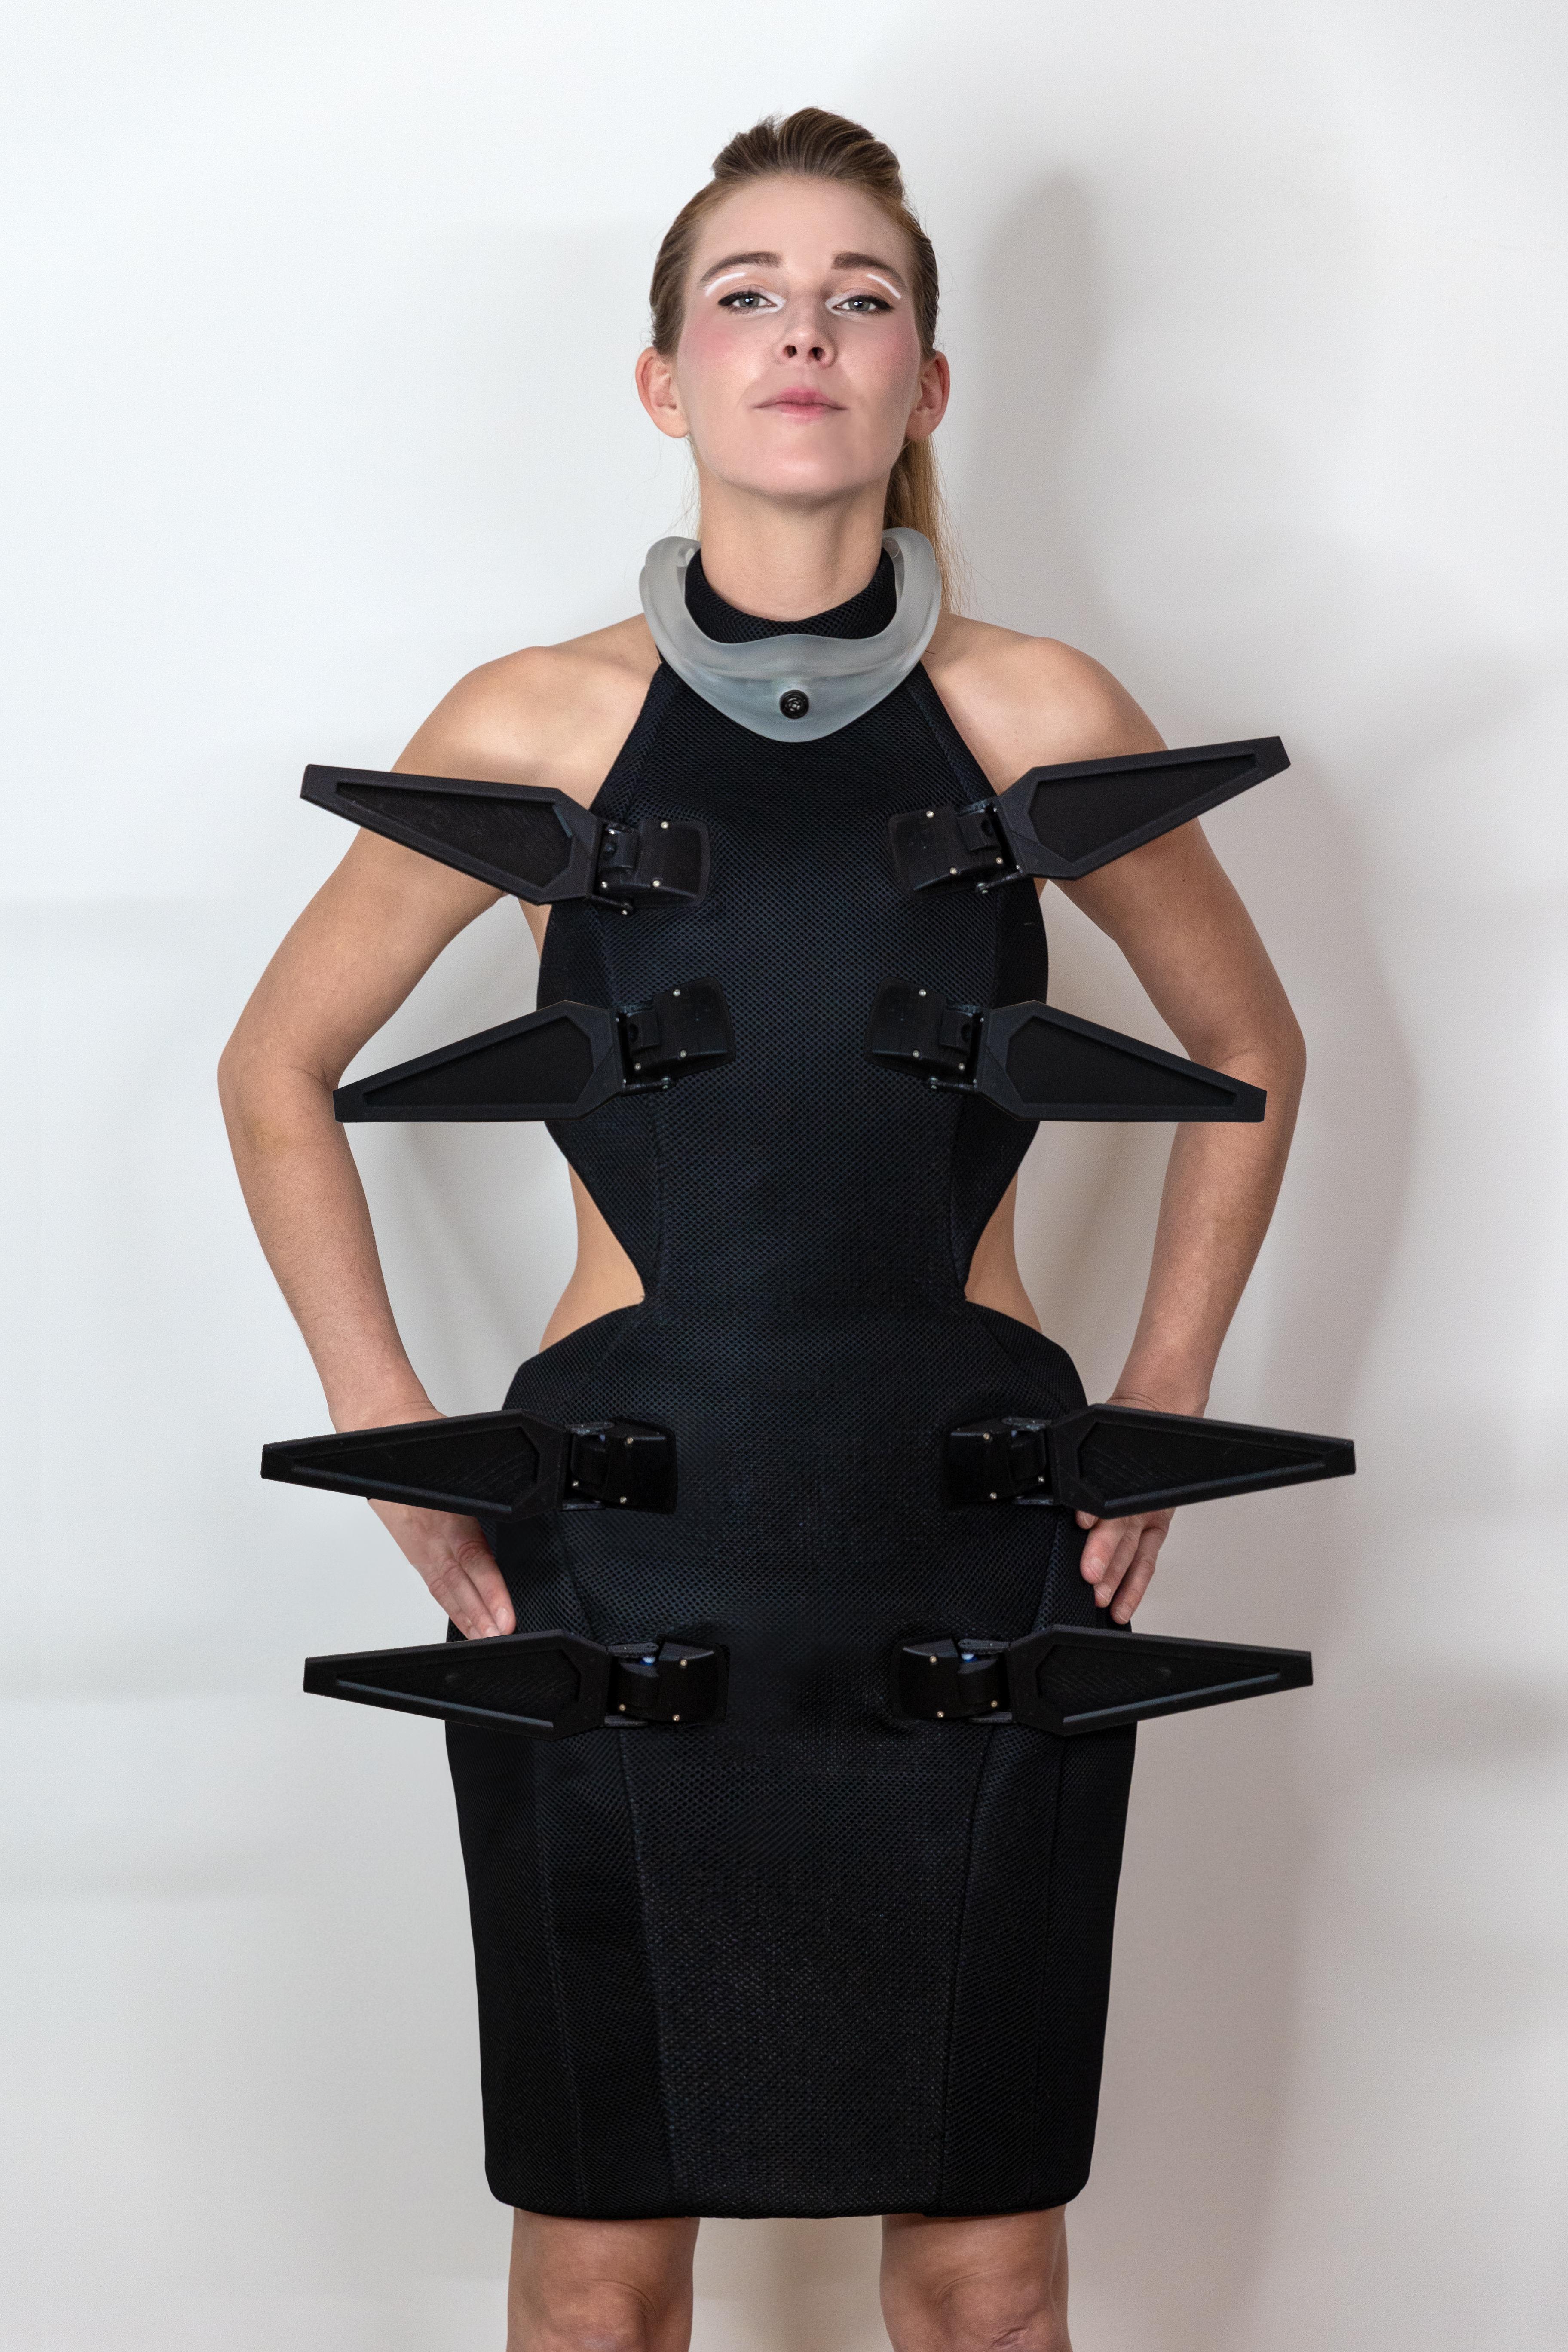
By and large, our clothes don’t actively move. They’re simple pieces of fabric assembled to sit nicely on our bodies, and little more. [anoukwipprecht] created something a little more technological and confronting, though, with the Robotic Open-Source Scale Dress.
Right from the drop, you can see what the dress is all about. It’s an open-shoulder design that has eight large moving scales mounted on the front. These scales are printed, and each features its own servo for independent movement. The scale baseplates are designed to hide the servos themselves, creating a sleeker look that hides the mechanism underneath. Each baseplate is also perforated with holes, allowing it to be sewn on to the base garment in a stout fashion. The dress itself is created with thick neoprene fabric, enabling it to take the weight of the scale assemblies without sagging or pulling away from the body. You can even customize the scales in various ways—such as adding feathers instead.
The dress is a neat piece, and would catch eyes for its pointy scales alone. The fact that they can start moving at any time only increases the garment’s impact. We’ve seen some other great fashionable uses of 3D printing before, too, like these awesome printed shoes. Meanwhile, if you’re printing your own garments in your home lab, don’t hesitate to let us know! Or, even better… wear them to the next Hackaday event!