We’re surrounded by ARM processors, which enjoy a commanding foothold in the consumer market, especially with portable electronics. However, Arm Holdings has never focused its business model on manufacturing chips, instead licensing its CPUs to others who make the physical devices. There is a bit of a tightrope to walk, though, because vendors want to differentiate themselves while Arm wants to keep products as similar as possible to allow for portability and reuse of things like libraries and toolchains. So it was a little surprising when Arm announced recently that for the first time, they would allow vendors to develop custom instructions. At least on the Armv8-M architecture.
We imagine designs like RISC-V are encroaching on Arm’s market share and this is a response to that. Although it is big news, it isn’t necessarily as big as you might think since Arm has allowed other means to do similar things via special coprocessor instructions and memory-mapped accelerators. If you are willing to put in some contact information, they have a full white paper available with a pretty sparse example. The example shows a population count function hand-optimized into 12 Arm instructions. Then it shows a single custom instruction that would do the same job. However, they don’t show the implementation nor do they offer any timing data about speed increases.
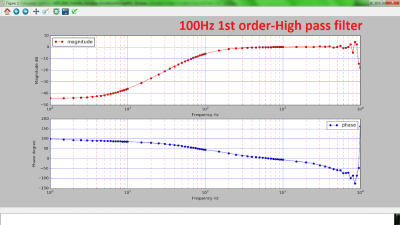
Electrical engineers will recognize the Bode plot as a plot of the frequency response of a system. It displays the frequency on the x-axis and the phase (in degrees) or magnitude (in dB) on the y-axis, making it helpful for understanding a circuit or transfer function in frequency domain analysis.
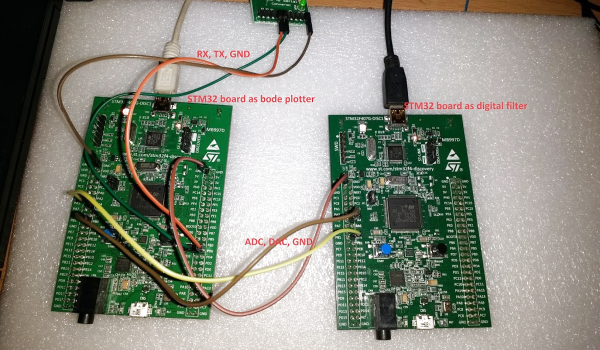
[Debraj] was able to use a STM32F407 Discovery board to build a Bode analyzer for electronic circuits. The input to the analyzer is a series of sine wave signals with linearly increasing frequency, or chirps, preferably twenty frequencies/decade to keep the frequency range reasonable.
The signals from a DAC are applied to a target filter and the outputs (frequencies obtained) are read back through an ADC. Some calculations on the result reveal how much of the signal is attenuated and its phase, resulting in a Bode plot. The filtering is done through digital signal processing from a microcontroller.
While the signals initially ran through a physical RC-filter, testing the Bode plotter with different circuits made running the signals through a digital filter easier, since it eliminates the need to solder resistors and capacitors onto protoboards. Plotting is done using Python’s matplotlib, with the magnitude and phase of the output determined analytically.
It’s a cool project that highlights some of the capabilities of microcontrollers as a substitute for a pricier vector network analyzer.
However, this only tells part of the story. Carbon dioxide is not alone in its role as a greenhouse gas, with many others contributing significantly to global temperature rises. As humanity struggles to keep warming below 2 degrees C over the century, strategies will be needed to tackle the problem on all fronts.
There’s A Bad Smell Around Methane
Ruminant animals are a major source of greenhouse gas emissions, which is probably no surprise to some. Source: Peter van der Sluijs, CC-BA-SA-2.0
Methane is a remarkably potent greenhouse gas, having 28 times the warming potential of CO2 by weight over a 100-year period. Historically, it’s mostly been released from natural sources, like bacteria processing organic material in stagnant watercourses, or from thawing permafrost. However, scientists now consider around 60% of methane in the atmosphere to be a direct result of human activity.
Agriculture is a major contributor in this area. Ruminant animals raised for human consumption are major methane emitters, as the microbes in their digestive systems release the gas when breaking down plant material. With the demand for meat and dairy showing no signs of slowing down, this could prove difficult to tackle. There are a variety of other diffuse sources of the gas, too. Landfills and sewage plants have significant methane emissions of their own, and it’s also often released from oil and gas drilling operations, too.
Oil and gas operations release significant quantities of methane into the atmosphere, often due to leaks or plant malfunctions. Credit: Hugh Chevallier, CC:BA:SA-2.0
Levels of methane in the atmosphere have been low compared to carbon dioxide. Methane also tends to have a short life in the atmosphere, of around 9 years. These factors have meant that methane has historically been of lower concern to environmental organisations. However, after levels plateaued from the 1990s to the mid-2000s, they have once again begun to climb precipitously. Scientists have yet to identify the cause of this rise, and it has the potential to undo hard-fought gains in the fight against global warming on the CO2 front. Theories range from a reduced level of chemicals that break down methane in the atmosphere, to increased livestock production or the rise of the hydraulic fracturing industry.
Whatever the cause of the recent rise, stemming the increase will require significant work. The Environmental Defence Fund is launching MethaneSAT in an attempt to better locate and quantify releases to the atmosphere, aiming to stem easily-fixed leaks in fossil fuel operations. Other ideas include using antibiotics to reduce animal’s methane output, or to capture the emissions from landfills and use them as an energy source. It’s likely a rigorous approach to both monitoring and emissions reduction will be required to keep methane levels in check.
Nitrous Oxide
Nitrous oxide isn’t just the favorite gas of the Fast and the Furious. It’s also a potent greenhouse gas, with 300 times the warming potential of carbon dioxide, pound for pound. With plenty of staying power, it sticks around in the atmosphere for 114 years on average. With 40 percent of NOx emissions coming from human activity, it’s a significant player as far as greenhouse gases go.
Fertilizer use in agriculture is the major contributor to nitrous oxide releases into the atmosphere. As farms push for ever-greater yields, there has been a corresponding increase in the use of nitrogen-containing fertilizers. Other lesser sources include fossil fuel combustion and various chemical production processes.
Reducing nitrous oxide emissions to any major degree is a difficult problem. Reducing farm yields is impractical if we wish to continue feeding as many people as possible. Increasing the efficiency of fertiliizer application is instead a more viable way to go. By applying fertilizers in the right way, in the right quantities at the right time, has the benefit of both reducing nitrous oxide emissions as well as cutting costs for farming operations. Other gains in this space can be made by reducing fossil fuel use by switching to renewable energy production, or cleaner burning technologies. The famous catalytic converter, introduced to gasoline-powered vehicles in the 1970s, plays a major role in reducing these emissions, and urea injection does much the same for diesel engines, which we’ve talked about before.
Sulfur Hexa-what now?
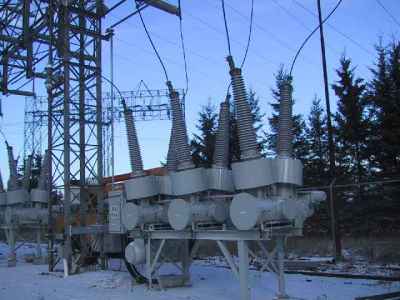
Sulfur hexafluoride is used heavily in high-voltage switchgear, as seen here in this hydroelectric installation. This circuit breaker is rated to run at 115 kV, 1200 A. Credit: Wtshymanski, public domain
Recently, sulfur hexafluoride has come under scrutiny. Also known by its chemical formula, SF6, it’s a highly potent greenhouse gas, with a warming potential of over 23,000 times that of CO2. Prized for its performance as a gaseous dielectric medium, it’s used heavily in high-voltage circuit breakers in modern electricity grids. It enables the construction of much more compact switchgear, while remaining safe and reliable in operation.
Concentrations of SF6 have begun to tick up in recent times, raising alarm bells. Speculation is that this is down to leaks of the gas from electrical equipment. As the world’s energy mix changes, grids have come to rely on more distributed generation, from sources like wind farms and solar. This mode of generation necessitates many more connections to the grid, which means more switchgear, and thus more SF6 out in the wild.
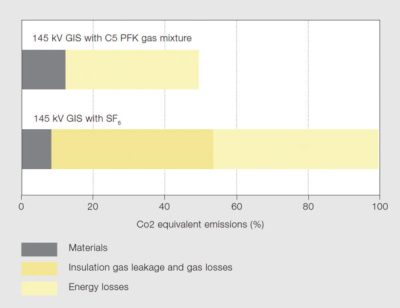
This graph shows the lifetime equivalent emissions of AirPlus versus SF6 technology. There are major gains to be had, thanks to the low global warming potential of AirPlus. Credit: 3M/ABB
Work is afoot to slow this trend before things get out of hand. A replacement has been developed in a collaboration between ABB and 3M, by the name of AirPlus. While the production process releases more CO2, over the lifecycle of an installation, AirPlus-based switchgear should have far lower impact on warming. This is due to the fact that when released into the atmosphere, AirPlus degrades under UV light exposure in just 15 days, versus 3200 years for SF6. Its global warming potential is less than 1, meaning it has less of a warming effect than even CO2, while delivering comparable dielectric performance to SF6. Variants are available for both medium and high voltage applications.
Over time, as goverments work to reduce the prevalance of SF6 in new installations, its likely that we’ll see AirPlus and other alternatives gain steam. The gas has already been banned in the EU for all non-electrical purposes, since 2014. Industry is typically slow to act unless there’s a strong business case, so government intervention is likely to be the game changer that pushes adoption of newer, cleaner technology in this space.
Other Fluorinated Gases
SF6 is just one of a series of fluorinated gases that have significant global warming potential. Many of these were introduced as replacements for chlorofluorocarbons (CFCs), which tend to eat a hole in the ozone layer. Thankfully, that problem was largely solved when production of CFCs was tailed off in 1996, but their replacements can still cause further troubles.
With lifetimes in the hundreds to thousands of years in the upper atmosphere, gases like hydrofluorocarbons and perfluorocarbons have an outsized effect on atmospheric warming, thousands of times that of CO2 on a per-molecule basis. They have applications as aerosol propellants, solvents, and fire retardants, but their primary use is as refrigerants in cooling systems. HFC-134a is the most well-known, used widely in air conditioning systems worldwide, and particularly in motor vehicles. This has led to its position as the most abundant HFC in the atmosphere.
Efforts are in place to limit the impact of these chemicals, through precautionary measures. This involves taking more care during the repair and disposal of HVAC systems, as well as designing systems to be more resilient of leaks in the first place. Recycling methods are also beneficial to ensure that where possible, these gases are captured rather then simply vented to the atmosphere. Enforcement on a broad scale remains a challenge.
Automakers are already planning to switch air conditioning systems to use gases that have less global warming potential. Source: Mercedes Benz
Sometimes, it’s better to avoid the problem entirely. A transition away from using refrigerants like HFC-134a is in progress. The EPA has legislated that all light vehicles manufactured or sold in the USA by model year 2021 must no longer use HFC-134a. Instead, alternatives like HFO-1234yf, HFC-152a, and R-744 will be legal. The first two are mildly flammable, while the latter is simply another name for good old CO2. These refrigerants will require different technology to existing air conditioners. CO2-based systems in particular needing to operate at up to 10 times the pressure of traditional systems. However, progress in technology should allow these gases to take over, reducing the impact these refrigeration gases have on global warming.
The Fight Continues
CO2 is still the primary greenhouse gas, but it’s not the whole story. We’ve looked at a wide variety of chemicals, each with their own important roles and impact on the Earth’s atmosphere. This highlights the fact that there’s no single panacea to heading off global warming; instead, a broad spectrum approach across all aspects of human endeavour is required.
Halting the impacts of these chemicals is difficult, and will require decisive action by both government bodies, as well as cooperation from relevant industries. In some cases, there are additional gains to be had, while in others, the solution comes with high costs and painful changes. We engineered ourselves into this situation, so we can probably engineer ourselves out. Regardless, if humanity is to flourish in the next century, there remains much work to be done.
There’s something oddly soothing about the practice of laying down Perler Beads on a casual weekend to make your favorite classic Nintendo characters. But seriously, why use our grubby hands like a caveman when we could leverage a machine to do the heavy-lifting for us? That’s exactly what [knezuld11] did! They’ve built a 64-color Bead Sprite Printer including an automatic cooking feature for fusing the result. (Video, embedded below.)
From the top, up to 64 unique bead colors are stashed into cartridges at the top. A bulk agitator does the work of passing these beads into tubes for the lower-stage bead selector. At this level, beads colors are serialized into a single tube that feeds into the output “nozzle.” The entire process of directing the bead pattern is driven by a Python script that takes images as input and approximates their colors to the available bead palette. When the bead “printing” is done, the machine ramps up its heated bed and cooks the bottoms of the beads, fusing them together in a way that [knezuld11] says works actually better than the typical ironing method.
We simply love how feature-complete this system is. While [knezuld11] mentioned that the Bead Sprite Printer was an attempt at beating a world record, we imagine that there are dozens of other ways this machine could lead to some whimsical engagements. Quite frankly, we’d love to see this machine at an Artist Alley making on-demand art.
If you managed to spill all your beads from sheer excitement watching this video, fret not! This automatic bead sorter from our past is just the thing to help you out.
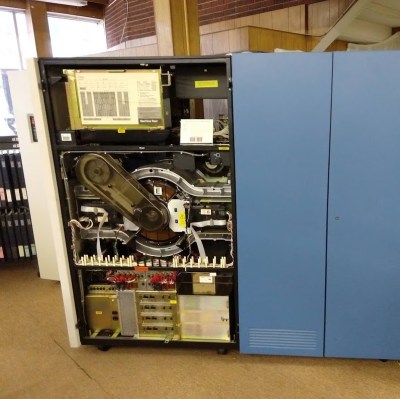
An IBM 3380E disk storage system, 5 gigabyte capacity.
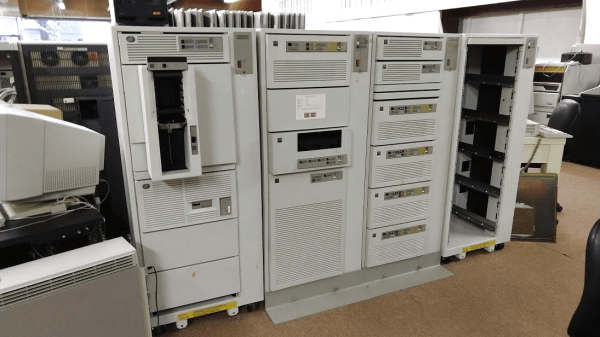
[Ken Shirriff] recently shared some pictures and a writeup from his visit to the Large Scale Systems Museum, a remarkable private collection of mainframes and other computers from the 1970s to the 1990s. Housed in a town outside Pittsburgh, it contains a huge variety of specimens including IBM mainframes and desk-sized minicomputers, enormous disk and tape storage systems, and multiple 90s-era Cray supercomputers. It doesn’t stop there, either. Everything through the minicomputer revolution leading to personal home computers is present, and there are even several Heathkit HERO robot kits from the 80s. (By the way, we once saw a HERO retrofitted with wireless and the ability to run Python.)
Something really special is that many of the vintage systems are in working order, providing insight into how these units performed and acted. The museum is a private collection and is open only by appointment but they encourage interested parties not to be shy. If a trip to the museum isn’t for you, [Ken] has some additional photos from his visit here for you to check out.
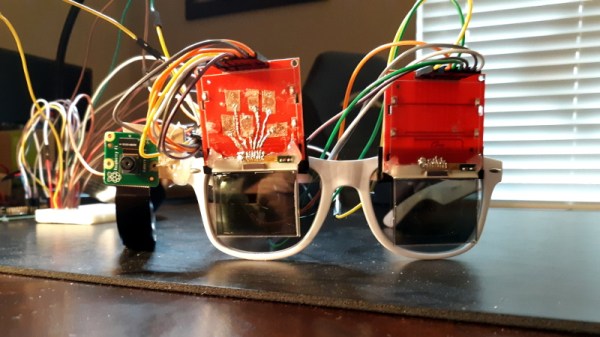
Whether it was rays from the Sun that made a 150 million kilometer trip just to ruin your day or somebody’s unreasonably bright aftermarket headlights, at some point or another we’ve all experienced the discomfort of bright spots in our eyes. But short of wearing welder’s goggles all the time, what can we do? Luckily for us, [Nick Bild] has come up with a solution. Sort of.
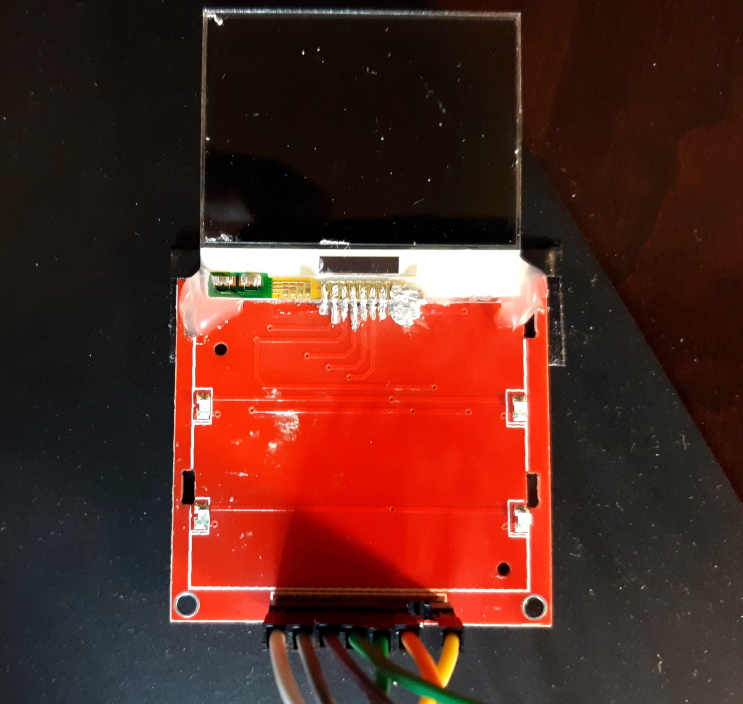
Modifying the LCD so it can be seen through.
By adding LCDs to a pair of standard sunglasses, [Nick] has created something he’s calling “Light Brakes”. The idea is that the LCDs, having their backings removed, can essentially be used as programmable shutters to block out a specific part of the image that’s passing through them. With the addition of a Raspberry Pi and a camera, the Light Brakes can identify an unusually bright source of light and block it from the wearer’s vision by drawing a sufficiently large blob on the LCDs.
At least, that’s the idea. As you can see in the video after the break, the LCDs ability to block out a moving source of light is somewhat debatable. It’s also unclear what, if any, effect the “blocking” would have on UV, so you definitely shouldn’t try looking at the sun with a pair of these.
That said, a refined version of the concept could have some very interesting applications. For instance, imagine a pair of glasses that could actively block out advertisements or other unpleasant images from your field of vision. If this all sounds a bit like something out of an episode of Black Mirror, that’s because it is.
Whether it’s been a Python script running on a Linux box or an ESP8266, abusing using WiFi SSIDs to convey messages is hardly a new trick. But for DerbyCon 2019, [vgrsec] wanted to do put together something a little unique. Dare we say, even useful. Rather than broadcast out SSID obscenities or memes, this Raspberry Pi created fake WiFi networks that told everyone what talks were coming up.
The concept here is fairly simple: there’s a text file in /boot that contains the truncated names of all the talks and workshops in the schedule, one per line, and each line starts with the time that particular event is scheduled for. The script that [vgrsec] wrote opens this text file, searches for the lines beginning with the current time, and generates the appropriate SSIDs. With the number of tracks being run at DerbyCon, that meant there could be as many as five SSIDs generated at once.
Now in theory that would be enough to pull off this particular hack, but there’s a problem. The lack of an RTC on the Raspberry Pi means it can’t keep time very well, and the fact that the WiFi adapter would be busy pumping out SSIDs meant the chances of it being able to connect to the Internet and pull down the current time over NTP weren’t very good.
As the system was worthless without a reliable way of keeping time, [vgrsec] added an Adafruit PiRTC module to the mix. Once the time has been synchronized, the system could then run untethered via a USB battery bank. We might have put it into an enclosure so it looks a little less suspect, but then again, there were certainly far more unusual devices than this to be seen at DerbyCon.
Of course, if you’re OK with just dumping the entire schedule out at once and letting the user sift through the mountain of bogus SSIDs themselves, that’s even easier to accomplish.