Hands-on With New IPhone’s Electrically-Released Adhesive

There’s a wild new feature making repair jobs easier (not to mention less messy) and iFixit covers it in their roundup of the iPhone 16’s repairability: electrically-released adhesive.

Here’s how it works. The adhesive looks like a curved strip with what appears to be a thin film of aluminum embedded into it. It’s applied much like any other adhesive strip: peel away the film, and press it between whatever two things it needs to stick. But to release it, that’s where the magic happens. One applies a voltage (a 9 V battery will do the job) between the aluminum frame of the phone and a special tab on the battery. In about a minute the battery will come away with no force, and residue-free.

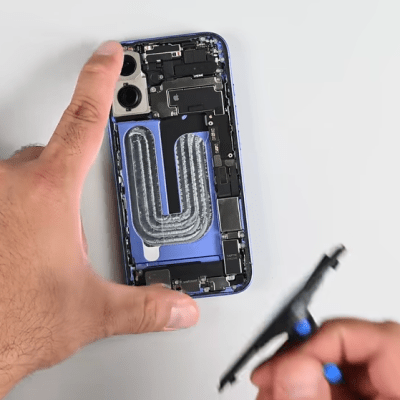
There is one catch: make sure the polarity is correct! The adhesive releases because applying voltage oxidizes aluminum a small amount, causing Al3+ to migrate into the adhesive and debond it. One wants the adhesive debonded from the phone’s frame (negative) and left on the battery. Flipping the polarity will debond the adhesive the wrong way around, leaving the adhesive on the phone instead.

Some months ago we shared that Apple was likely going to go in this direction but it’s great to see some hands-on and see it in action. This adhesive does seem to match electrical debonding offered by a company called Tesa, and there’s a research paper describing it.

A video embedded below goes through the iPhone 16’s repairability innovations, but if you’d like to skip straight to the nifty new battery adhesive, that starts at the 2:36 mark.

Continue reading “Hands-on With New IPhone’s Electrically-Released Adhesive”

Completed wire-wrap connection with WSU-30M tool. (Credit: Sparkfun)

3D Printing A Wire-Wrap Tool: Emergency Fix Or Permanent Solution?

Although less popular these days, wire-wrap is still a very relevant, easily reversible solder-free way to assemble (prototype) systems using wire-wrap wire and a wire-wrap tool. This latter tool can be either a hand or powered tool, but all it has to do is retain the stripped wire, fit around the wire-wrapping post and create a snug, oxidation-proof metal-metal contact fit. For the very common 30 AWG (0.25 mm) wire-wrap wire, the Jonard Tools (OK Industries) WSU-30M wire-strip-unwrap tool is pretty much the popular standard. It allows you to strip off insulation, wrap and unwrap connections all with one tool, but the question is whether you can just 3D print a wrap-unwrap tool that’s about as good?

First a note about cost, as although the genuine WSU-30M has risen in cost over the years, it can still be obtained for around $50 from retails like Mouser, while clones of varying quality can be obtained for around $15 from your favorite e-tailer website. From experience, these clones have quite sloppy tolerance, and provide a baseline of where a wrapping tool becomes unusable, as they require some modding to be reliable.

Wire-wrap tool model by [KidSwidden] on Thingiverse.
Taking a quick look at the wire-wrap tools available on Thingiverrse, we can see basically two categories: one which goes for minimally viable, with just a cylinder that has a hole poked on the side for the stripped wire to fit through, as these versions by [JLSA_Portfolio], [paulgeneres], [orionids] and [cmellano]. The WSU-30M and similar tools have a channel on the side that the stripped wire is fed into, to prevent it from getting tangled up and snagging. On the clone units this channel often has to be taped off to prevent the wire from escaping and demonstrating why retaining the wire prior to wrapping is a good idea.

This leads us to three examples of a 3D printed wire-wrap tool with such a wire channel: by [KidSwidden] (based on a Radio Shack unit, apparently), another by [DieKatzchen] and an interesting variation by [4sStylZ]. Naturally, the problem with such fine features is that tolerance matter a lot, with an 0.2 mm nozzle (for FDM printers) recommended, and the use of an SLA printer probably a good idea. It’s also hard to say what kind of wire-wrap connection you are going to get, as there are actually two variants: regular and modified.

The starting guide to wire-wrapping by Sparkfun uses the WSU-30M, which as the name suggests uses modified wire-wrap, which means that part of the wire insulation is wrapped around the bottom of the post, for extra mechanical stability, effectively like strain-relief. A lot of such essential details are covered in this [Nuts and Volts] article which provides an invaluable starting guide to wire-wrapping, including detecting bad wraps.

Naturally, the 3D printed tools will not include a stripper for the wire insulation, so you will have to provide this yourself (PSA: using your teeth is not recommended), and none of these 3D models include an unwrap tool, which may or may not be an issue for you, as careful unwrapping allows you to reuse the wire, which can be useful while debugging or reworking a board.

Top image: completed wire-wrap on a post. (Credit: Sparkfun)

Hackaday Links Column Banner

Hackaday Links: September 22, 2024

Thanks a lot, Elon. Or maybe not, depending on how this report that China used Starlink signals to detect low-observable targets pans out. There aren’t a lot of details, and we couldn’t find anything approximating a primary source, but it seems like the idea is based on forward scatter, which is when waves striking an object are deflected only a little bit. The test setup for this experiment was a ground-based receiver listening to the downlink signal from a Starlink satellite while a DJI Phantom 4 Pro drone was flown into the signal path. The drone was chosen because nobody had a spare F-22 or F-35 lying around, and its radar cross-section is about that of one of these stealth fighters. They claim that this passive detection method was able to make out details about the drone, but as with most reporting these days, this needs to be taken with an ample pinch of salt. Still, it’s an interesting development that may change things up in the stealth superiority field.

Continue reading “Hackaday Links: September 22, 2024”

Brass Propeller Gets Impressive Hand Trimming

Whether you’re a landlubber or an old salt, you’ve got to appreciate the effort that [The Aussie boat guy] puts into cutting an old brass propeller down into a far smaller and sleeker specimen. Especially since he does the entire thing with hand tools, a couple different calipers, and that most valuable of natural resources: experience.

The whole process was made somewhat easier by the fact that [The Aussie boat guy] had a model to work from — his friend had a small propeller that was already known to perform well, it was just a matter of cutting the larger prop down to match its dimensions. Using what appears to be pieces of leather (presumably for its flexibility), a template was made to accurately map out the front face of the blade.

As Bob Ross would say — “Here comes your bravery test”

By measuring out from the hub of the prop with his calipers, [The Aussie boat guy] was able to make sure the template was properly positioned before scribing its shape into the larger prop. An angle grinder was used to cut the shape out of each blade, followed by a smoothing off with a flap wheel.

But there was still a problem — the blades were the right shape, but they were far too thick. So he took the angle grinder to the back of each one to start removing material, using another set of calipers to occasionally spot-check them to make sure they were thinning out at roughly the same rate.

This thinning out process continued until the prop was brought into balance. How do you check that, you might be wondering? Well, if you’re a madman like [The Aussie boat guy], you chuck the thing into a power drill and spin er’ up to see how badly it shakes. But this only gives you a rough idea, so he has to move over to a somewhat more scientific apparatus that uses a set of parallel bars to help determine which blade is heavier than its peers.

Continue reading “Brass Propeller Gets Impressive Hand Trimming”

Hackfest, A New Event For Your European Calendar

Our community’s events are something special, bringing as they do an opportunity to meet and mingle with other hackers whether their field be hardware, software, or security, to share ideas, and to see some very cool projects. Here at Hackaday aside from our own Supercon and Hackaday Europe events we try to take in as many as we can over the year, and thus it’s always interesting to sot a new one. If you’re in north-west Europe next weekend, consider dropping by Hackfest, in the Dutch city of Enschede, right on the German border.

Looking at the program and the projects and workshops  listed on the website we can see robotics, lockpicking, demoscene, retrocomputing, and plenty of open source. There are quite a few names which have featured at times here on these pages, something which certainly piqued our interest. Finding that it’s only 15 Euros for a weekend’s admission sealed the deal, and thus it’s time for Hackaday to break out the trusty Interrail pass once more and make the trek. Sadly many of Hackaday’s community will be too far away to join us, but if you’re close enough to make it then it’s one to consider.

This is a part of the world it’s fair to say isn’t often featured on Hackaday, but some of you might remember the city as being at the centre of a Wi-Fi tracking scandal.

Linux, Now In Real Time

Although Linux runs almost every supercomputer, most of the web, the majority of smart phones, and a few writers’ ancient Macbooks, there’s one major weak point in the Linux world that will almost always have developers reaching for a different operating system. Linux is not a real-time operating system (RTOS), meaning that it can’t respond to requests in the real world within a set timeframe. This means that applications needing computer control in industry, medicine, robotics, and other real-world situations generally need a purpose-built RTOS. At least, that was true until recently when an update to the Linux kernel added real-time capabilities.

The feature, called PREEMPT_RT, forces the Linux kernel to respond to certain request within a set limit of time. This means that a system with this support built into the kernel can “preempt” any current task, stopping everything else a computer is doing in order to execute that task right away. There are some existing solutions to getting a functional equivalent system working with Linux now, but they can be clunky or inelegant, requiring the user to install patches or other software to get it to work. With the support built directly into the kernel this will become much less of a pain point for anyone who needs this functionality going forward.

This feature has been in the works for around two decades now, so with this entering general use now we would expect to start seeing it show up in various projects as well as in commercial offerings soon, especially since other RTOS solutions can be pricey. Don’t recompile the kernel in your desktop for this feature just yet, though; real-time function can cause some unintended consequences with normal use you’ll need to account for. There’s some more discussion on this in the /r/Linux subreddit and there are some other real-time operating systems available for computers not typically capable of running Linux to take a look at as well.

Against Elitism

A while back we got an anonymous complaint that Hackaday was “elitist”, and that got me thinking. We do write up the hacks that we find the coolest, and that could lead to a preponderance of gonzo projects, or a feeling that something “isn’t good enough for Hackaday”. But I really want to push back against that notion, because I believe it’s just plain wrong.

One of the most important jobs of a Hackaday writer is to find the best parts of a project and bring that to the fore, and I’d like to show you what I mean by example. Take this post from two weeks ago that was nominally about rescuing a broken beloved keyboard by replacing its brain with a modern microcontroller. On its surface, this should be easy – figure out the matrix pinout and wire it up. Flash in a keyboard firmware and you’re done.

Of course we all love a good hardware-rescue story, and other owners of busted Sculpt keyboards will be happy to see it. But there’s something here for the rest of us too! To figure out the keyboard matrix, it would take a lot of probing at a flat-flex cable, so [TechBeret] made a sweet breakout board that pulled all the signals off of the flat-flex and terminated them in nicely labelled wires. Let this be your reminder that making a test rig / jig can make these kind of complicated problems simpler.

Checking the fit with a 3D printed PCB

Once the pinout was figured out, and a working prototype made, it was time to order a neat PCB and box it up. The other great trick was the use of 3D-printed mockups of the PCBs to make sure that they fit inside the case, the holes were all in the right places, and that the flat-flex lay flat. With how easily PCB design software will spit out a 3D model these days, you absolutely should take the ten minutes to verify the physical layout of each revision before sending out your Gerbers.

So was this a 1337 hack? Maybe not. But was it worth reading for these two sweet tidbits, regardless of whether you’re doing a keyboard hack? Absolutely! And that’s exactly the kind of opportunity that elitists shut themselves off from, and it’s the negative aspect of elitism what we try to fight against here at Hackaday.