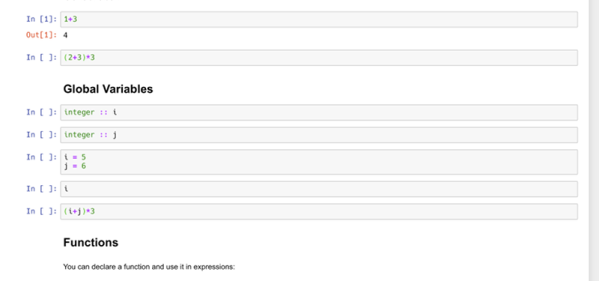
Retrotechtacular: Robots And Bowling Pins

On a recent bowling excursion it occurred to us that this is one of the most advanced robotics systems most Americans will directly interact with. That’s a bold claim today, but certainly one that was correct decades ago. Let’s take a stroll back to 1963 for a look at the state of the art in bowling at the time, the AMF automatic pinspotter.

With their basis in industrial automation, bowling was a perfect problem for the American Machine and Foundry company (AMF) to take on. Their business began at the turn of the 20th century with automated cigarette manufacturing before turning their sights on bowling pins after the second world war. The challenge involves more than you might think as pinspotters are confined to a narrow area and need to work with oddly-shaped pins, the bowling ball itself, and deal with setting up fresh frames but also clearing out the field after the first roll.

Separating the ball from the pins is handled by gravity and an oscillating plunger that pushes errant pins back onto a conveyor. That conveyor stretches the width of the lane and moves pins back to a pin elevator — a wheel moving perpendicular to the ground with orients and raises them to a swiveling conveyor belt that can drop them into the setting jig waiting for the next full frame setup.

Everything in this promo video has jargon which is just delightful. We especially enjoyed the non-mechanical mention of how the machine “clears dead wood from the pin deck”. We could watch this kind of automation all day, and in fact found some other gems while searching about. Here’s a more recent look a the AMF 82-70 (the same model as in the promo video). We also wondered about manual pinspotting and found this manual-with-mechanical-assist setup to be interesting despite the audio.

Much to our surprise we’ve featured AMF in a Retrotectacular article before. Once their bowling automation started to take off, they set their sights on restaurant automation. Looks like Brian Benchoff’s visit to the robo-hamburger joint was actually a retro experience!

Continue reading “Retrotechtacular: Robots And Bowling Pins”

You Should Not Try These Taser NERF Darts

For most of us, a good part of our childhood involved running around someone’s backyard (or inside the house) trying to score hits with a toy NERF gun. The fun level was high and the risk of personal injury was low. Now that we’re all mostly adults, it’s probably time to take our NERF game to the next level with some risk of serious personal harm.

In an effort to help his brother get back at him for being somewhat of a bully in their youth, [Allen Pan] gifted him with an upgraded NERF gun. Specifically, one with darts that pack a punch. Each of the “Elite” darts was equipped with a 300 V capacitor packed into the interior of the dart. New tips were 3D printed with special metal tips that allow the capacitor to discharge upon impact.

Besides the danger, there’s a good bit of science involved. Parts were scavenged from a new (and surprisingly expensive) disposable camera, and a customized circuit was constructed around the barrel of the dart gun that allows the darts to charge up when they’re loaded. It’s an impressive build that would be relatively simple to reconstruct for yourself, but it’s probably not the worst thing we’ve seen done with high voltage and a few small capacitors.

Thanks to [Itay] for the tip!

Continue reading “You Should Not Try These Taser NERF Darts”

Seeing A Webcam’s PCBs In A Whole Different Light

When it comes to inspection of printed circuits, most of us rely on the Mark I eyeball to see how we did with the soldering iron or reflow oven. And even when we need the help of some kind of microscope, our inspections are still firmly in the visible part of the electromagnetic spectrum. Pushing the frequency up a few orders of magnitude and inspecting PCBs with X-rays is a thing, though, and can reveal so much more than what the eye can see.

Unlike most of us, [Tom Anderson] has access to X-ray inspection equipment in the course of his business, so it seemed natural to do an X-ray enhanced teardown and PCB inspection. The victim for this exercise was nothing special – just a cheap WiFi camera of the kind that seems intent on reporting back to China on a regular basis. The guts are pretty much what you’d expect: a processor board, a board for the camera, and an accessory board for a microphone and IR LEDs. In the optical part of the spectrum they look pretty decent, with just some extra flux and a few solder blobs left behind. But under X-ray, the same board showed more serious problems, like vias and through-holes with insufficient solder. Such defects would be difficult to pick up in optical inspection, and it’s fascinating to see the internal structure of both the board and the components, especially the BGA chips.

If you’re stuck doing your inspections the old-fashioned way, fear not – we have tips aplenty for optical inspection. But don’t let that stop you from trying X-ray inspection; start with this tiny DIY X-ray tube and work your way up from there.

Thanks for the tip, [Jarrett].

Video Shows Power Isn’t Everything In Laser Engraving

When it comes to power tools, generally speaking more watts is better. But as laser maestro [Martin Raynsford] shows, watts aren’t everything. He shares a brief video showing his older 100 W laser being handily outperformed by a newer 30 W machine. Shouldn’t the higher power laser be able to do the same job in less time? One might think so, but wattage isn’t everything. The 30 W laser engraves and cuts a wooden tile in just under half the time it takes the 100 W machine to do the same job, and with a nicer end result, to boot.

Why such a difference? Part of the answer to that question lies in that the newer machine has better motion control and can handle higher speeds, but the rest is due to the tubes themselves. The older 100 W machine uses a DC-excited (big glass water-cooled tube) CO2 laser, and the newer 30 W machine uses an RF-excited laser that looks a bit like a big metal heat sink instead of oversized lab glassware. Both tubes output what is essentially the same beam, but the RF tube is overall capable of a more refined, more stable, and more finely focused point than that of the glass tube. Since engraving uses only a small fraction of even the 30 W laser’s power, the finer control that the RF laser has over the low end of the power scale results in a much higher quality engraving.

Embedded below is a short video showing both machines engraving and cutting the same tile, side by side. You may wish to consider watching this one full screen, to better see the fine details.

Continue reading “Video Shows Power Isn’t Everything In Laser Engraving”

Bird Beats Cancer With The Help Of A 3D-Printed Prosthetic

It’s a reasonable certainty that 3D-printing is one day going to be a huge part of medicine. From hip implants to stents that prop open blood vessels to whole organs laid down layer by layer, humans will probably benefit immensely from medical printing. But if they do, the animals will get there first; somebody has to try this stuff out, after all.

An early if an unwilling adopter of 3D-printed medical appliances is [Jary], a 22-year-old Great Pied Hornbill, who recently received a 3D-printed replacement for his casque, the large, mostly hollow protuberance on the front the bird’s skull leading out over the upper beak. There’s no known function for the casque, but it had to be removed since cancer was destroying it and [Jary] wouldn’t have fared well post-surgically without one. Working from CT scans, the veterinary team created a model of the casque as well as a jig to guide the saw during surgery. There’s no word on what filament was used, but we’d guess PLA since it’s biocompatible and available in medical grades. The video below shows some of the surgery; it’s interesting to note that the prosthetic started out natural colored but quickly turned yellow as [Jary] preened with oils from glands near his tail feathers, just like a natural casque would.

Hornbills live to about 40 years old, so [Jary] is just middle-aged. Here’s hoping that he lives a long, happy life in return for being a pioneer in 3D-printing for medical and surgical appliances.

Continue reading “Bird Beats Cancer With The Help Of A 3D-Printed Prosthetic”

Swedish Front Plus Japanese Back Makes For Useful Hybrid Camera

Professional or amateur, doing things the hard way doesn’t always make for better results. Take photography as an example. Once upon a time, the success or failure of what happened during the instant that the camera’s shutter was open was only known hours or days later after processing the film. Ruin the shot with bad exposure or suboptimal composition? Too bad. Miss a once-in-a-lifetime moment as a result? Ouch.

Once instant photography came along, pros were quick to adopt it as a quick and dirty way to check everything before committing the shot to higher-quality film. Camera manufacturers made special instant film cartridges that could be swapped for roll film, and charged through the teeth for them. Unwilling to shell out big bucks, [Isaac Blankensmith] hacked his own instant film back for his Hasselblad medium-format camera. The unlucky donor camera was a Fujifilm Instax, a camera that uses film packs similar to those used by Polaroid and Kodak instant cameras from the 70s and 80s. Several of these cameras were dissected – carefully; those flash capacitors pack a wallop – and stripped down to the essential film-handling bits. An adapter was fabricated from laser-cut acrylic to mount the film back to the Hasselblad, with care taken to match the original focal plane. The shots are surprisingly good; despite a minor light leak from the adapter, they’re fine for the purpose. The best part: the whole build took just 48 hours from conception to first shots.

Speaking of Polaroid, we’ve featured quite a few hacks of Edwin Land’s venerable cameras over the year. From replacing the film with a printer to an upgrade to 35-mm film, instant cameras in general and Polaroids in particular seem to have quite a following among hackers.

Thanks for tipping us off, [macsimski].

Trashed TV Gets RGB LED Backlight

It might not be obvious unless you’ve taken one apart, but most of the TVs and monitors listed as “LED” are simply LCD panels that use a bank of LEDs to illuminate them from behind. Similarly, what are generally referred to as “LCDs” are LCD panels that use fluorescent tubes for illumination. To get a true LED display with no separate backlight, you need OLED. Confused? Welcome to the world of consumer technology.

With those distinctions in mind, the hack that [Zenodilodon] recently performed on a broken “LED TV” is really rather brilliant. By removing the dead white LED backlights and replacing them with RGB LED strips, he not only got the TV working again, but also imbued it with color changing abilities. Perfect for displaying music visualizations, or kicking your next film night into high gear with a really trippy showing of Seven Samurai.

In the video after the break, [Zenodilodon] starts his RGB transplant by stripping the TV down to its principal parts. The original LEDs were toasted, so they might as well go straight in the bin alongside their driver electronics. But the LCD panel itself was working fine (tested by shining a laser pointer through it to see if there was an image), and the plastic sheets which diffuse the LED backlight were easily salvaged.

With the old LEDs removed, [Zenodilodon] laid out his new strips and soldered them up to the external controller. He was careful to use all white wires, as he was worried colored wires might reflect the white light and be noticeable on the display. After buttoning the TV back up, he went through a few demonstrations to show how the image looked with the white LEDs on, as well as some interesting effects that could be seen when the LEDs are cycling through colors.

The RGB strips don’t light up the display as well as the original backlight did, as there are some obvious dark spots and you can see some horizontal lines where the strips are. But [Zenodilodon] says the effect isn’t too bad in real-life, and considering it was a cheap TV the image quality was probably never that great to begin with.

On the flip side, if you find an LED TV or monitor in the trash with a cracked screen, it might be worth taking it home to salvage its super-bright white LEDs for your lighting projects.

Continue reading “Trashed TV Gets RGB LED Backlight”