Custom Control Panels With Photogrammetry

One of the best applications for desktop 3D printing is the creation of one-off bespoke components. Most of the time a halfway decent pair of calipers and some patience is all it takes to model up whatever part you’re after, but occasionally things get complex enough that you might need a little help. If you ever find yourself in such a situation, salvation might be just a few marker scribbles away.

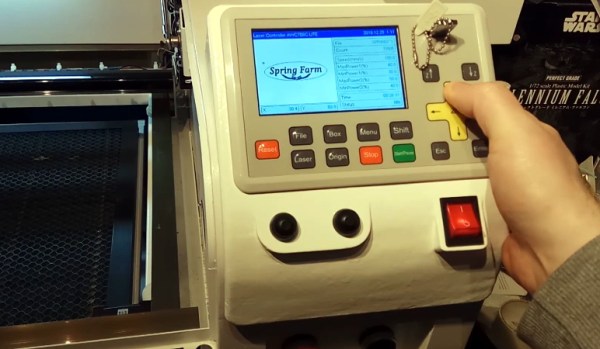
As [Mangy_Dog] explains in a recent video, he wanted to model a control panel for a laser cutter he’s been working on, but thought the shapes involved were a bit more than he wanted to figure out manually. So he decided to give photogrammetry a try. For the uninitiated, this process involves taking as many high-resolution images as possible of a given object from multiple angles, and letting the computer stitch that into a three dimensional model. He reasoned that if he had a 3D model of the laser’s existing front panel, it would be easy enough to 3D print some replacement parts for it.
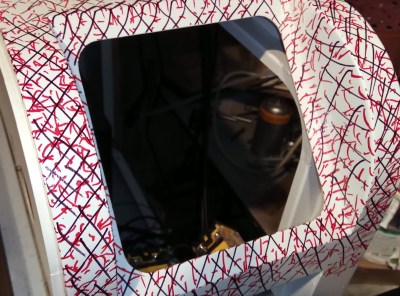
That would be a neat enough trick on its own, but what we especially liked about this video was the tip that [Mangy_Dog] passed along about increasing visual complexity to improve the final results. Basically, the software is looking for identifiable surface details to piece together, so you can make things a bit easier for it by taking a few different colored markers and drawing all over the surface like a toddler. It might look crazy, but all those lines give the software some anchor points that help it sort out the nuances of the shape.

Unfortunately the markers ended up being a little more permanent than [Mangy_Dog] had hoped, and he eventually had to use acetone to get the stains off. Certainly something to keep in mind. But in the end, the 3D model generated was accurate enough that (after a bit of scaling) he was able to design a new panel that pops right on as if it was a factory component.

Hackaday readers may recall that when we last heard from [Mangy_Dog] he was putting the finishing touches on his incredible “Playdog Blackbone” handheld gaming system, which itself is a triumph of mating 3D printed components with existing hardware.

Continue reading “Custom Control Panels With Photogrammetry”

Sim Panel Proves You Can Always Use More Buttons

Many people enjoy playing flight simulators or making the occasional orbit in Kerbal Space Program, but most are stuck controlling the onscreen action with nothing more exotic than a keyboard and mouse. A nice compromise for those that don’t have the space (or NASA-sized budget) to build a full simulator cockpit is a USB “button box” that you can plug in whenever you need a couple dozen extra knobs, switches, and lights.

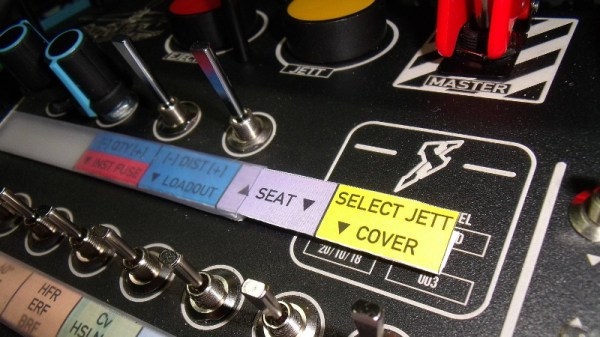
If you’ve been considering building one for yourself, this incredible build by [nexprime] should prove quite inspirational. Now at this point, a box of buttons hooked up to a microcontroller isn’t exactly newsworthy. But there are a few features that [nexprime] packed in which we think make this particular build worth taking a closer look at.

For one, the powder coated 8.5” x 10” enclosure is absolutely gorgeous. The console itself was purchased from a company called Hammond Manufacturing, but of course it still took some work to turn it into the object you’re currently drooling over. A CNC machine was used to accurately cut out all the necessary openings, and the labels were laser etched into the powder coat.

But not all the labels. One of the things we like best about this build is that [nexprime] thought ahead and didn’t just design it for one game. Many of the labels are printed on strips of paper which slide into translucent plastic channels built into the front of the box. Not only does this allow you to change out the overlays for different games, but the paper labels look fantastic when lit with the LED strips placed behind the channels.

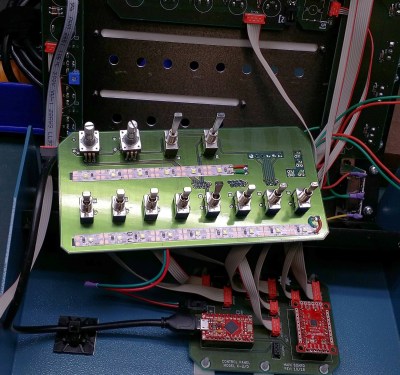
Internally, [nexprime] used a SparkFun Pro Micro paired with a SX1509 I/O expander. The electronics are all housed on professionally manufactured PCBs, which gives the final build an incredibly neat look despite packing in 68 separate inputs for your gaming pleasure. On the software side this box appears as a normal USB game controller, albeit one with a crazy number of buttons.

If this build doesn’t have enough switches and buttons for you, don’t worry. This Kerbal Space Program cockpit has banks of switches below and above the player, so one can more realistically scramble for the correct onet to flip when things start going sideways. On the other hand, we’ve seen slightly less intense builds if you’re not quite ready to take out a loan just to get into orbit.

Art Deco Control Panel Looks Out Of Metropolis

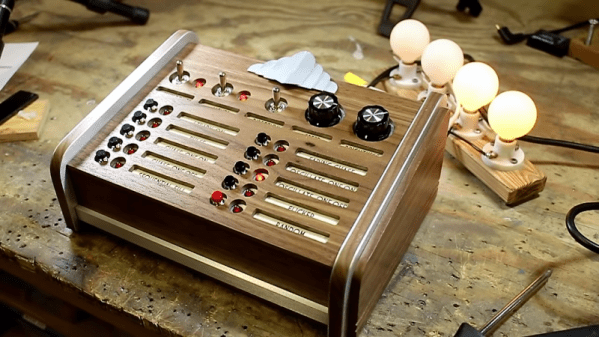
Bakelite, hammertone gray finish, big chunky toggle switches, jeweled pilot lights – these are a few of [Wesley Treat]’s favorite retro electronics things. And he’ll get no argument from us, as old gear is one of our many weak spots. So when he was tasked by a friend to come up with some chaser lights for an Art Deco-themed bar, [Wesley] jumped at the chance to go overboard with this retro-style control panel.

Granted, the video below pays short shrift to the electronics side of this build in favor of concentrating on the woodworking and metalworking aspects of making the control panel. We’re OK with that, too, as we picked up a ton of design tips along the way. The control panel is all custom, with a chassis bent from sheet aluminum. The sides of the console are laminated walnut and brushed aluminum, which looks very chic. We really like the recessed labels for the switches and indicators on the front panel, although we’d have preferred them to be backlighted. And that bent aluminum badge really lends a Chrysler Building flair that ties the whole project together.

All in all, a really nice job, and another in a long string of retro cool projects from [Wesley]. We recently featured his cloning of vintage knobs for an old Philo tube tester, and we’ll be looking for more great projects from him in the future.

Continue reading “Art Deco Control Panel Looks Out Of Metropolis”

Easy GUI Front Ends For Arduino, Rasberry Pi, And More With MyOpenLab

If you want to integrate a nice graphical interface with a microcontroller or single-board computer for a useful piece of custom equipment, how will you go about it? MyOpenLab is a platform that makes it easy to design virtual interfaces your electronic builds. If you want controls and readouts for Arduino, Raspberry Pi, Android, or anything with a serial port, this is worth a try.

MyOpenLab reminds me of LabView. Not so much modern LabView with all of its add-ons and extras, but LabView back when it did just a few things but did them really well. The open source MyOpenLab project has been around for a while. The website and documentation are not in English, which may have kept some people from giving it a try, but the software itself is available in German, English, and Spanish. I took the plunge and found the language barrier didn’t cause me trouble.

As an example of what you can do, image you want to build a custom bench tool. You build virtual device (they call it a “VirtualMachine”) that uses your computer as the control panel and readout, and your electronic project as the physical interface. In myOpenLab your device will consist of two parts: a diagram and a front panel. Some things only live on the diagram, like a timer or a connection to an Arduino. But some things live on both like switches, LEDs, graphs, and so on. You can connect all the little boxes together to build up applications. They can stand alone, but the power comes in being able to connect to an Arduino or Raspberry Pi (or a few other options) for I/O.

Continue reading “Easy GUI Front Ends For Arduino, Rasberry Pi, And More With MyOpenLab”

Milspec Teardown: AH-64A Apache Data Entry Panel

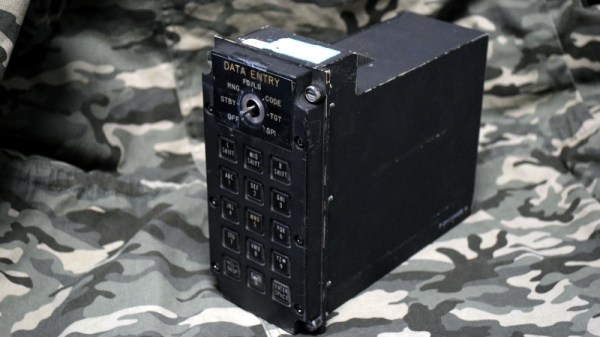
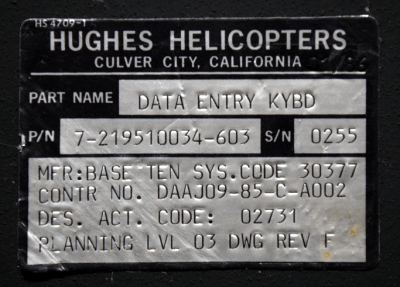
It’s time once again to see how those tax dollars are spent, this time in the form of a “Data Entry Keyboard” manufactured by Hughes Helicopters. This device was built circa 1986 or so, and was used in the AH-64A Apache. Specifically, this panel would have been located by the gunner’s left knee, and served as a general purpose input device for the Apache’s Fire Control System. Eventually the Apache was upgraded with a so-called “glass cockpit”; consolidating various vehicle functions into a handful of multi-purpose digital displays. As such, this particular device became obsolete and was pulled from the active Apache fleet.

The military vehicle aficionados out there may know that while the Apache is currently a product of Boeing, it was originally designed by Hughes Helicopter. In 1984, McDonnell Douglas purchased Hughes Helicopter and took over production of the Apache, and then McDonnell Douglas themselves were merged with Boeing in 1997.

So it’s somewhat interesting that this device bears the name of Hughes Helicopter, as of the time it was manufactured, they would have been known as McDonnell Douglas Helicopter Systems. Presumably they had to work through existing stock of components that already had Hughes branding on them, leaving some transitional examples such as this one.

But you didn’t come here for a history lesson on the American military-industrial complex, you want to know about the hardware itself. So let’s crack it open to see what we can learn about this piece of aviation history.

Continue reading “Milspec Teardown: AH-64A Apache Data Entry Panel”

Build Your Own Digital Panel Meter

A popular purchase from the usual stockists of imported electronic modules is a digital panel meter. A very small amount of money secures a module with a seven-segment display that you can stick on the front of your power supply or project for an easy readout. Even before the advent of these ultra-cheap Chinese products there have been readily available digital meters, in a line stretching back to the 1970s with chips such as the Intersil 7106.

[Marcus Taciuc] is eschewing the off-the-shelf parts, and creating his own digital panel meter. He’s using an MSP430 microprocessor as the brain of his device, and a Hitachi HD44780 compatible LCD display at the front end. The appropriate combinations of resistors and op-amps feeding the MSP’s ADC inputs allow his meter to be used to measure up to 40 VDV, and up to 10A.

He’s put up a video which we’ve included below the break, showing the use to which this meter has been put: replacing the moving-coil meter in what looks like a classic piece of Heathkit equipment. A 3D printed bracket allows the new meter to fit the circular hole of the original meter, with the LCD on the front. You might still order a prefab meter module, but you can’t deny this looks good.

Continue reading “Build Your Own Digital Panel Meter”

A Modern Day PDP-11 Front End

Hands up if you feel your spiritual home is in front of a terminal with a “DIGITAL” logo on it.  It’s a name that has long ago been subsumed into first Compaq and then by extension HP, but it’s one with a lot of history when it comes to computing.

From the start of the electronic computing age, there were the computers we’d probably now describe as mainframes. Big computers that cost the GDP of a small country, filled an entire floor of a building, and could only be found in government departments, universities, and large companies. By the 1960s, the technologies existed to build computers that broke this mould, could be bought within the budget of a smaller organisation, and for which you didn’t need a huge air-conditioned basement to house. These so-called minicomputers were the great revolution of that era because they bought the fruits of computing into everyday business, and probably the most successful of the companies that produced them was the Maynard, Massachusetts-based Digital Equipment Corporation, or DEC.

DEC produced a succession of minicomputers in their PDP line, of which the most successful was their PDP-11 series. These were 16-bit minicomputers that remained in their product line from their launch in 1970 through to the early 1990s, and were available in a succession of configurations and physical form factors. The famous view of a PDP-11 is of a set of floor-to-ceiling racks, but there were also standalone terminal models, and desktop models. One of these, a PDP-11/03 from 1975, has come into the hands of [Joerg], and he’s used it to craft his LSIbox, the PDP11/03 card frame packaged with a BeagleBone for access via a modern-day interface. It’s a build in the vein of modern tube audio amplifiers that feature the retro hardware on the top of their cases, the card frame is exposed as a feature on top of a white case that is featureless except for a genuine PDP-11/03 front panel.

You might ask why anyone would do this in order to run PDP-11 software when the BeagleBone could almost certainly emulate the vintage hardware much faster than the real thing. But to take that view is to miss the point; the PDP-11 series are a seminal part of computing history, and to have genuine PDP-11 hardware on your desk is quite an achievement.

We’ve shown you a few PDP-11 projects in the past. There was this minimalist PDP-11 implementation using one of the later integrated PDP-11 processors, and we’ve seen a faithful reproduction of an earlier PDP-11 front panel powered by a Raspberry Pi.