Thermistors And 3D Printing

I always find it interesting that 3D printers — at least the kind most of us have — are mostly open-loop devices. You tell the head to move four millimeters in the X direction and you assume that the stepper motors will make it so. Because of the mechanics, you can calculate that four millimeters is so many steps and direct the motor to take them. If something prevents that amount of travel you get a failed print. But there is one part of the printer that is part of a closed loop. It is very tiny, very important, but you don’t hear a whole lot about it. The thermistor.
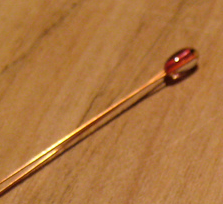
The hot end and the heated bed will both have a temperature sensor that the firmware uses to keep temperatures at least in the ballpark. Depending on the controller it might just do on-and-off “bang-bang” control or it might do something as sophisticated as PID control. But either way, you set the desired temperature and the controller uses feedback from the thermistor to try to keep it there.

If you print with high-temperature materials you might have a thermocouple in your hot end, but most machines use a thermistor. These are usually good to about 300 °C. What got me thinking about this was the installation of an E3D V6 clone hot end into my oldest printer which had a five-year-old hot end in it. I had accumulated a variety of clone parts and had no idea what kind of thermistor was in the heat block I was using.

Continue reading “Thermistors And 3D Printing”

Meet The Modern Meat Man’s Modified Meat-Safe

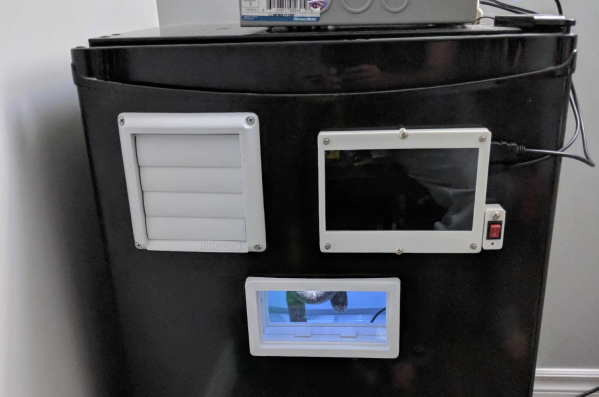
Charcuterie is delicious — but is it hackable? When talking about the salty preserved meats, one might be more inclined to indulge in the concept of bacon before pondering a way to integrate an electrical monitoring system into the process. However, [Danzetto] decided to do both when he did not have anywhere to cure his meats. He made his own fully automatic meat curing chamber lovingly called the curebOS with the aid of a raspberry pi. It is basically a beefed up mini fridge with all of the bells and whistles.

This baby has everything.  Sitting on top is a control system containing the Pi. There are 5 relays used for the lights, circulating fan, ventilating fans, refrigerator, and humidifier all powered by a 5 amp supply — minus the fridge. Down below that is the 3D printed cover with a damper for one of the many ventilation fans that regulate the internal temperature.  To the right is a touchscreen for viewing and potentially controlling the system if necessary. The control program was written in Python for viewing the different trends. And below that, of course, is a viewing window. On the inside are temperature and humidity probes that can be monitored from the front screen. These readings help determine when to activate the compressor, any of the fans, or the humidifier for optimal settings. For a final touch, there are also some LEDs placed above the hanging meat to cast a glowing effect upon the prized possessions.

Continue reading “Meet The Modern Meat Man’s Modified Meat-Safe”

PID Controlled Charcoal BBQ – Put An Arduino On It!

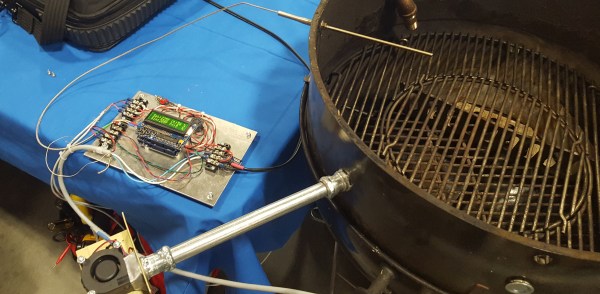
At Maker Faire Milwaukee this past weekend, [basement tech]  was showing off his latest build, a PID controlled charcoal grill. While it hasn’t QUITE been tested yet with real food, it does work in theory.

PID (a feedback loop with some fancy math used to adjust the input to get a consistent output) controlled cooking is commonly used for sous vide, where one heats up a water bath to a controlled temperature to cook food in plastic bags. Maintaining water temperature is fairly easy. Controlling a charcoal barbecue is much more difficult. [basement tech] accomplishes this with controlled venting and fans. With the charcoal hot and the lid on, there are two ways to control temperature; venting to let hot air out, and blowing air on the coals to make them hotter. A thermocouple sensor stuck through the grill gives the reading of the air inside, and an Arduino nearby reads that and adjusts the vents and fans accordingly.

The video goes into extensive detail on the project, and describes some of the challenges he had along the way, such as preventing the electronics and servos from melting.

Continue reading “PID Controlled Charcoal BBQ – Put An Arduino On It!”

Annealing Plastic For Stronger Prints

Much fuss has been made over the strength of 3D printed parts. These parts are obviously stronger in one direction than another, and post processing can increase that strength. What we’re lacking is real data. Luckily, [Justin Lam] has just the thing for us: he’s tested annealed printed plastics, and the results are encouraging.

The current research of annealing 3D printed parts is a lot like metallurgy. If you put a printed part under low heat — below the plastic’s glass transition temperature — larger crystals of plastic are formed. This research is direct from the Society of Plastics Engineers, and we’re assuming they know more about material science than your average joe. These findings measured the crystallinity of a sample in relation to both heat and time, and the results were promising. Plastic parts annealed at a lower temperature can attain the same crystallinity, and therefore the same strength, if they’re annealed for a longer time. The solution is simple: low and slow is the best way to do this, which sounds a lot like sous vide.

A while back, [Justin] built a sous vide controller for the latest cooking fad. The idea behind a sous vide controller is to heat food in a water bath at a lower temperature, but for a longer time. The result here is the most tender steaks you’ll ever have, and also stronger 3D printed parts. In his test, [Justin] printed several rectangular samples of PLA, set the temperature to 70°C, and walked away for a few hours. The samples annealed in the water bath were either cooled quickly or slowly. The test protocol also included measuring the strength in relation to layer height. The test jig consisted of a bathroom scale, a drill press, and a slot head screwdriver bit.

Although the test protocol is slightly questionable, the results are clear: annealing works, but only if the part is printed at a low layer height. However, parts with larger layer heights had a higher maximum stress. Is this helpful for the home prototyper? That depends. The consensus seems to be that if you’re at the mechanical limits of a 3D printed part, you might want to think about more traditional manufacturing. That’s just common sense, but there’s always room to push the envelope of 3D printing.

An Eggcelent Eggspriment

After multiple iterations [Keef] has nailed down the fabrication process for an unusual component. Using only a heater water bath, some silicone and easily available reagents, [Keef] demonstrate how he manufactures a gastronomic enigma: the long egg.

The similarities between [Keef’s] process and the typical hacker iteration cycle are eggceptional. He starts out with a goal and iterates, modifying his methods until he gets the perfect long egg. Sound familiar? Cooking can be as much of a science as it is an art.

In his quest, [Keef] utilizes sausage casing, plastic bags, sticky tape, “lots of sweat and almost some tears” to hold eggs for cooking via an Anova Precision Cooker immersion circulator. However, [Keef] notes, the Anova is normally used for sous vide cooking so you might not have one sitting around. In that case, you can use a regular pan on a stovetop along with a digital thermometer, but you’ll have to be quite vigilant to keep the temperature steady.

But wait. Why would one want a long egg in the first place? I’ll leave this explanation to [Keef]. “Well, the main use is in a Gala Pie (a long pork pie baked in a loaf tin and often cut into slices for picnics). Or you could just slice the egg and lay it out on a platter and amaze your friends with how every slice is exactly the same size.”

Go check out [Keef’s] two videos. He has two, one that chronicles the eggciting initial attempts, and another that describes his final method. With [Keef’s] help, the number of long eggs outside of Denmark may substantially increase. But, if you’d rather have some pizza, we won’t be offended.

Hackaday Prize Entry: The Internet Of Meat

We’ve only just begun to see the proliferation of smart kitchen gadgets. Dumb crock pots with the intelligence of a bimetallic strip, are being replaced by smart sous vide controllers. The next obvious step is barbecue. For his Hackaday Prize entry, [armin] is building a smart, eight-channel BBQ controller for real barbecue, with smoke and fans, vents and metal boxes.

This BBQ controller has been in the works for years now, starting with a thread in a German barbeque forum. The original build featured an original Raspberry Pi, and could relay temperatures from inside a slab of meat to anywhere with range of a WiFi network.

For his Hackaday Prize entry, [armin] is working on a vastly improved version. The new version supports eight temperature probes, temperature logging and plotting, a webcam, setting alarms, a web interface, 433MHz radio, and PWM and fan control. Yes, if you’re very, very clever you can use this project to build a barbeque that will cycle a fan, and open and close a damper while monitoring the temperature of a brisket and email you when it’s done. It’s the Internet of Meat, and it’s the most glorious thing we’ve seen yet.

Improving Rice Cooker Efficiency

Looking at the plate on the bottom of his electric rice cooker, [AC_Hacker] was surprised to find that it was rated to consume 400 watts. Furthermore when he measured its consumption he found that it consumed 385 watts without even having a cooking cycle initiated. The circuit to keep cooked rice warm was always on – even when the cooking circuit wasn’t engaged.

Something clearly had to be done, so he set about modifying the cooker for better economy. Removing the base revealed that disabling the warming circuit was as simple as disconnecting it. [AC_Hacker] also noticed that the device had no thermal insulation. There was plenty of space between the inner and outer walls, so he packed it with glass wool. The final modification was to reduce the power taken by the heater by installing a half-wave rectifier diode. The cooker still reached the desired temperature, it just used half the power.

You might think that would be the end of it, given that the modifications significantly reduced the cooker’s power consumption without detriment to its rice cooking ability. Rice now took a little longer to cook, so there was still room for improvement. The moment of inspiration came when [AC_Hacker] realized that the cooking time was proportional to the amount of water used in a cooking cycle. He could safely reduce the water without affecting the cooked rice. A 30% water reduction led to a proportional cooking time reduction, and rice cooked using a lot less power.

Surprisingly this seems to have been Hackaday’s first rice cooker hack. Perhaps that’s because you’ve been so busy supplying us with sous vide hacks to write about.