Give Workshop Pencils A Flush-Mounted Home

Pencils and pens are apt to go wandering in a busy workshop if they don’t have a handy storage spot. For most of us a soup can or an old coffee mug does the trick, but for a prettier and more useful holder [Stuff I Made] has a short video demonstrating a storage unit made from an elbow fitting and a scrap piece of plywood. He cuts a plywood disk that is friction-fit into one end of the elbow, then it gets screwed into a wall making an attractively flush-mounted holder in a convenient spot.

With the right joint the bottom of the holder remains accessible, as a 90 degree bend would be no good. With a shallower joint angle, a regular screwdriver can still reach the mounting screw and it’s possible to access the bottom of the holder just in case it needs cleaning or something small falls inside. You can see the process and results in the video embedded below. Not bad for one screw, a spare joint, and a scrap piece of plywood.

Continue reading “Give Workshop Pencils A Flush-Mounted Home”

Turning Saw Blades Into Throwing Stars

The holidays are nearly upon us, and if you haven’t found the perfect gift for the Mall Ninja in your life yet, this latest hack might be just what you’re looking for. On his YouTube channel, [The Nocturnal Alchemist] demonstrates how to make ninja throwing stars (shuriken) out of an old circular saw blade. One could probably argue that a circular saw itself is close enough to throwing star if your only goal is to wreck some stuff in your backyard, but with this method they’ll have that official samurai look.

To start the process, he hits both sides of the circular saw blade with a grinder to smooth out the surface. He then traces the desired star shapes onto the blade, and cuts the blade into pieces so it’s easier to manage. The rough shape of the stars is cut out with an angle grinder, and a belt sander lets him sharpen the edges.

At this point the stars are effectively finished, but if you want something that’s going to look good on the shelf next to the katana you bought online, you need to do some more finish work. He sands both sides of the stars by hand, starting at 80 grit and working all the way up to 1200 grit wet paper. Once sanded, paste wax is rubbed in with a cloth to give it a protective coating.

With the finish work done, all that’s left to do is throw your new shuriken at cans of soda and watermelons as a demonstration of their power. To this end, he has come prepared with a 1,000 FPS camera; so if you’ve ever wanted to see cans of off-brand soda getting exploded with a throwing star, your Mall Ninja friend isn’t the only one about to get a gift.

With circular saw blade shuriken completed, all you’ll need to do to complete your urban samurai transformation is forge yourself a sword, and perfect your run in virtual reality.

Continue reading “Turning Saw Blades Into Throwing Stars”

Coin Cell Powered Sea Turtle Research

Hacking and tinkering are always fun and games, but one just has to appreciate when all efforts are additionally aimed towards doing something good. [Nikos] sets an example by combining his interest in technology with his passion for wildlife conservation by creating a low cost and ultra-low power temperature logger — and he is using a coin cell for it.

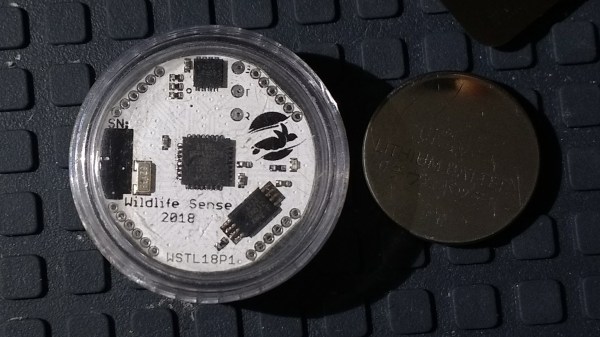
As the founder of a sea turtle conservation project in Greece, [Nikos] enjoys building scientific instruments that help him and his team on their mission. With a goal to log the temperature every 10 minutes over a period of at least 180 days, he designed a PCB just big enough to hold a CR2032 coin cell. Fifty of them will eventually be sealed in waterproof enclosures, and buried in the sand for the whole research duration.

Limiting the design to its bare necessities, the rest of the PCB is housing a digital temperature sensor, an SPI EEPROM to hold all the recorded sensor values over those 180 days, and an ATmega328PB clocked by a 32.768kHz crystal. Wondering what to do with all the extra, unused pins of the ATmega, [Nikos] simply routed them to be accessible through pin headers, thus turning the data logger alternatively into a coin cell powered development board.

Assuming your logging interval requirements are significantly lower, you might be thrilled to hear that [Nikos] estimates a theoretical 7+ years an average coin cell could power the data logger in sleep mode, which makes him confident to reach the 180 days goal.

A Robot Arm For Virtual Beer Pong

Leave it to engineering students to redefine partying. [Hyun], [Justin], and [Daniel] have done exactly that for their final project by building a virtually-controlled robotic arm that plays beer pong.

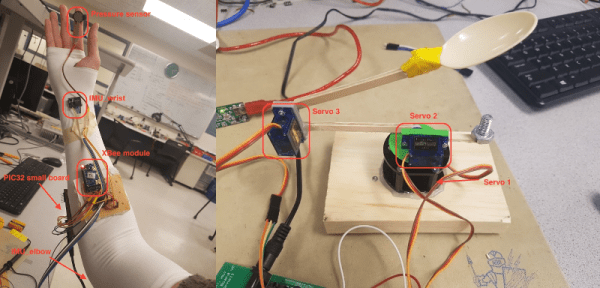
There are two main parts to this build: a sleeve worn by the user, and the robotic arm itself. The sleeve has IMUs at the elbow and wrist and a PIC32 that calculates their respective angles. The sleeve sends angle data to a second PIC32 where it is translated it into PWM signals and sent to the arm.

There’s a pressure sensor wired sleeve-side that’s worn between forefinger and thumb and functions as a release mechanism. You don’t actually have to fling your forearm forward to get the robot to throw, but you can if you want to. The arm itself is built from three micro servos and mounted for stability. The spoon was a compromise. They tried for a while to mimic fingers, but didn’t have enough time to implement grasping and releasing on top of everything else.

Initially, the team wanted wireless communication between the sleeve and the arm. They got it to work with a pair of XBees, but found that RF was only good for short periods of use. Communication is much smoother over UART, which you can see in the video below.

You don’t have to have a machine shop or even a 3-D printer to build a robot arm. Here’s another bot made from scrap wood whose sole purpose is to dunk tea bags.

Continue reading “A Robot Arm For Virtual Beer Pong”

Brute Forcing Passwords With A 3D Printer

Many of us use a 4 digit pin code to lock our phones. [David Randolph] over at Hak5 has come up a simple way to use a 3D printer to brute force these passwords. Just about every 3D printer out there speaks the same language, G-code. The same language used in CAD and CNC machines for decades.

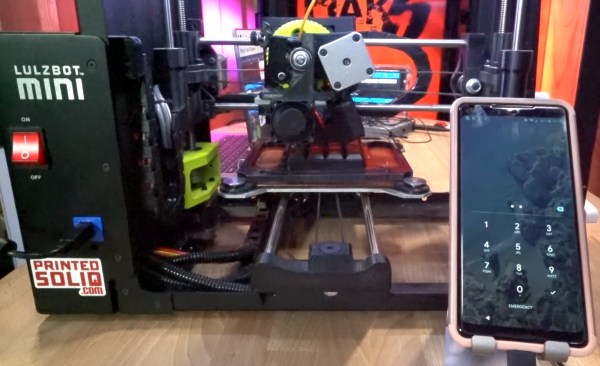
[David] placed a numeric keypad on the bed of his printer. He then mapped out the height and positions of each key. Once he knew the absolute positions of the keys, it was easy to tell the printer to move to a key, then press and release. He even created a G-code file which would press every one of the 10,000 4 key pin combinations.

A file this large was a bit unwieldy though, so [David] also created a python script which will do the same thing — outputting the G-code and coordinates to brute force any 4 pin keypad. While a printer is quite a bit slower than Hak5’s own USB Rubber Ducky device (which acts as an automated keyboard), it will successfully brute force a password. Although most phones these days do limit the number of password attempts a user gets.

[David] admits this is probably useless in a clandestine/hacking application, but the video is still a great introduction to G-code and using 3D printers for non-printing functions.

Continue reading “Brute Forcing Passwords With A 3D Printer”

Thermistors And 3D Printing

I always find it interesting that 3D printers — at least the kind most of us have — are mostly open-loop devices. You tell the head to move four millimeters in the X direction and you assume that the stepper motors will make it so. Because of the mechanics, you can calculate that four millimeters is so many steps and direct the motor to take them. If something prevents that amount of travel you get a failed print. But there is one part of the printer that is part of a closed loop. It is very tiny, very important, but you don’t hear a whole lot about it. The thermistor.

The hot end and the heated bed will both have a temperature sensor that the firmware uses to keep temperatures at least in the ballpark. Depending on the controller it might just do on-and-off “bang-bang” control or it might do something as sophisticated as PID control. But either way, you set the desired temperature and the controller uses feedback from the thermistor to try to keep it there.

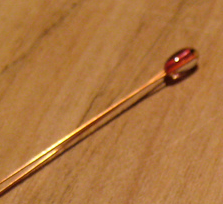
If you print with high-temperature materials you might have a thermocouple in your hot end, but most machines use a thermistor. These are usually good to about 300 °C. What got me thinking about this was the installation of an E3D V6 clone hot end into my oldest printer which had a five-year-old hot end in it. I had accumulated a variety of clone parts and had no idea what kind of thermistor was in the heat block I was using.

Continue reading “Thermistors And 3D Printing”

Mount Sopris

Design A Microcontroller With Security In Mind

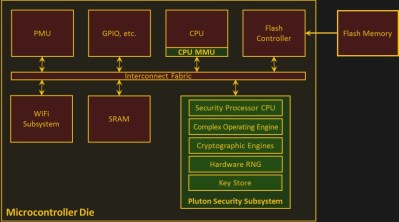
There are many parts to building a secure networked device, and the entire industry is still learning how to do it right. Resources are especially constrained for low-cost microcontroller devices. Would it be easier to build more secure devices if microcontrollers had security hardware built-in? That is the investigation of Project Sopris by Microsoft Research.

The researchers customized the MediaTek MT7687, a chip roughly comparable to the hacker darling ESP32. The most significant addition was a security subsystem. It performs tasks notoriously difficult to do correctly in software, such as random number generation and security key storage. It forms the core of what they called the “hardware-based secure root of trust.”

Doing these tasks in a security-specific module solves many problems. If a key is not stored in memory, a memory dump can’t compromise what isn’t there. Performing encryption/decryption in task-specific hardware makes it more difficult to execute successful side-channel attacks against them. Keeping things small keeps the cost down and also eases verifying correctness of the code.

But the security module can also be viewed from a less-favorable perspective. Its description resembles a scaled-down version of the Trusted Platform Module. As a self-contained module running its own code, it resembles the Intel Management Engine, which is currently under close scrutiny.

Will we welcome Project Sopris as a time-saving toolkit for building secure networked devices? Or will we become suspicious of hidden vulnerabilities? The researchers could open-source their work to ease these concerns, but value of their work will ultimately depend on the fast-moving field of networked device security.

Do you know of other efforts to add hardware-assisted security to microcontrollers? Comment below or let us know via the tip line!

[via Wired]

Image of Mount Sopris, namesake of the project, by [Hogs555] (CC-BY 4.0)